Do it yourself casting

This section contains tips and tricks on building and running model vehicles. If you know any then post them here and if you need to find any, try your first search here.
Forum rules
This section is for posting helpful Tips and Tricks only. Questions need to be posted within general questions section viewforum.php?f=14
User avatar
Rogue Sub
Private
Posts: 83
Joined: Mon Dec 20, 2010 10:25 pm
Location: Ct USA
Contact:

Do it yourself casting

Post by Rogue Sub »

I am going to begin this How-to by restating something I said on the other thread.

"Now as for the legality of what you use this for... I personally only reproduce products with direct permission of the person who made them or that I have made myself. In my mind it is just the same as stealing when you replicate or reproduce to sell. Some of these products take time to make and people expect to make some cash at it or they wont do it any more. However, there are no laws that I am aware of that prevent you from cloning a product for yourself but, there are ones out there to prevent you from reselling the same product especially when a copyright violation is involved."

Now that I have reiterated that let us begin.

This DIY session is geared twords showing the average Joe how to make a mold and then cast it. There are higher quality products and better methods out there but this methods will get the job as simply as possible.


The first task is going to be gathering supplies. Keep in mind that the quantities I bought my supplies in are not the only ones available. Many companies offer smaller quantities down to a pint. I just happen to go through alot of the stuff so I order enough so that I use it all before it goes past expiration. Getting fresh product is also essential. If possible I only buy factory direct when selecting a rubber or resin. When you deal with 3rd parties you cant guarantee that the product hasn't been sitting on a shelf for the last year or two. Its your money spend it wisely. If you hate money... pm me and ill send you my paypal information. :clap:

Here is a short list of everything I have selected for this walk through. More will come up later and I will make sure to mention it.

Image

1. Resin- Alumilite RC-3 1 gal kit -$105.00 http://www.alumilite.com/" onclick="window.open(this.href);return false;

I like this stuff because it mixes 1:1. There is no fancy math involved. I also like this stuff over the standard line they have because, it has a pot life of 3 min compared to 90 sec. Another benefit is the stuff is so close to water in viscosity that it degases a bit better and gets into those detail part well. The stuff is also wonderful to machine.

Mix Ratio (wt. or Vol.) 1:1
Pot Life 3 min.
Demold Time (100 gr. Mass) 5-15 min
Mixed Viscostiy (cps.) 110
Shore Hardness 74 D
Shrinkage (in./in.) .004

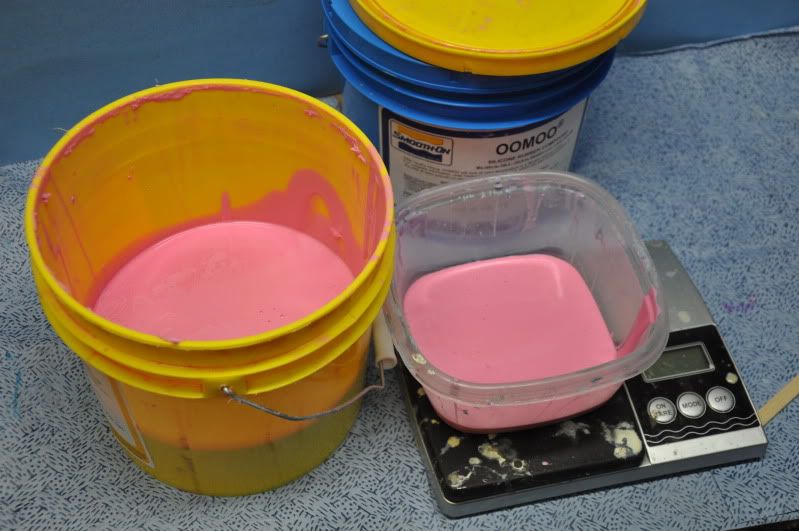
2. Rubber- OOMOO® 30 - Shore 30A hardness 1 gal unit - $145.74 http://www.smooth-on.com" onclick="window.open(this.href);return false;

Where to begin with rubber or more accurately silicone. There are two types of silicone I use, platinum cure silicone and tin cure silicone. Platinum cure last longer, doesn't deform as bad and can handle much higher temperatures. The down side is that it cost a lot more and it can be sensitive to paints, latex, etc leaving a gooey incurable mess where it contacted it. Tin on the other hand can be very forgiving regardless of what you pour it on. It will deform over time due to stretching and such but its cheaper cost helps out there. Omoo 30 also degases very well which means you can get away with not molding in a pressure pot, huge bonus for the hobby modeler. For those of you that are curious when I buy the good stuff I like to buy bjb tc 50-50. It is amazing silicone. Ive seen ancient molds that are still in service. When selecting a shore hardness I usually get at least a 30 - 50a. Softer is better for more intricate details but the hard stuff is more durable.

Image

"OOMOO® 25 & 30 are easy to use silicone rubber compounds that feature convenient one-to-one by volume mix ratios (no scale necessary). Both have very low viscosity for easy mixing and pouring, and vacuum degassing is usually not necessary. Both products cures at room temperature with negligible shrinkage and have good tear strength. "

A:B Mix Ratio 1:1 by volume
Demold Time 6 hours
Pot Life 30 min.

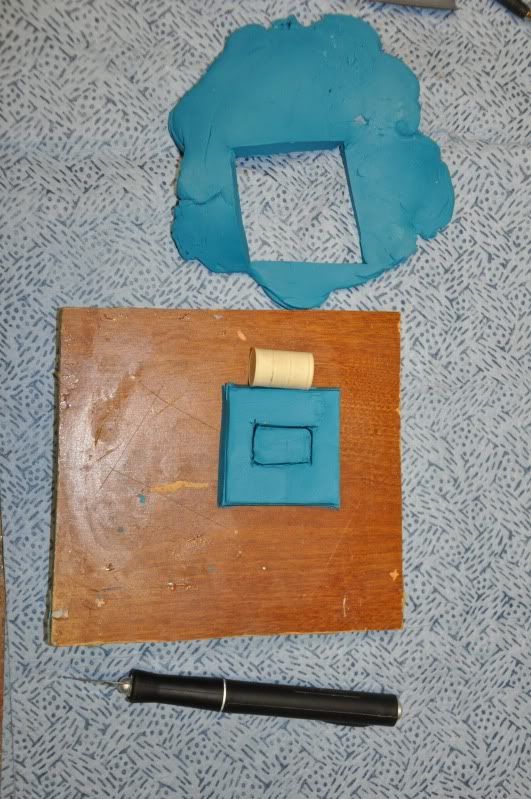
3. Molding Clay- Klean Klay 1lb- $8.25 http://www.kleanklay.com/" onclick="window.open(this.href);return false;

Remember how I said some silicones were sensitive? Well that is another reason I stick with Klean Klay. I know without a doubt that it is sulfur free clay. Sulfur = nasty gooey molds. Besides that, the stuff isn't to rock hard at room temp. I still like to knead my clay a bit to soften it up before I get to work anyway. Kind of like prepping to clay bar your car.

"Art Chemical Products produces non-drying, non-hardening, no-sulfur modeling clay for a variety of applications. It is non-toxic, sanitary, and odorless. Klean Klay is easy to handle and work with and remains hand-pliable at room temperature. Klean Klay keeps its smooth, firm consistency and retains the shape into which it is molded. "

4. Mold Release- Mann 200- $11.49 http://mann-release.com/erelese2.htm" onclick="window.open(this.href);return false;

Comes in an spray an its easy to apply. Why use it though? Nothing sticks to silicone except silicone right? It will help with separating your parts from the mold extending the service life of your molds.

"General purpose mold release that works with silicones and urethane mold making rubbers. Will release urethane, epoxy and polyester resins from a variety of surfaces."

5. Mixer- Turbine Mixer- $11.30 http://www.smooth-on.com/gallery.php?ga ... cPath=1221" onclick="window.open(this.href);return false;

Ok you dont really need this but, I love it . It does a wonderful job and doesn't aerate the silicone to much. On a serious note Ive used a tongue depressor to a model boat prop on a shaft and been just fine.

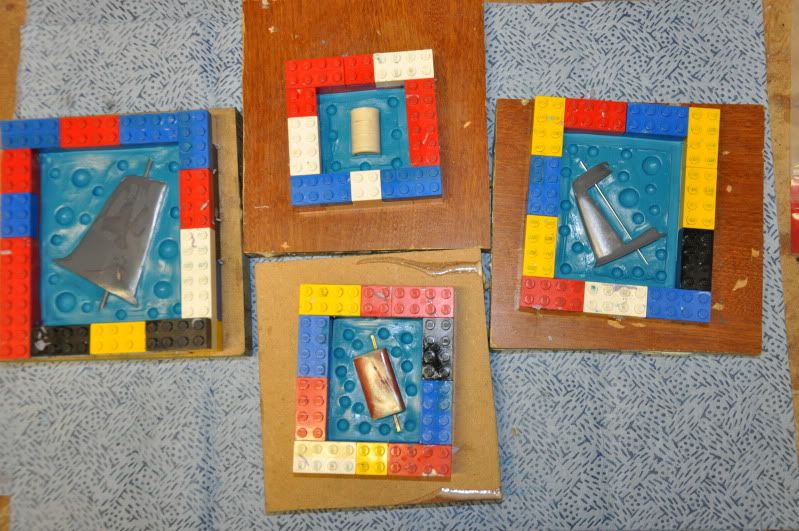
6. Mold Housing- Legos- $? Anywhere in the world

These little engineered blocks are great for molds. They always fit together in perfect shapes that can be reproduced easily. You could cut out forms using plastic or wood but then you have to get it all square so that when you flip the mold over it still fits in the jig.

7. Mixing Cups - Disposable cups

Buy a big pack and never worry about it again.

8. Resin mix sticks

I buy these by the 1000 at the local crafts store. I use them alot. Its basically wood Popsicle sticks

9. Scale

It doesnt have to be ultra sensitive. To the first decibel at least. Technically you dont need this as everything here is 1:1 by weight or volume.. I find weight is easier.

10. Glove- Nitrile based

The use of latex glove will give you a gooey mess when dealing with platinum rubber. Dont bother with latex just get the good stuff.

Well thats not everything but the other stuff I will cover is kind of optional so it will be covered in the next installment when I write it tomorrow night. Id give it to you all in one go but this stuff takes time to write! Tanks Guys
Last edited by Rogue Sub on Thu Jan 06, 2011 2:33 pm, edited 1 time in total.
All I need is a tank that can dive like a sub and shoot torpedoes.
User avatar
Rogue Sub
Private
Posts: 83
Joined: Mon Dec 20, 2010 10:25 pm
Location: Ct USA
Contact:

Re: Do it yourself casting

Post by Rogue Sub »

I forgot to mention...

Alumilite and other companies offer Casting kits like the one here.
http://www.alumilite.com/ProdDetail.cfm ... ting%20Kit" onclick="window.open(this.href);return false;

It will get you where you want to go for a cheaper price but there isn't generally a lot of silicone to make many molds. Nor is it always the best quality silicone and such. It is where I got my start though so I cant deny it as a decent place to get your start. Either way the process will remain the same.
All I need is a tank that can dive like a sub and shoot torpedoes.
User avatar
sparks
Warrant Officer 2nd Class
Posts: 1152
Joined: Thu Sep 23, 2010 10:57 pm

Re: Do it yourself casting

Post by sparks »

Nice, detailed "How to" :thumbup:
Thanks
Hey man....I just ride 'em, I dunno what makes 'em work.
Woof woof woof !
User avatar
Rogue Sub
Private
Posts: 83
Joined: Mon Dec 20, 2010 10:25 pm
Location: Ct USA
Contact:

Re: Do it yourself casting

Post by Rogue Sub »

The next step is to select the part you are going to cast. For this article I will be making a mold of 1/32 35gal oil drum that I am going to be putting on one of my tug boats.

Image

Now that the subject matter has been selected A box can be made around it using legos. You should leave about .5" around each side of the part or between the parts you are casting to help reduce flashing and ensure the part does not distort. It will also give you room to make "keys" for the mold.

Image

With the box size selected I put on a set of gloves and begin kneading my clay to soften it. I highly recommend the gloves as the clay does not come out easily one it gets..well anywhere. After its softened roll it out to a thickness that is half the thickness of the diameter of the piece being cast.

Image

Now set your frame on top and score the inside of the box onto the clay

Image

Now place the part on the clay and outline it in the middle of the box.

Image

Remove the clay and insert the part. Once in the clay the edges need to be smoothed to the part so that the silicone wont run down underneath once poured. I havve seen acid brushes, fingers, or in my case a set of clay working tools I bought. It helps to give a shot of Mann 200 on what ever you are using.

Image

Now its time to put the framing on top and smooth the clay to the edges of the box making a tight seal. I then use the bulbous end of one of my tools to make indexing keys in the clay. These will help ensure the mold is properly aligned every time you cast. Some people like to put a piece of scrap rod in to cast in a smoot pour spout for their part. That works fine but you dont have to. It can easily be done after curing. It should also be noted that some shapes need vent ports in order to be properly cast. I will go over this later in the casting section.

Image

Now its time to mix up your silicone and make some molds. Here is the lot I have ready for this session.

Image
All I need is a tank that can dive like a sub and shoot torpedoes.
User avatar
Wizzard033
Corporal
Posts: 339
Joined: Thu Sep 30, 2010 4:51 am
Location: Lubbock, Texas

Re: Do it yourself casting

Post by Wizzard033 »

Awsome! I have been playing with new fabrication techniques for all my hobbies and this would be very useful for all of them. :clap:

Well done sir! :thumbup:
ImageImage
User avatar
Rogue Sub
Private
Posts: 83
Joined: Mon Dec 20, 2010 10:25 pm
Location: Ct USA
Contact:

Re: Do it yourself casting

Post by Rogue Sub »

You should share your techniques.
All I need is a tank that can dive like a sub and shoot torpedoes.
oldfeller
Corporal
Posts: 312
Joined: Wed Aug 25, 2010 9:49 pm
Location: Rhondda Valley, South Wales

Re: Do it yourself casting

Post by oldfeller »

Hi Rogue Sub
Great idea Mate :clap: , I heard about this stuff a couple of years ago when I wanted to make my own figures but could not find out where to get the moulds from.
Gerwyn
User avatar
Rogue Sub
Private
Posts: 83
Joined: Mon Dec 20, 2010 10:25 pm
Location: Ct USA
Contact:

Re: Do it yourself casting

Post by Rogue Sub »

Ok it is time to mix silicone and pour it up!

Here is a quick look at what is needed for this step.

Image
-Silicone
-Mixer
-Gloves
-Stir Sticks
-Scale (or measured cups)
-Bowl to mix in
-Disposable cups to get the product out

There are several methods to calculate the amount of silicone you will need for your mold. One method is to calculate the total volume with some simple math (made easier by the square shape from the legos). Another method I have seen is to take some rice and pour it into the mold, then pour it into a measured cup to get a total volume. I'm not a huge fan of this because it usually involves cleaning out some rice (quick blast from the air gun helps). I personally just guess. Ive done a enough of these now that I am pretty good with my calibrated eye. If I make to much I just build up the wall of legos a bit and use some more. Just makes a more robust mold. Better then tossing it away!

I like to start with the Yellow bucket first. Get your gloves on. Put your bowl on the scale. Zero the scale. Use your cup and get some of the product out to your desired amount. I then use the stir stick to scrape as much material as I can back into the bucket. Waste not want not.

Image

The blue bucket is a bit of the same as the yellow bucket with one exception.

Image

You really need to make sure this stuff is mixed well before using it. It is another reason I highly recommend the tornado mixer!

Image

Once you have the same amount of blue stuff mixed in with the pink, just transfer the mixer over to the mixing bowl and begin mixing. This is the reason I start with the Yellow bucket.

Image

Once you have everything all mixed up you have 30 mins to get it poured up. So just like the Hitch Hikers Guide to the Galaxy says "Don't Panic". There is plenty of time to get things right.

You may also have noticed that there is a large amount of bubbles on the surface of your bowl.

Image

Again don't panic. This is normal for this product. It is very good at degassing so all the air trapped in the bottom is making its way to the top. Just think if you weren't using this product. All of those bubbles might be hiding down in your rubber...Yuck. That is why this product is so great, you dont have to have a pressure pot to make it work.

Now it is time to pour the rubber. It is best to do a very slow pour almost like laying a string down. This will help minimize air getting into the mold. I also start with any corners, edges, or minute details to ensure no air pockets form over these areas as they or more prone to trap air.

Image

Thats it your all done with this half of the mold. You can technically demold this after 6 hrs. I always give it 24hrs. No need to rush perfection, patients always pays off with this stuff. Besides temperature affects cure time and it may take more then 6hrs.

Following these steps will get you on your way to making a decent molds that you can use over and over but....
You can take things to the next step. To get the best quality molds I use a pressure pot. A pressure pot is a chamber used to apply a pressure to the mold causing any air left in the rubber to collapse or dissolve into solution. It also assists in forcing the rubber into any small detail areas.

You could go to some of the rubber supply shops and pay their $300 for a pressure pot or you can get smart! We don't really have a need for a 5 gallon pressure pot. Something smaller will work just fine for small parts. I bought a 2.5gal pressurized painting pot for $75 and it came with a regulator, relief valve and was rated for 80psi (more then enough). All I had to do was use a wrench and remove the paint pickup line and cap off the outlet.

Once ready I put my mold in the pot, Seal it up making sure to use a proper torquing pattern (like putting a tire on your car) and apply 40psi to the mold.

Image
All I need is a tank that can dive like a sub and shoot torpedoes.
User avatar
Wizzard033
Corporal
Posts: 339
Joined: Thu Sep 30, 2010 4:51 am
Location: Lubbock, Texas

Re: Do it yourself casting

Post by Wizzard033 »

SWEET!!! I have almost everything I need already. :clap:
ImageImage
User avatar
Rogue Sub
Private
Posts: 83
Joined: Mon Dec 20, 2010 10:25 pm
Location: Ct USA
Contact:

Re: Do it yourself casting

Post by Rogue Sub »

Ok, now that the mold has cured it is time to finish the other half of the mold.
First, pull the mold out of the clay and legos and clean the clay off of everything with a paper towel. Next reinsert the part back into the mold exactly as it was.

Image

Now build up your legos again with enough height to give you at least a 1/4" thickness and spray everything with mold release.

Image

Mix and pour your rubber and allow to cure.

After the rubber has curred remove the mold from the legos.

Image

Now you will need to find the seam to separate the mold. I find just rubbing my fingers along the ege can peel back the excess rubber. An xacto knife can also be used but care must be taken as it will slice through the rubber very easily.

Image

Now that the mold is separated remove the master and set it aside. It is now time to determine where to place the pour spout and any required vents. This is going to take some critical thinking on your own behalf. It is always best to arrange the spouts so that the high points can easily be molded. A longer pour spout will also provide more head pressure allowing resin to fill smaller areas more easily. This part should only require a single pour spout but, after a cast or two I any find it needs more areas to vent and I can simple add those in as I like.

I like to use a brass tube that was sharpened with an xacto knife to make my channels. Some people also place solid tubed in their molds so that when the molding is done the channels are already in there for you. It makes things real easy.

Image

I then selected the center of the mold and made my hole.

Image

Here is an example of a part that would need venting. I arranged all the points to face up ward then made a fill path that went straight to the bottom. This allows a natural flow for the air to exit the mold.

Image

Now that the mold is read spray it with mold release and put it between to wood block and wrap it with rubber bands.

Image

We are now ready to cast!

To get a good idea of how much resin to use I like to put the master on the scale and then split that number in half for each part of the resin. This part weighs 4 grams. Not very much and a difficult amount of resin to mix. Instead I will use 10 grams of each part. This will account for the fill spout and I will use the rest on one of my other molds I have around. No need to waste product.

Image

Next I pour both parts of the Alumilite resin into a Dixie cup and mix it with a tongue depressor.

Image

You now have approximately 3 minutes to get your work done so don't sit around! Pour the resin into the mold until it is full. Some light tapping may assist in the process. Now leave it alone. At this point you could also through it into the pressure pot at 40 psi to aid in collapsing bubbles and forcing resin into small places.

Here is a picture of what I used the rest of the resin for. It is a one piece mold where one side of the part did not contain any details.

Image

That just about wraps it up. In a few hours you will be able to demold your product and make another part if you like. Let me know if there are any questions and I will do my best to answer them. I will be putting this into a pdf later and making it available for download off of my site. it will be a bit more refined and better structured.

Ok im tired :) I will proof read this later :oops:
All I need is a tank that can dive like a sub and shoot torpedoes.
Post Reply

Return to “Tips and Tricks”