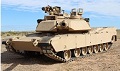
I am officially starting the build for my M1a2 Sep V3 AUS variant. This will defiantly not be a sprint of a build time but more a slow jog with the workspace I have on hand. I will try to keep this thread updated as I go along for others to follow and use as a reference for there own builds. This model is also the newer batch of m1a2s from heng long for reference...
- Base tank.jpg (2.73 MiB) Viewed 3938 times
To start off the build we are stripping this bad boy down so I have less of a hassle modifying and painting parts.
The first thing I noticed is the mounting points that hold the upper and lower hull together were not where the manual stated they where. Apparently they decided to keep the old holes and hide the new holes under various parts that can be removed to cover them. Once those where removed the 2 hull parts separated without any issues (see the pics below for locations).
- Foward mounting points.jpg (2.35 MiB) Viewed 3938 times
- Aft Mounting points.jpg (2.32 MiB) Viewed 3938 times
- Tank entiror.jpg (2.9 MiB) Viewed 3938 times
After surfing the web a handful of times and asking around the forms I decided to do the heavy lifting and make them myself, 3 blender attempts later, I finally had my first printable test. and low and behold. Wasn't to spec enough.
- Print underway.jpg (2.15 MiB) Viewed 3938 times
After about 8 iterations I was finally happy with the left cheek, and proceeded to the Right cheek.
- Various test prints.jpg (2.69 MiB) Viewed 3938 times
- Test fitment.jpg (1.36 MiB) Viewed 3938 times
- Epoxy puddy.jpg (1.64 MiB) Viewed 3938 times
- Texture added.jpg (1.79 MiB) Viewed 3938 times
- Texture added 2.jpg (2.36 MiB) Viewed 3938 times
11C out