British Cold War Conquerer Tank.

Re: British Cold War Conquerer Tank.
Inkor's models are listed by him using "RC_3D_Tanks". Specifically for the Conqueror the link is https://cults3d.com/en/3d-model/various/conqueror. If you click on the "live view" in the Cults description, it takes you to his site that does a breakdown of all of his tanks in 3D form. There is also a purchase button from the live view, but it may just take you to Cults. Haven't clicked on that button recently.
Derek
Too many project builds to list...
Too many project builds to list...
-
jhamm
- Warrant Officer 2nd Class
- Posts: 1122
- Joined: Fri May 19, 2017 7:21 am
- Location: Germany
- Contact:
Re: British Cold War Conquerer Tank.
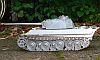
I have redrawn the headlight lens and printed from crystal-clear PETG.
Some of the parts of your Conqueror look very rough, I wouldn't use anything like that.
Here are some improvements I have made:
- Conqueror 19042024-002.jpg (131.53 KiB) Viewed 1913 times
- Conqueror 19042024-001.jpg (240.83 KiB) Viewed 1913 times
- Conqueror-24042024-004.jpg (92.47 KiB) Viewed 1913 times
- Conqueror-24042024-002.jpg (100.22 KiB) Viewed 1913 times
-
HERMAN BIX

- Lieutenant-General
- Posts: 12021
- Joined: Sun Jan 12, 2014 12:15 am
- Location: Gold Coast,Australia
Re: British Cold War Conquerer Tank.
That turret bustle is a thing of beauty Mr Jhamm 
The Conqueror is a mighty looking AFV thats for sure
The Conqueror is a mighty looking AFV thats for sure
HL JAGDPANTHER,HL TIGER 1,HL PzIII MUNITIONSCHLEPPER, HL KT OCTOPUS,HL PANTHER ZU-FUSS,HL STuG III,HL T34/85 BEDSPRING,
HL PZIV MALTA,MATORRO JAGDTIGER,HL F05 TIGER,TAMIYA KT,HL PANTHERDOZER,HL EARLY PANTHER G,TAIGEN/RAMINATOR T34/76,
HL AN-BRI-RAM SU-85
HL PZIV MALTA,MATORRO JAGDTIGER,HL F05 TIGER,TAMIYA KT,HL PANTHERDOZER,HL EARLY PANTHER G,TAIGEN/RAMINATOR T34/76,
HL AN-BRI-RAM SU-85
-
jhamm
- Warrant Officer 2nd Class
- Posts: 1122
- Joined: Fri May 19, 2017 7:21 am
- Location: Germany
- Contact:
Re: British Cold War Conquerer Tank.
yes it is:HERMAN BIX wrote: ↑Thu Mar 06, 2025 7:06 am That turret bustle is a thing of beauty Mr Jhamm
The Conqueror is a mighty looking AFV thats for sure
- Comqueror 14042024-009.jpg (699.28 KiB) Viewed 1902 times
Re: British Cold War Conquerer Tank.
Thanks for adding your pictures to this blog jhamm.
The printing of my 3D tank is very rough in places so I will have a lot of "cleaning-up" to do to make it presentable.
The printing of my 3D tank is very rough in places so I will have a lot of "cleaning-up" to do to make it presentable.
Never too old to learn........
-
Herr Dr. Professor

- Major
- Posts: 6228
- Joined: Mon Apr 22, 2019 10:48 pm
- Location: Southern Wisconsin USA
Re: British Cold War Conquerer Tank.
zooma: a few years ago, someone on RCTW recommended a finish solution to the striations in a 3D print. It was a product for sale, if not specifically for that purpose, then at least useful for that purpose. I am sorry I cannot remember enough about it to do a search, but maybe someone will see my blathering here and recall the product or where to find the discussion here on RCTW.
Here are two relevant discussions, but I don't think the solutions suggested here are exactly what I dimly recall:
viewtopic.php?p=320784&hilit=striat%2A#p320784
viewtopic.php?p=281931&hilit=striat%2A#p281931
Here are two relevant discussions, but I don't think the solutions suggested here are exactly what I dimly recall:
viewtopic.php?p=320784&hilit=striat%2A#p320784
viewtopic.php?p=281931&hilit=striat%2A#p281931
British Cold War Conquerer Tank. Well Engineered Model.
Only two screws need to be removed to allow access to the lower hull. Once these two screws are taken out the base that is under the turret ring, it can be slid backwards and lifted off with the turret attached.. This will make for very easy battery changing, and it should be even easier to achieve if magnets can be used to replace these two small screws - and this looks like it will be easy enough to do.
Unlike the Heng Long tanks that need the retaining screws to maintain the structural rigidity (by keeping the top and lower half of the hull securely aligned), this models hull strength is unaffected by the removal of the "top deck" and is remarkably stiff and twist free. Very impressive - no need to worry about making any hull reinforcement's on this model.
I also noted that the large sections of the hull are all screwed together, so it would be relatively easy to take it apart and reprint any sections that became damaged or that needed any major repair work in the future.
My knowledge of 3D printing is absolutely zero, so I have no idea how well the materiel that has been used to print the chassis and turret parts will age, but at the moment the plastic feels like it is very tough and strong and should take some hard use, so I have no concerns at all about this part of the tank.
What I do have some concerns about are the tracks and the drive sprockets as these components are also 3D printed. I have no idea how well they will stand up to regular use when being driven around, but I hope they will be strong enough to enable the tank to be driven and enjoyed. Maybe if this tank becomes popular enough, somebody will make a pair of drive sprockets in metal - or maybe something already exists that can be fitted and used (?)
I am aware that 3D printing in metal has already been achieved so there is even a future possibility of having a pair of metal drive sprockets 3D printed...and possibly track links too!
- Attachments
-
- Only two screws need to be removed to give access inside the hull.
- 89A8E4C9-F810-4423-86DE-2B14764F8493.jpeg (805.58 KiB) Viewed 1585 times
Never too old to learn........
British Cold War Conquerer Tank. 3D Print Marks
It is a shame that my particle example of this 3D printed Conquerer is a bit rough, because if it had been printed with a smoother surface it has the makings of being a very good model.
As it is, this model is not the best example of 3D printing that I have ever seen, and it will take more time and work to prepare the surfaces than others that I have seen that have been finished better.
I fully expected to find that some of the surfaces would need some attention and smoothing - but not as much as this one has. Some small parts like the gun crutch are not worth the time it would take to "make good" so I will either get this re-printed, or scratch build a replacement using my scruffy example to gain the correct measurements.
The most obvious area to show the 3D printed "swirling marks" to me when the tank was first seen were those on top of the exhaust covers.
Some 80 grade abrasive paper was used to rub the top surface of the two exhaust covers - and this is when I discovered just how tough this 3D printed plastic is - and how long it is going to take to "make good"!
After some rubbing I decided to brush some paint over the sanded areas to help highlight (and maybe start to fill ?) these contours. I had a jar of Tamiya XF-11 JN Green that has been in my box of old paints for many years (still in the old type larger sized paint jars) so I gave it a stir and brushed some over the exhaust covers.
When the paint is dry it will highlight the surface imperfections even more, so I can rub away and continue to add paint from time to time until I achieve a smooth enough finish. I am guessing that in real life these exhaust covers would have shown similar rusting to those used on the Centurion (of the same 1955 - 1965 sort of time period - and presumably made of the same sort of steels?) so I may also add some texture of my own as I go along to see what it looks like.
- Attachments
-
- Paint added to help highlight and fill progressive actions.
- 4E550C1B-F4E7-4792-B900-68C65D1E10A9.jpeg (960.78 KiB) Viewed 1572 times
-
- First sanding attempt - this plastic is tough !
- B36C2464-5E9C-479F-987F-022CF1BB9C32.jpeg (1.1 MiB) Viewed 1572 times
-
- Fairly heavy printing marks.
- C3D54DDF-C2C5-4190-A8DC-37471C5CB03E.jpeg (934.52 KiB) Viewed 1574 times
Never too old to learn........
Re: British Cold War Conquerer Tank.
If you are going to do a bunch of 3D print sanding, I recommend some mechanical help. I actually bought a foot sander (basically a metal tube with a geared 370 motor in it) like this:
https://www.amazon.com/Electric-Profess ... 9hdGY&th=1
Thing works great for sanding larger areas on 3D prints.
https://www.amazon.com/Electric-Profess ... 9hdGY&th=1
Thing works great for sanding larger areas on 3D prints.
Derek
Too many project builds to list...
Too many project builds to list...
Re: British Cold War Conquerer Tank.
tankme wrote: ↑Tue Mar 18, 2025 12:18 am If you are going to do a bunch of 3D print sanding, I recommend some mechanical help. I actually bought a foot sander (basically a metal tube with a geared 370 motor in it) like this:
https://www.amazon.com/Electric-Profess ... 9hdGY&th=1
Thing works great for sanding larger areas on 3D prints.
Thanks Derek - that looks interesting!
Never too old to learn........
