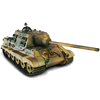
Taigen Panther G with a British twist
-
John Glover
- Corporal
- Posts: 400
- Joined: Wed Jun 06, 2018 8:59 pm
- Location: KeriKeri, New Zealand
Re: Taigen Panther G with a British twist
Cant beat a good looking panther. So the color is Migs olive drab. I would like to replicate. regards John.
Tamiya King Tiger
Tamiya King Tiger [Porsche turret]
Tamiya Tiger 1
Tamiya Panther
HL/Taigen Stug 111
Tamiya King Tiger [Porsche turret]
Tamiya Tiger 1
Tamiya Panther
HL/Taigen Stug 111

Re: Taigen Panther G with a British twist
I agree and as most of the things I like to build are OD, I always appreciate a great looking green paint job (never tried the Mig's products).John Glover wrote: ↑Mon Jan 20, 2025 4:02 am Cant beat a good looking panther. So the color is Migs olive drab. I would like to replicate. regards John.
"Don't believe everything you see on the internet" - George S. Patton
Eric
Eric
-
Panzermechaniker
- Sergeant
- Posts: 677
- Joined: Wed Feb 08, 2023 1:04 am
- Location: Toronto
Re: Taigen Panther G with a British twist
Really like this one.  I thought of doing Cuckoo a few years back. But with 5 Panthers now I think I better stop
-
PanzerCmdr
- Recruit
- Posts: 13
- Joined: Fri Jan 17, 2025 4:00 pm
- Location: Houston, TX
Re: Taigen Panther G with a British twist
Yes, I installed the servo recoil system in my Tiger, along with the barrel smoke and flash. It looks pretty cool in action and the muzzle brake allows for getting a nicely visible flash from the LED.LordLudikrous wrote: ↑Wed Dec 04, 2024 6:44 pm
...The Heng Long recoil system is designed to be paired with their barrel smoke system, so I’ll definitely be installing that as well.
-
LordLudikrous
- Private
- Posts: 96
- Joined: Sun Apr 16, 2023 2:22 pm
Re: Taigen Panther G with a British twist
The lower hull has had its filth and weathering applied. I might have made the rust on the rear armour plate a bit too vibrant but that might be the phone magnifying the effect. I’ll be doing touch ups and tweaks once the model comes together so I can always revisit things later.

https://i.imgur.com/CzJUSwc.jpeg

https://i.imgur.com/GdPriP8.jpeg
The wheels have been attached, and went on without too much difficulty.

https://i.imgur.com/sBNZ7yC.jpg[
For some reason the camera is making the rust on the flammenvernichte look overly flat and orange, not too sure why as in real life it looks much better.

https://i.imgur.com/ZA2Z8oL.jpg
As before though, I might revisit it later and touch it up a bit.
The final drive covers have been completed and attached, and much to the delight of my wife I can now have most of the tank assembled and taking up far less space when I’m working on it.

https://i.imgur.com/ee9q12O.jpg
Another view from the rear with the hull and turret attached, its really clear here how the weathering alters the colour of the paint (although the lighting plays a big part too). I also realised once I'd attached the wheels that I'd neglected to paint the convoy and rear lights, so thats one thing to add to the touch up list.

https://i.imgur.com/vlv7LWL.jpg
Next up is the turret and mantlet assembly. The upper hull is going to take by far and away the longest so I’m leaving that until last.
https://i.imgur.com/CzJUSwc.jpeg
https://i.imgur.com/GdPriP8.jpeg
The wheels have been attached, and went on without too much difficulty.
https://i.imgur.com/sBNZ7yC.jpg[
For some reason the camera is making the rust on the flammenvernichte look overly flat and orange, not too sure why as in real life it looks much better.
https://i.imgur.com/ZA2Z8oL.jpg
As before though, I might revisit it later and touch it up a bit.
The final drive covers have been completed and attached, and much to the delight of my wife I can now have most of the tank assembled and taking up far less space when I’m working on it.
https://i.imgur.com/ee9q12O.jpg
Another view from the rear with the hull and turret attached, its really clear here how the weathering alters the colour of the paint (although the lighting plays a big part too). I also realised once I'd attached the wheels that I'd neglected to paint the convoy and rear lights, so thats one thing to add to the touch up list.
https://i.imgur.com/vlv7LWL.jpg
Next up is the turret and mantlet assembly. The upper hull is going to take by far and away the longest so I’m leaving that until last.
Last edited by LordLudikrous on Mon Oct 20, 2025 9:07 pm, edited 1 time in total.
-
Herr Dr. Professor

- Major
- Posts: 5903
- Joined: Mon Apr 22, 2019 10:48 pm
- Location: Southern Wisconsin USA
Re: Taigen Panther G with a British twist
I scratch my head a bit, look again, scratch my head: no matter how hard I try, an Olive Drab Panther is different---just as you wanted! What fun to watch your progress. Thanks for all the photos, heretofore and henceforth.
-
HERMAN BIX

- Major-General
- Posts: 11779
- Joined: Sun Jan 12, 2014 12:15 am
- Location: Gold Coast,Australia
Re: Taigen Panther G with a British twist
Brain = Panther
Eyes = Not Panther !!
The colour does throw a $%$#into the time/space continuum
Eyes = Not Panther !!
The colour does throw a $%$#into the time/space continuum
HL JAGDPANTHER,HL TIGER 1,HL PzIII MUNITIONSCHLEPPER, HL KT OCTOPUS,HL PANTHER ZU-FUSS,HL STuG III,HL T34/85 BEDSPRING,
HL PZIV MALTA,MATORRO JAGDTIGER,HL F05 TIGER,TAMIYA KT,HL PANTHERDOZER,HL EARLY PANTHER G,TAIGEN/RAMINATOR T34/76,
HL AN-BRI-RAM SU-85
HL PZIV MALTA,MATORRO JAGDTIGER,HL F05 TIGER,TAMIYA KT,HL PANTHERDOZER,HL EARLY PANTHER G,TAIGEN/RAMINATOR T34/76,
HL AN-BRI-RAM SU-85
-
LordLudikrous
- Private
- Posts: 96
- Joined: Sun Apr 16, 2023 2:22 pm
Re: Taigen Panther G with a British twist
It raises the question actually of how many German personnel experienced the same thing while Cuckoo was rolling around. It seems likely at least one person spotted the tank, saw the outline of a Panther and assumed it was a friendly or a wreck, only to do a double take when they noticed the markings just in time for Cuckoo to shoot them in the face.
Hell considering a German tank commander mistook a Pershing for a German tank at close range it seems entirely possible.
In any case if the colours are breaking everyone’s brains, prepare to have them fried even further as I’ve added the decals to the turret.

https://i.imgur.com/XHNUgWw.jpeg
Its just waiting detailing and weathering passes, and of course bringing it to a matt finish.
Hell considering a German tank commander mistook a Pershing for a German tank at close range it seems entirely possible.
In any case if the colours are breaking everyone’s brains, prepare to have them fried even further as I’ve added the decals to the turret.
https://i.imgur.com/XHNUgWw.jpeg
Its just waiting detailing and weathering passes, and of course bringing it to a matt finish.
Last edited by LordLudikrous on Mon Oct 20, 2025 9:08 pm, edited 1 time in total.
-
LordLudikrous
- Private
- Posts: 96
- Joined: Sun Apr 16, 2023 2:22 pm
Re: Taigen Panther G with a British twist
It’s been a little while since I last updated but the turret is now complete. I’m aware that Olive Drab was a physically durable paint so I’ve kept the chipping a minimum with no apparent rust or exposed metal. As the turret is also not subject to the same amount of mud and filth being flung up on the lower hull I’ve not applied as much grime as I did to the lower hull and wheels.
Overall I’m very pleased with how the turret turned out despite being a bit unsure about the decal placement at first (even though I’ve planned it this way from the very start), as I’ve always thought the way Cuckoo had the star positioned on the bend of the turret looked a bit odd; while I’ve opted to have it on the flat section instead, but now it’s done I’m satisfied I made the right choice.
I’ve uploaded a few photos taken in different lighting to give an idea of how the colours look in different conditions, and it’s really a lovely shade of Olive Drab.

https://i.imgur.com/qAfBRP9.jpg

https://i.imgur.com/s2LDxmZ.jpg

https://i.imgur.com/os4ckA2.jpg

https://i.imgur.com/GaGLVwe.jpg
Another small modification I’ve done is add some PTE skates to the underside of the turret to prevent any damage to the upper hull from the metal turret in the event of any sagging or less than even positioning. I might look at some bracing/supports once everything is installed if it turns out to be necessary.

https://i.imgur.com/lHQDUkI.jpg
I’ve now begun work on the upper hull, aside from the gun barrel and sprockets/idlers this is the last component that will require painting and weathering. I might have overdone the grime on the top of the rear hull plate as its quite a bit more brown than the upper hull that joins with it. I’ll see about blending the colour in that area but I might need to do some Olive Drab drybrushing on the rear plate to bring it the colour back toward green.

https://i.imgur.com/wusd4hZ.jpg

https://i.imgur.com/OiHGoiq.jpg
I neglected to take any photos at the time but I applied the decals to the upper front plate and found that actually I didn’t like the look of the allied star on the front at all. Which was a bit strange seeing as that’s been a key idea in my head since the beginning but once I actually saw it I just didn’t like it and I can’t really explain why. I removed it and ultimately the only decal on the upper hull is the yellow triangle. The final result will now look something like this:

https://i.imgur.com/320wHN2.png
Overall I’m very pleased with how the turret turned out despite being a bit unsure about the decal placement at first (even though I’ve planned it this way from the very start), as I’ve always thought the way Cuckoo had the star positioned on the bend of the turret looked a bit odd; while I’ve opted to have it on the flat section instead, but now it’s done I’m satisfied I made the right choice.
I’ve uploaded a few photos taken in different lighting to give an idea of how the colours look in different conditions, and it’s really a lovely shade of Olive Drab.
https://i.imgur.com/qAfBRP9.jpg
https://i.imgur.com/s2LDxmZ.jpg
https://i.imgur.com/os4ckA2.jpg
https://i.imgur.com/GaGLVwe.jpg
Another small modification I’ve done is add some PTE skates to the underside of the turret to prevent any damage to the upper hull from the metal turret in the event of any sagging or less than even positioning. I might look at some bracing/supports once everything is installed if it turns out to be necessary.
https://i.imgur.com/lHQDUkI.jpg
I’ve now begun work on the upper hull, aside from the gun barrel and sprockets/idlers this is the last component that will require painting and weathering. I might have overdone the grime on the top of the rear hull plate as its quite a bit more brown than the upper hull that joins with it. I’ll see about blending the colour in that area but I might need to do some Olive Drab drybrushing on the rear plate to bring it the colour back toward green.
https://i.imgur.com/wusd4hZ.jpg
https://i.imgur.com/OiHGoiq.jpg
I neglected to take any photos at the time but I applied the decals to the upper front plate and found that actually I didn’t like the look of the allied star on the front at all. Which was a bit strange seeing as that’s been a key idea in my head since the beginning but once I actually saw it I just didn’t like it and I can’t really explain why. I removed it and ultimately the only decal on the upper hull is the yellow triangle. The final result will now look something like this:
https://i.imgur.com/320wHN2.png
Last edited by LordLudikrous on Mon Oct 20, 2025 9:15 pm, edited 1 time in total.
Re: Taigen Panther G with a British twist
In your pics, that motordeck looks great the way it is!
But I know, in pics it might look different compared to the real model on the bench!
But only you cann judge that.
Rob.
But I know, in pics it might look different compared to the real model on the bench!
But only you cann judge that.
Rob.
