Juckenburg Nashorn

Up to the end of WWII.
User avatar
lmcq11
2nd Lieutenant
Posts: 2752
Joined: Mon Dec 19, 2016 7:42 pm
Location: Quebec, Canada

Re: Juckenburg Nashorn

Post by lmcq11 »

Hi,

With this step, the last interior modules were built in plasticard and installed, this is the optical equipment bin on top and the tools bin below. The locking clamps are temporary as I have some photo etched on order.
Nashorn interior
Nashorn interior
Nashorn interior optical and tool bins
This is the overall interior now. It is mostly completed. I need to install some telecom wiring in a few places and some other miscellaneous equipments and brackets that i see on pictures. This is the fun part.
Nashorn interior
Nashorn interior
Nashorn interior
Nashorn interior
The temporary MG 34 stand I did last week was replaced by my interpretation of the pictures I saw of the stand on a Hummel. The surviving Nashorn no longer have their MG stands.
Nashorn interior
Nashorn interior
While I am awaiting some parts, I will finish the exterior as next steps. There is quite a lot still to do.

Regards, Louis
User avatar
HERMAN BIX
Major-General
Posts: 11179
Joined: Sun Jan 12, 2014 12:15 am
Location: Gold Coast,Australia

Re: Juckenburg Nashorn

Post by HERMAN BIX »

Massive effort mate................just extraordinary interior detail :thumbup: :clap:
HL JAGDPANTHER,HL TIGER 1,HL PzIII MUNITIONSCHLEPPER, HL KT OCTOPUS,HL PANTHER ZU-FUSS,HL STuG III,HL T34/85 BEDSPRING,
HL PZIV MALTA,MATORRO JAGDTIGER,HL F05 TIGER,TAMIYA KT,HL PANTHERDOZER,HL EARLY PANTHER G,TAIGEN/RAMINATOR T34/76,
HL AN-BRI-RAM SU-85
User avatar
lmcq11
2nd Lieutenant
Posts: 2752
Joined: Mon Dec 19, 2016 7:42 pm
Location: Quebec, Canada

Re: Juckenburg Nashorn

Post by lmcq11 »

Hi,

First, I wanted to show you some parts provided with the kit. I recognize some braces from the Munster Hummel. And some terribly formed bins vaguely resembling those seen on a Hummel as well. So, Juckenburg provided Hummel parts for the Nashorn, which should not be the same. I have no use for these.
Juckenburg Hummel interior parts provided with Nashorn
Here is the Hummel or early Hornisse barrel clamp provided with the kit. The ring fits the 150mm barrel of the Hummel. I have no use for these either.
Juckenburg Hummel barrel clamp provided with Nashorn
Here is the Nashorn barrel clamp as it should be on this kit, as shown on the excellent book "Panzers at Saumur, vol 3".
Nashorn barrel clamp
I worked hard to recreate the clamp from pictures, including the release mechanism. The Nashorn is equipped with a barrel clamp that is released from the inside of the fighting compartment. The Hummel type clamp installed on early Hornisse was requiring a crew member to come out in the open, climb the glacis and manually release the clamp while totally exposed to gun fire.
Nashorn barrel clamp
All barrel clamp parts needed to be scratch built.
Nashorn barrel clamp
rsz_img_8113.jpg (96.9 KiB) Viewed 3054 times
Once released, the clamp falls on the glacis and the gun is let loose. However, you can see that the kit part for the driver compartment is oversized, likely by 20%.
Nashorn barrel clamp
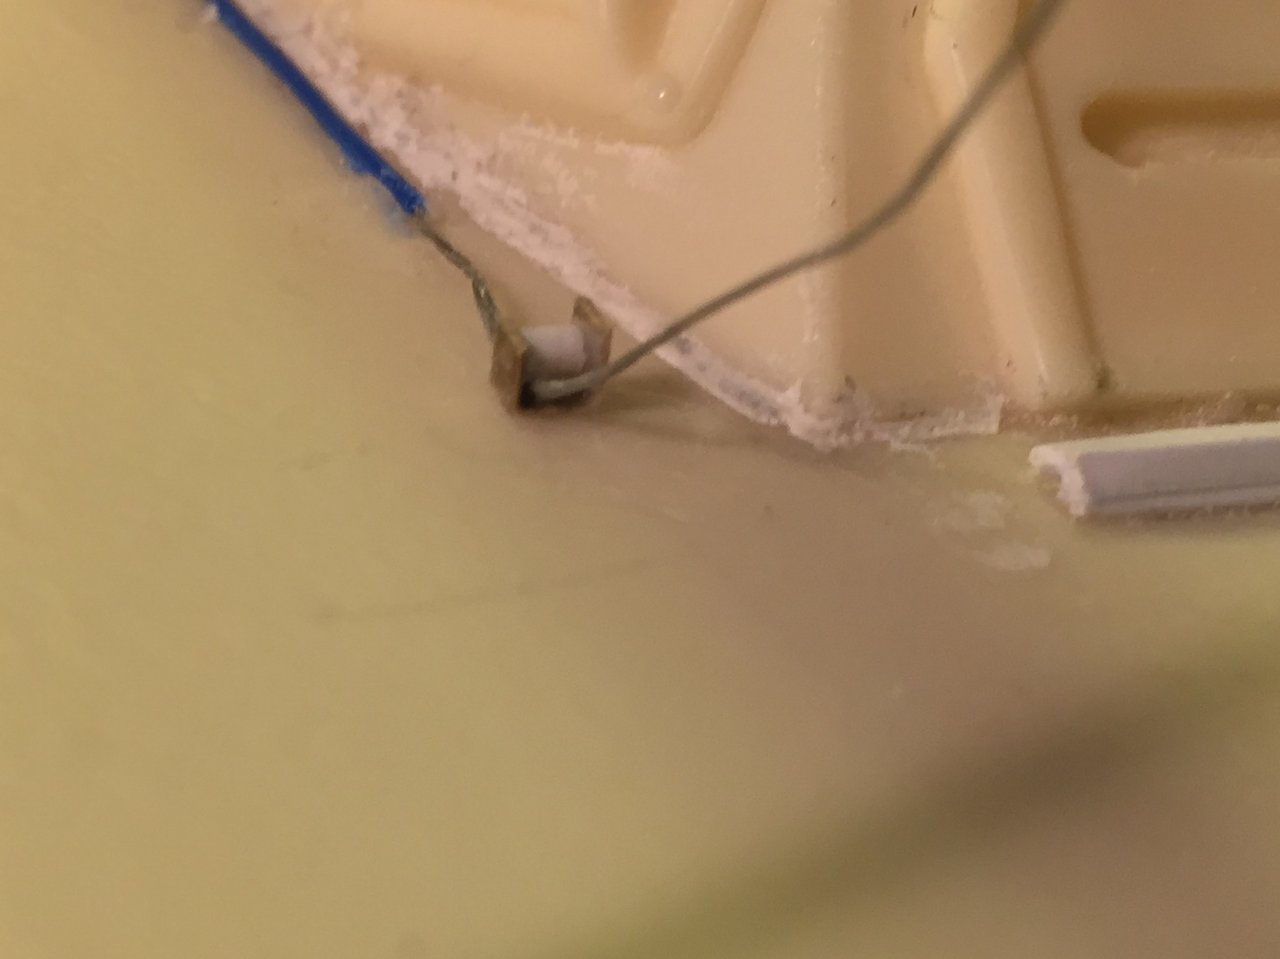
This is the simple release mechanism installed on the left of the gun inside the fighting compartment. it pulls the wire all the way to the tip of the clamp.
Nashorn barrel clamp
Overview of the Nashorn at this time
Nashorn
Nashorn
User avatar
c.rainford73
Major
Posts: 6104
Joined: Thu Aug 25, 2016 7:34 pm
Location: Connecticut USA

Re: Juckenburg Nashorn

Post by c.rainford73 »

Louis that is awesome work It's so nicely engineered it's a shame to paint it lol...

I might have to take your idea for the gun assembly release for my build. Super job
Tanks alot.... :wave:
User avatar
HERMAN BIX
Major-General
Posts: 11179
Joined: Sun Jan 12, 2014 12:15 am
Location: Gold Coast,Australia

Re: Juckenburg Nashorn

Post by HERMAN BIX »

Holy-shit that gun release is magnificent :thumbup:
HL JAGDPANTHER,HL TIGER 1,HL PzIII MUNITIONSCHLEPPER, HL KT OCTOPUS,HL PANTHER ZU-FUSS,HL STuG III,HL T34/85 BEDSPRING,
HL PZIV MALTA,MATORRO JAGDTIGER,HL F05 TIGER,TAMIYA KT,HL PANTHERDOZER,HL EARLY PANTHER G,TAIGEN/RAMINATOR T34/76,
HL AN-BRI-RAM SU-85
User avatar
Soeren
Warrant Officer 2nd Class
Posts: 1356
Joined: Sat Oct 22, 2016 3:27 pm

Re: Juckenburg Nashorn

Post by Soeren »

GREAT stuff !
User avatar
lmcq11
2nd Lieutenant
Posts: 2752
Joined: Mon Dec 19, 2016 7:42 pm
Location: Quebec, Canada

Re: Juckenburg Nashorn

Post by lmcq11 »

Hi,

Thank you everyone for your interest. It is encouraging.

Currently working on the few remaining items, still more to do but the end is in sight.

The model as it stands today.
Nashorn
Nashorn
This is the "track pin replacing plate", installed at the rear on both sides. It is designed to push loose pins back in place. The parts are available on ebay for a couple of euros from a German dealer, advertised as a Ketten-Abstandshalter. Not having to scratch build something is a rare luxury.
Track pin replacing plate
Nashorn have a Panzer III sprocket. Later Nashorns have the Ausf J version with many seen on pictures without the hub cap, which is more interesting. The Mato metal sprocket is oversized I think.
Panzer III Ausf J sprocket
A Tamiya Pz-IV jack was installed. My parts reserve is getting depleted.
Tamiya jack
Tamiya jack
rsz_img_8164.jpg (93.67 KiB) Viewed 3024 times
The jacking block. An actual kit part that can be used...
Jacking block
Jacking block
Started some of the interior radio wiring. I think it adds a lot to the look.
radio wiring and MG-34 stand
The air intake as they currently stand. I do not think I can do better than this. Sanding them just make more air bubbles come out.
Air intakes
Air intakes
I will have a big job preparing and painting the ammo rounds. I also bought markings for them. Each round will be a small project. Not too sure how they will turn out.
Nashorn ammo rounds
Nashorn ammo rounds
Regards, Louis
User avatar
Soeren
Warrant Officer 2nd Class
Posts: 1356
Joined: Sat Oct 22, 2016 3:27 pm

Re: Juckenburg Nashorn

Post by Soeren »

8O Jeeeek 8O
User avatar
lmcq11
2nd Lieutenant
Posts: 2752
Joined: Mon Dec 19, 2016 7:42 pm
Location: Quebec, Canada

Re: Juckenburg Nashorn

Post by lmcq11 »

Hi,

It is almost complete. One last look at my references tells me it is only missing the barrel cleaning rods at the back.

One last look around with the latest details. Next time you see it, I might have stated the painting process.

This is the engine starter cover. It looks a bit small. I might redo it.
Nashorn engine starter cover
The tow cable arrangement is in place n the glacis.
Nashorn tow cable
Nashorn tow cable
Latest interior views. The periscope were added, one on each side. Their mounting is quite fragile. Telecom wires are in place.
Nashorn interior
Nashorn interior
Nashorn interior
Nashorn interior
8 rounds will eventually fill the ammo bin on the right.
Nashorn interior
Nashorn interior
Nashorn interior
Nashorn interior
Nashorn interior
Nashorn interior
Nashorn interior
Nashorn interior
The cables were positioned as per arrangements seen on the Nashorn at Aberdeen.
Nashorn interior
Nashorn interior
Last shot unpainted
Juckenburn Nahorn - highly modified
Regards, Louis
User avatar
lmcq11
2nd Lieutenant
Posts: 2752
Joined: Mon Dec 19, 2016 7:42 pm
Location: Quebec, Canada

Re: Juckenburg Nashorn

Post by lmcq11 »

Hi,

Final additions before painting

These are the gun cleaning rods. The Nashorn carries these connecting rods at the rear, and not to be confused with the longer "gun aiming posts" carried at the same location by the Hummel SP howitzer.
Gun cleaning rods
Gun cleaning rods
I did a better job on the armor section at the base of the gun shield, modelled on Aberdeen.
Nashorn shield armor
Spare tracks installed at the front, as usual.
Spare tracks holder
Spare tracks holder
After a good wash (it was so dirty with all the sanding...), a coat of Tamiya Dark Yellow enamel was sprayed as a primer to seal the resin, plasticard and all the putty put on this model during the past month. Otherwise, the putty oil will come through to the acrylic surface after a few months and ruin the paint job. The paint make various issues become apparent as expected (scratches, air bubble, small holes, imperfections of all sorts), and all need to be corrected before going further. These will be sealed again locally with enamel before the following coats which will use acrylics. I will give the Nashorn a three tone camo scheme.
Nashorn primed
Nashorn primed
At this point, I bring the model in the sunlight and take close up pictures of everything. It is very easy to spot every little thing that needs to be corrected by zooming at these with a PC screen. As you can see in the picture below, there are residues next to some bolts and hooks. These are present all over the model. A short 20 minutes exercise of cleaning these with a small blade will greatly improve the look. But I always have to remember that this is a rough WW2 vehicle build by hand, not a shiny Ferrari, so it is actually quite realistic to leave imperfections in places.
Nashorn error correction process
Regards, Louis
Post Reply

Return to “Other”