
Hi,
Recent scratch builds by Alwyn Turner and Carl inspired me to build the Juckenburg kit that has been sitting on the shelf for a few years. For many guys like me who switched from 1/35 to 1/16 RC, accuracy remains extremely important. What I thought would be a quick build of an off the shelf kit with a focus on RC functions is turning into a very complex salvage operation. Most resin parts are warped and have air bubbles, something I have not seen since the early days of resin. But that is being fixed with hot water and putty. No, the main concern is accuracy. I built the tub of the upper hull as per instructions just to determine its total length so that I could see how I would adjust it to fit the lower hull that I extended by 7mm at the front. I earlier noticed the fighting compartment was a bit short so the plan is to extend it by 7mm at the rear to compensate and all would be fine, right... Armed with all the Nashorn references I could find, I quickly determined that the gun seat, rear compartment panels and floor are not looking right. It does not look like ref pictures or the 1/35 Tamiya kit. It's disappointing when you spend money on a kit. An open hull like this has to be accurate for me to appreciate it. I will have to cut the tub in pieces and rebuild some of it with plastic card, at least what is obvious. I wonder why the kit designer did not use an accurate 1/35 kit as a model and just do something that looks like it instead of inventing shapes and parts... It would not have taken longer. Attached is a pic of the Juckenburg upper hull tub and the Tamiya 1/35 for comparison. I did not look at the gun parts yet. For now, I will focus on the lower hull... One thing at the time.
Juckenburg Nashorn
Juckenburg Nashorn
- Attachments
-
- Tamiya Nashorn
- Tamiya nashorn.PNG (227.2 KiB) Viewed 6394 times
-
- Juckenburg Nashorn
- before hull.jpg (94.49 KiB) Viewed 6394 times
-
c.rainford73

- Major
- Posts: 6104
- Joined: Thu Aug 25, 2016 7:34 pm
- Location: Connecticut USA
Re: Juckenburg Nashorn
Very excited to see yet another Nashorn come to life! I'm not sure about how many hours Mr Alwyn Turner spent designing the Nashorn kits he constructed ( probably as long as the designers of the real thing) but they are spot on. It appears that you have a very good base to work from. I'm sure if you need any photos or measurements I'd like to help you any way I can.
One build that has given me some excellent ideas is this 1/6 nashorn I found while on the web...
http://www.sixtharmygroup.com/forums/sh ... p?p=188160
I know it's from another forum but with its sheer size it's a great place to get some references from and much easier to view than a 1/35 model IMHO
Cheers
Carl
Tanks alot.... 
-
AlwynTurner

- 2nd Lieutenant
- Posts: 2656
- Joined: Thu Oct 23, 2014 10:47 am
- Location: Chapel-en-le-Frith, Derbyshire
Re: Juckenburg Nashorn
Hi Imcq, yes I believe that Mr juckenburg designed his kits for use with a standard panzer Iv chassis, which would never give an accurate model as the nashorn used a special chassis, hence for my builds I have to build an extended chassis. When I designed my nashorn I started with the blueprints and scaled from there using a 1/35 model for reference as you are doing. I'm afraid that you will be in for a lot of work with that kit but hope it comes out OK at the end.
It should be noted by anyone who wants to build a nashorn that when juckenburg nashorn kits do come back on the market which is planned, then they are not accurate.
Here are the blueprints I used
Alwyn
It should be noted by anyone who wants to build a nashorn that when juckenburg nashorn kits do come back on the market which is planned, then they are not accurate.
Here are the blueprints I used

Alwyn
YOU'RE NEVER TOO OLD TO HAVE A HAPPY CHILDHOOD!
Saladin scratchbuild, Matilda scratchbuild, Churchill scratchbuild, Crusader scratchbuild, M10 Achiĺles scratchbuild, Universal Carrier scratchbuild
Saladin scratchbuild, Matilda scratchbuild, Churchill scratchbuild, Crusader scratchbuild, M10 Achiĺles scratchbuild, Universal Carrier scratchbuild

Re: Juckenburg Nashorn
Wow, that is harsh to read. But it is something i realised for myself. It is a good idea to have a well detailed 1/35 scale model for detail reference. Wish you much success with the Nashorn. I will be following your progress.
-
AlwynTurner
- 2nd Lieutenant
- Posts: 2656
- Joined: Thu Oct 23, 2014 10:47 am
- Location: Chapel-en-le-Frith, Derbyshire
Re: Juckenburg Nashorn
Hi Imcq, sorry I forgot to mention (and this will really rain on your parade) is that the front upper glacis is also going to be wrong as the Juckenburg kit is designed for a panzer 4 hull and the Nashorn had a higher front, so I think you may need some mods there too.
Best regards and good luck
Alwyn
Best regards and good luck
Alwyn
YOU'RE NEVER TOO OLD TO HAVE A HAPPY CHILDHOOD!
Saladin scratchbuild, Matilda scratchbuild, Churchill scratchbuild, Crusader scratchbuild, M10 Achiĺles scratchbuild, Universal Carrier scratchbuild
Saladin scratchbuild, Matilda scratchbuild, Churchill scratchbuild, Crusader scratchbuild, M10 Achiĺles scratchbuild, Universal Carrier scratchbuild
Re: Juckenburg Nashorn
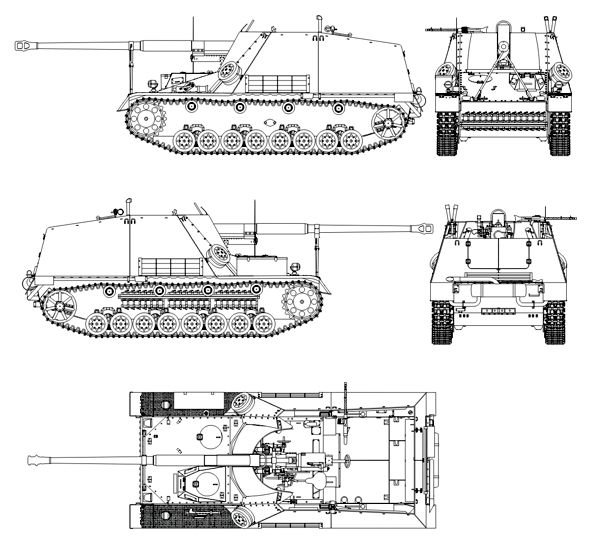
Thank you Alwin, I will keep an eye on the front height chassis and ensure it is aligned properly, as shown on this AFV Club 1/35 Nashorn side view. Noticeable are the return roller struts position that are different from the Panzer IV and also how the go downhill from the second strut instead of the third.
Carl, this 1/6 Nashorn on the link you provided is amazing. I can imagine the size of it. It's very tempting. I built the static Dragon 1/6 Sherman a few years ago as an M4A3 75mm. See pic, you can see the size difference with the 1/16 Hooben Elefant just below. My wife won't let me bring another one of those monsters in the house...
Louis
- Attachments
-
- Dragon 1/6 Sherman
-
- Nashorn side view
-
c.rainford73
- Major
- Posts: 6104
- Joined: Thu Aug 25, 2016 7:34 pm
- Location: Connecticut USA
Re: Juckenburg Nashorn
Nice Sherman wow! Cool information on the return rollers on the nashorn. Any more progress on yours? As Alwyn noted it's amazing how different the hull is from a standard Panzer iv. I honestly didn't know this until I bought his kit and started to take it apart to prep for assembly
I knew it had some Panzer III details but was unaware of just how they combined the parts of both vehicles to make this gun carriage
I knew it had some Panzer III details but was unaware of just how they combined the parts of both vehicles to make this gun carriage
Tanks alot....
Re: Juckenburg Nashorn
Hi,
First a couple of pictures of the Juckenburg kit resin parts, it has many, with major parts on display. I started the cleaning on some of them, each requiring thorough preparation.
The lower hull was thoroughly cleaned of all features, only the road wheel remaining. The kit rear extension part was installed after a cut was made and the Panzer IV rear section removed. The kit arrangement to re-install the idler wheel was pure fantasy so it needs to be completely reworked so that it looks like a Nashorn, and also to be at the proper height. The kit was positioning it too high.
The 7mm hull extension at the front was done with a simple clean cut as shown, and 0.8 plasticard was used to fill the void and solidify the hull. This extension is needed if you want to represent the space between the sprocket wheel and the first road wheel that is typical to the III/IV hull of the Nashorn. The HL gearbox was raised maybe 3mm at the front, and lowered at the back. The adjustments shown will position the sprocket more or less at the proper height instead of being too low like all HL Panzer IV. This raised the gearbox just enough to be flush with the top of the hull so that the top glacis will sit correctly on the hull. I did not have to buy a new low gearbox or trim the metal of the HL gearbox. The chassis was provided with a Mato Panzer III metal sprocket and external gearbox. This is not entirely correct because the reference shown a somewhat different type of Panzer III gearbox, smaller with 2 fins, but since it is hidden behind the sprocket, it does not really matter. What you want to avoid is having a big panzer IV gearbox sticking out.
Then the return rollers were repositioned as per reference, and going downhill from the second one on a strait line all the way to the idler wheel. However, not all references show the same arrangement. The graph shown in the book "Panzer at Saumur" has the angle starting with the first roller. So, there are variations. For sure, the prototypes, earlier Hornisse, and late Nashorn will show differences in many areas that must be accounted for and not mixed up.
A few more items to put on the lower hull, and then I will attack the upper hull. That is where the fun starts.
Regards,
Louis
- Attachments
-
- Juckenburg Nashorn
-
- Juckenburg Nashorn
-
- Juckenburg Nashorn
-
- Juckenburg Nashorn
-
- Juckenburg Nashorn
-
- Juckenburg Nashorn parts
-
- Juckenburg Nashorn parts
-
c.rainford73
- Major
- Posts: 6104
- Joined: Thu Aug 25, 2016 7:34 pm
- Location: Connecticut USA
Re: Juckenburg Nashorn
Coming along quite nicely I must say  looks like you have the hull figured out.
looks like you have the hull figured out.Tanks alot....
Re: Juckenburg Nashorn
Hi,
I have broken up the deck and floor that was previously assembled with the kit parts. I did not like it at all. Everything was wrong with it; wrong shapes, wrong panel lines, wrong tread plate type, wrong or missing details, casting issues, weakness with all joints. I even had to reinforce the resin on the tub side with a layer of plastic card in order to try to salvage them from bad moulding. For the cradle, I tried various options to keep as much of the kit parts as possible, but in the end, there is not much left of the original parts when you compare to the first picture of this build.
The gun cradle was raised. I have built a new floor and tub with 0.8 and 0.4 plastic card. I have ordered tread plates and will detail the floor when they arrive. I will scratch build the rest of the panels as per references. It's important to think about the air filters at this stage and plan ahead. Honestly, it is easier for me to scratch build some areaa of the model than trying to reuse the kit parts.
As this tank destroyer is destined to run in the house only and stay mostly on the shelf as a display model, I will seal the upper deck and floor in place for solidity and ease of building. The electronics will be accessible through the former battery trap. The speaker was placed underneath the floor, not much else can fit there. I was never a big fan of smoke units anyway. The gun will be given rotation, and possibly elevation, i'll see.
But a kit is better than no kit. There are some good parts in there. The front glacis does not seem too bad so far. I really hope the gun will be good.
This is one tricky kit, if you want an accurate Nashorn.
Louis
- Attachments
-
- Juckenburg Nashorn
-
- Juckenburg Nashorn
-
- Juckenburg Nashorn
-
- Juckenburg Nashorn
