
I entirely agree Raminator, it is difficult to know where to stop with the hull reinforcement, Probably what we do can often be overkill but then, remember, these tanks were quite over-engineered so perhaps we are in keeping with history. I think too that great strength than is needed is perhaps better than no enough, though the increased weight might then be a problem. This KT is starting to weight in pretty heavy and testing (hard) did have the stock motor running very warm to hot (I may need to upgrade these to the JP 450's others have suggested. At least I know this will be no problem for the hull and gearboxes).
Tao, yes, the stock Tarr is very good but the acoustic smoker seems like a great idea though I admit I'm a little hazy at the moment on how these are set up. I might go with an IBU2 or 3 later, as you suggest, or even TK22 with the TBS upgrade but I'm going to see how this works out for my M36B1 first (you might recall from that thread), and when I get time. I also want to try and keep my tanks on the same battle system so I don't know if Clarke and IBU are, or can be, compatible?
Another Torro Pro-Metal King Tiger
Re: Another Torro Pro-Metal King Tiger
strmnd54 thread in the forum.. how he built his /tutorial is really perfect. After that.. to make it even more simple I just used the TARR I and mounted the one inch speaker/ cup on top (2.5 inch total height) in place of the existing fan. Once you get the hang of it the whole thing start to finish can be done in a few hours or less. The key is to follow the measurements..the 1mm gap etc. The one thing I found useful was to be able to adjust the volume of the acoustic speaker independently to adjust the smoke output via the overall volume coming from the main speaker. And the small speaker doesn't need much volume to really push out the smoke plus it can't handle the same output as an FRS8 etc.
(I also have small voltage regulator going to the TARR input so the voltage to the resistor can be tweaked too..I like it around a steady 8.25 volts)
(I also have small voltage regulator going to the TARR input so the voltage to the resistor can be tweaked too..I like it around a steady 8.25 volts)
Re: Another Torro Pro-Metal King Tiger
[quote="Eastern Front
I believe the lock goes on the Hatches on top of the Turret, 1940's era automotive anti theft device....
Cheers![/quote]
Thanks Eastern Front- so the idea was to stop those pesky ol' allies sneaking up under cover of darkness and hot-wiring their shiny new KT? Yep, a bet that happened a lot during the war - the insurance premiums on these tanks must have been sky high!
Still at least I know where they are intended to go!
Re: Another Torro Pro-Metal King Tiger
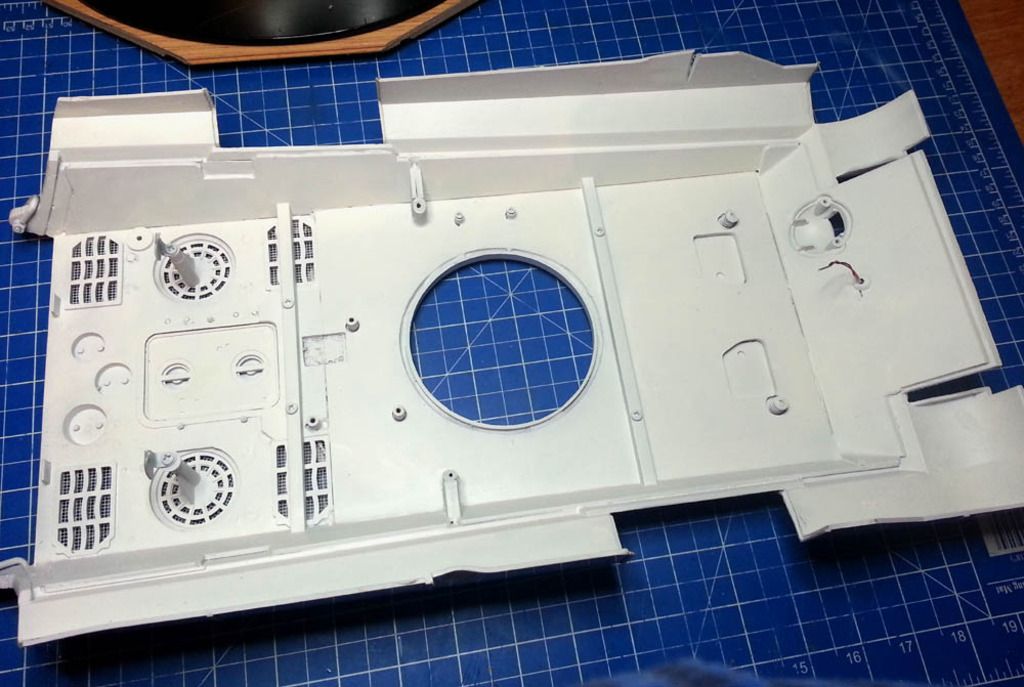
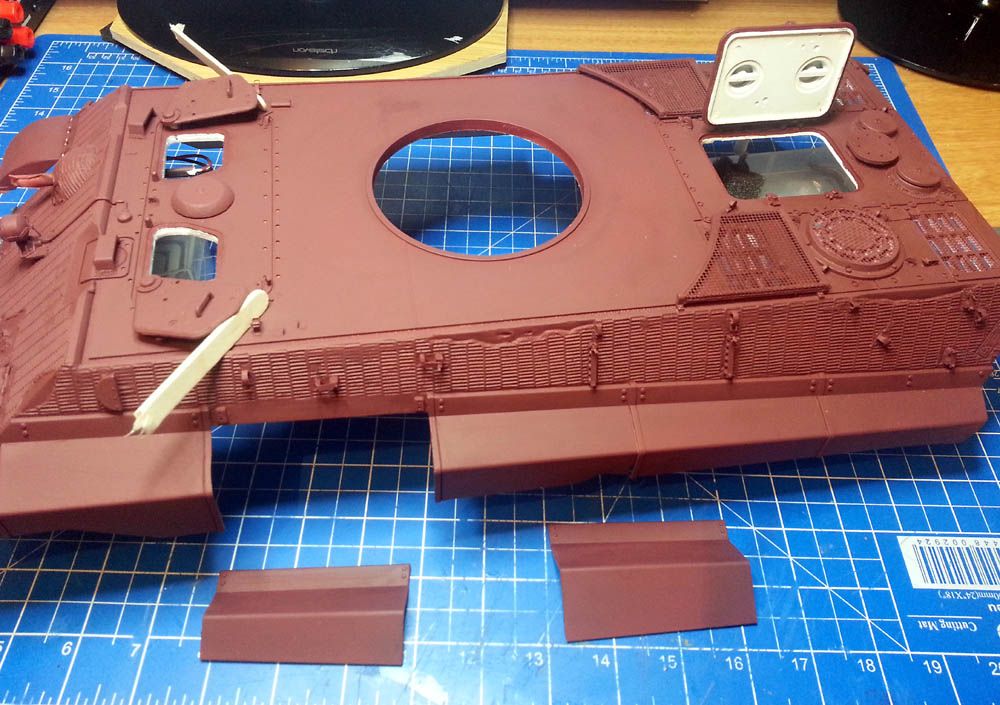
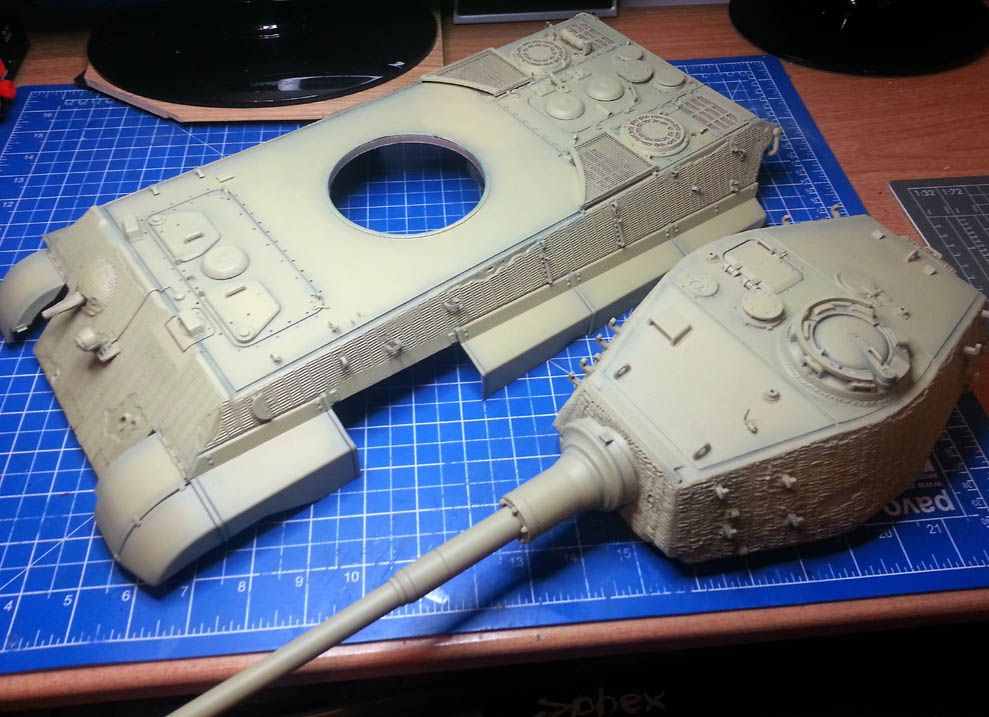
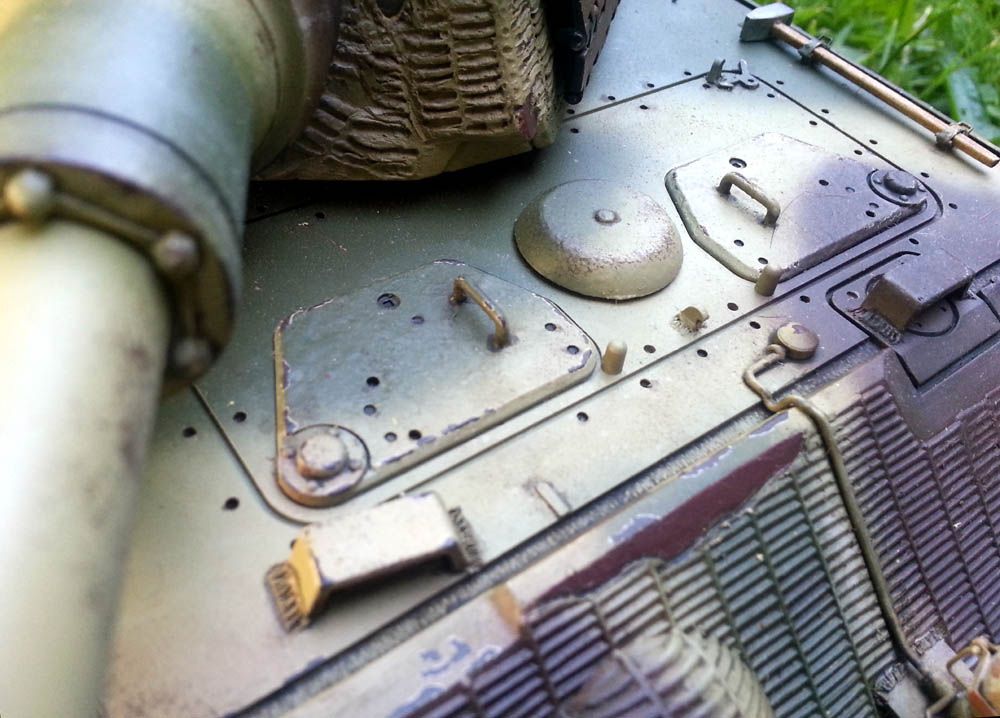
Just some minor updates. Having more or less finished the underside of the upper hull (for now at least) I primered it then gave it a nice coat of off-white and satin varnish (the underside of the side fenders will of course be painted red oxide later). As I understand it this was the color for the KT interiors, although later the factory dispensed with this and sent them out in just the German red oxide primer. I just wanted to have the hatch interiors white on this account, although I'm not sure the engine compartment interior/hatch would have been white like the turret, etc. Whatever, I just like it better than the raw plastic or red oxide look
Moving on to the top side of the upper hull I added brass bolts (1.2mm) to the rear engine deck mesh vent covers as the photo etch bolt is very faint and rather false looking;
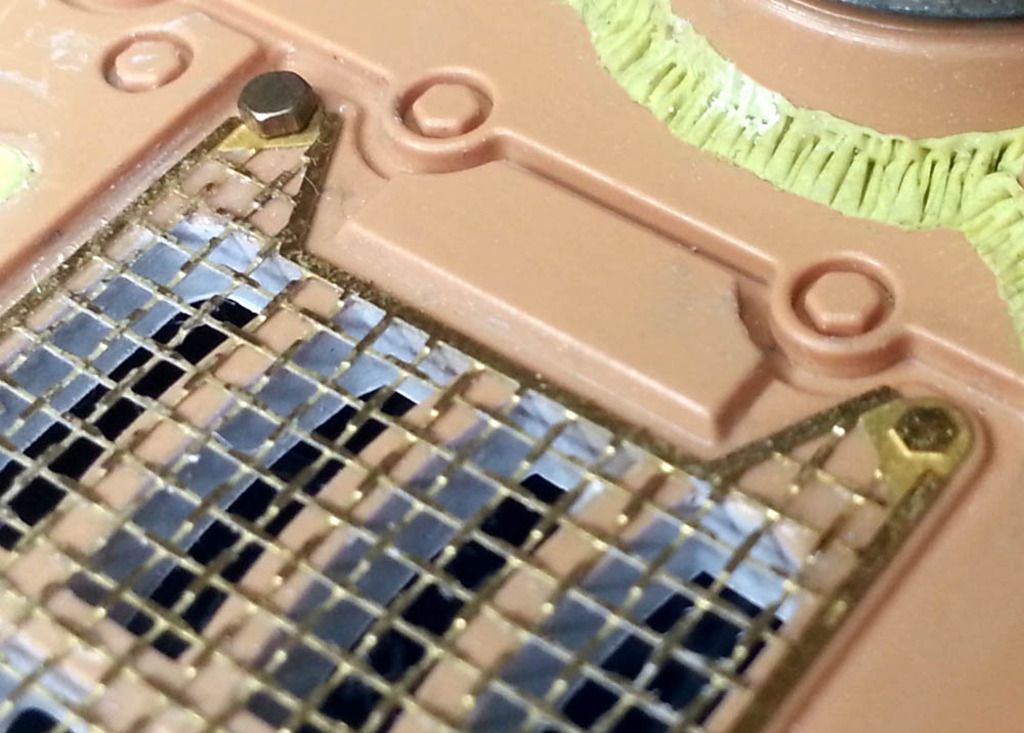
As someone else pointed out, the Torro plastic anti-mine mesh covers on the engine deck toward the turret are too thick. The PE mesh on these is fine but the plastic needs some reworking;
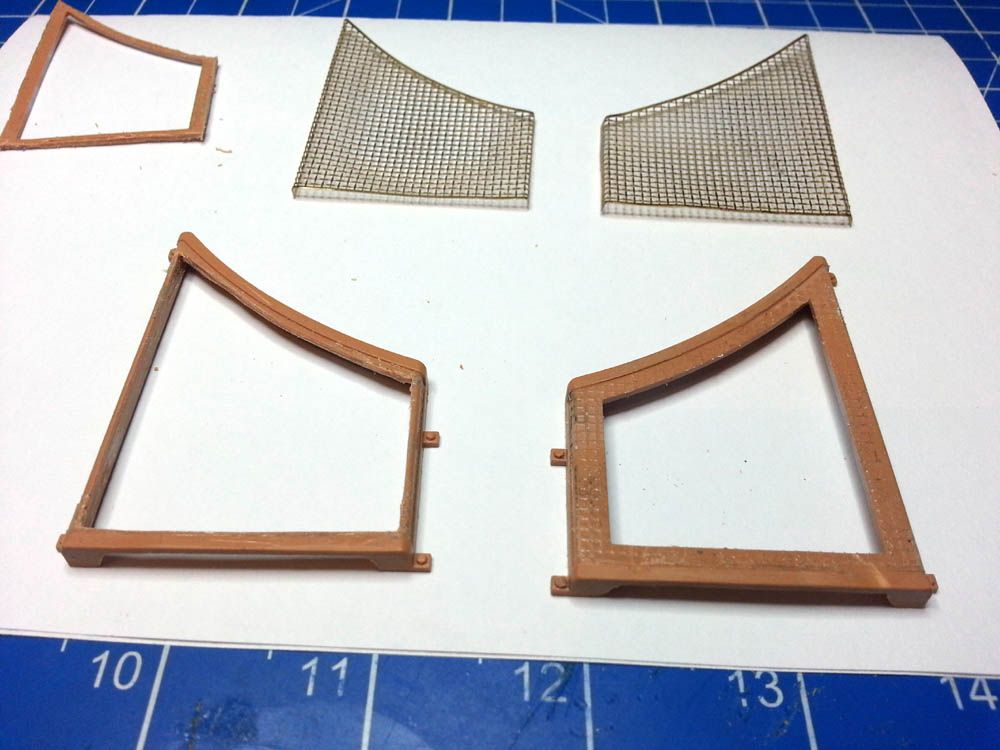
In the above picture the original is on the right. U started but cutting a whole section out of the frame. I then removed more plastic in various places until I had the more correct shape and form;
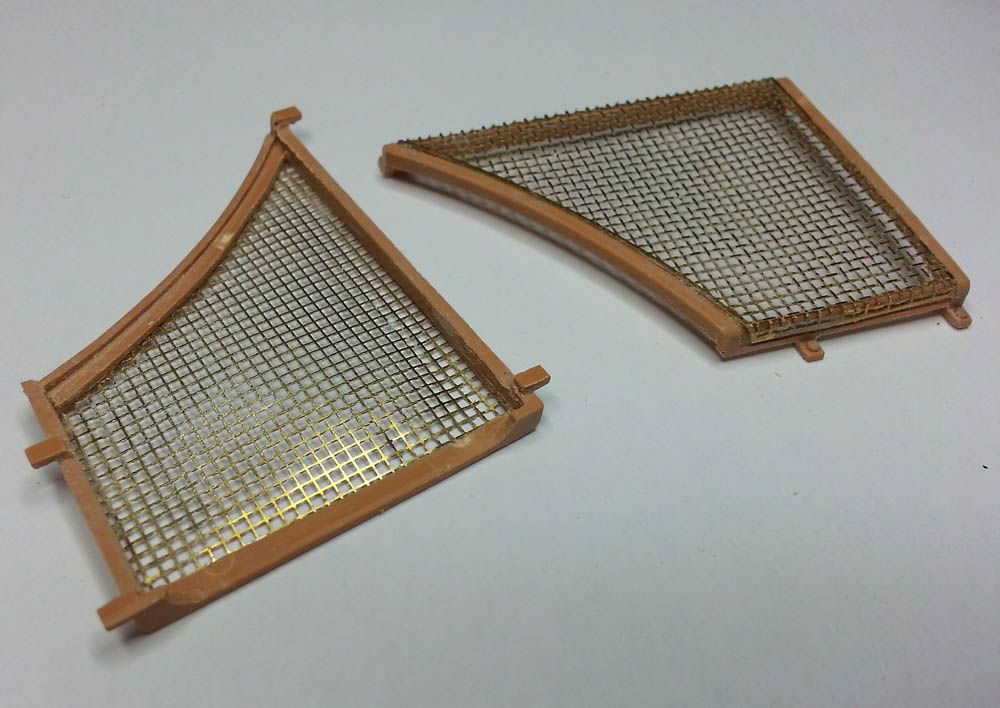
That's all for now. I will be away for a short while (work) but when I return I will start to add all the further detail and PE parts, cables, tools, etc...................
Re: Another Torro Pro-Metal King Tiger
Update: KT Progress
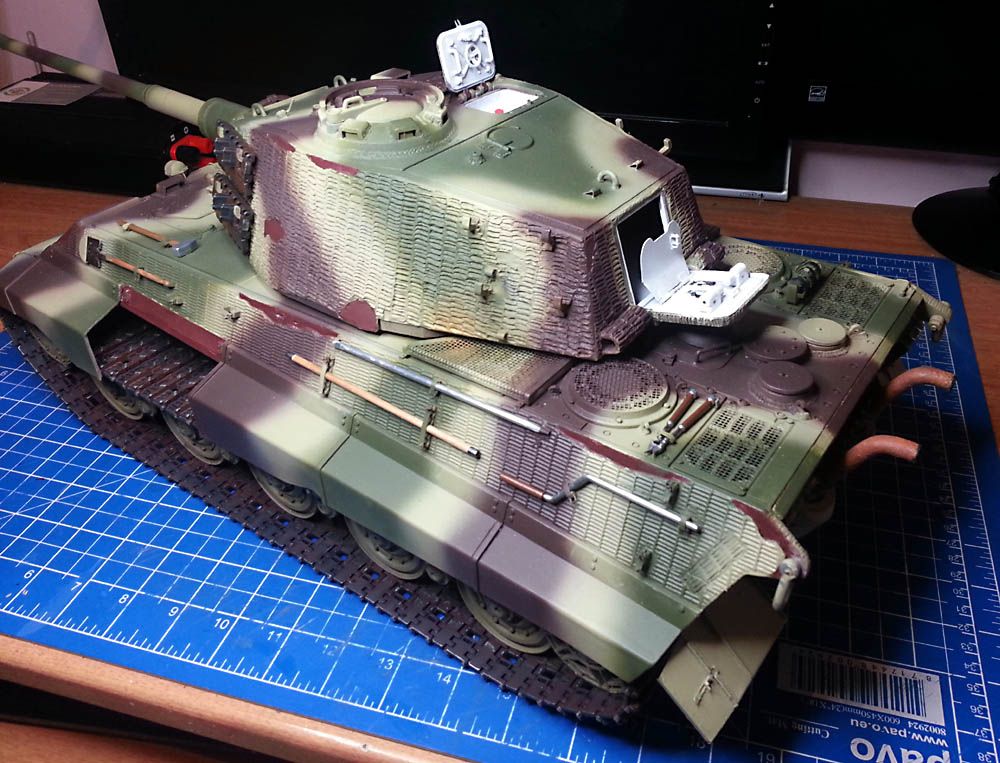
Well I thought I would give a little update; - been working on the upper hull detailing and progress has been slow to say the least. I expected this as my first build, working with some of the photo-etch has been a challenge to say the least. However I have got most of what I planned completed now and will hopefully be able to move on to painting and weathering soon. In the following picture new feature include the front fenders which I spent some time double soldering to make strong as this will be working RC tank not a display piece (mostly). As I mentioned before I kept the plastic side fenders and this did present one or two problems but it worked out ok in the end;

Here are the spade and sledge hammer in more detail. The handles are from hard wood and all the clasps work like the real ones - which I think is quite cool! (little things please little minds );
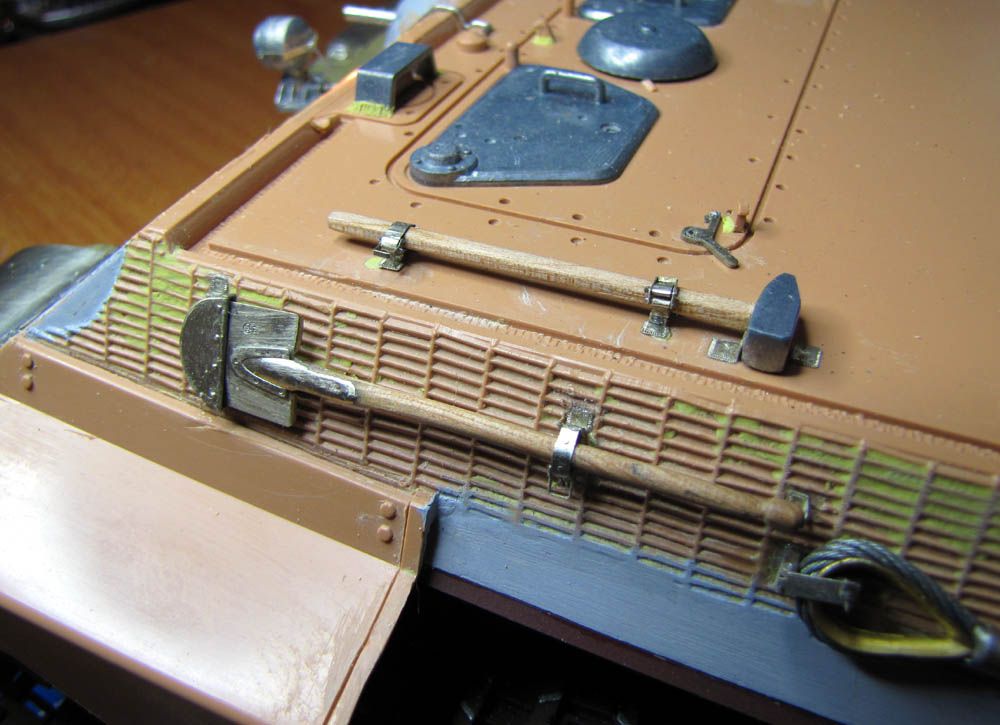
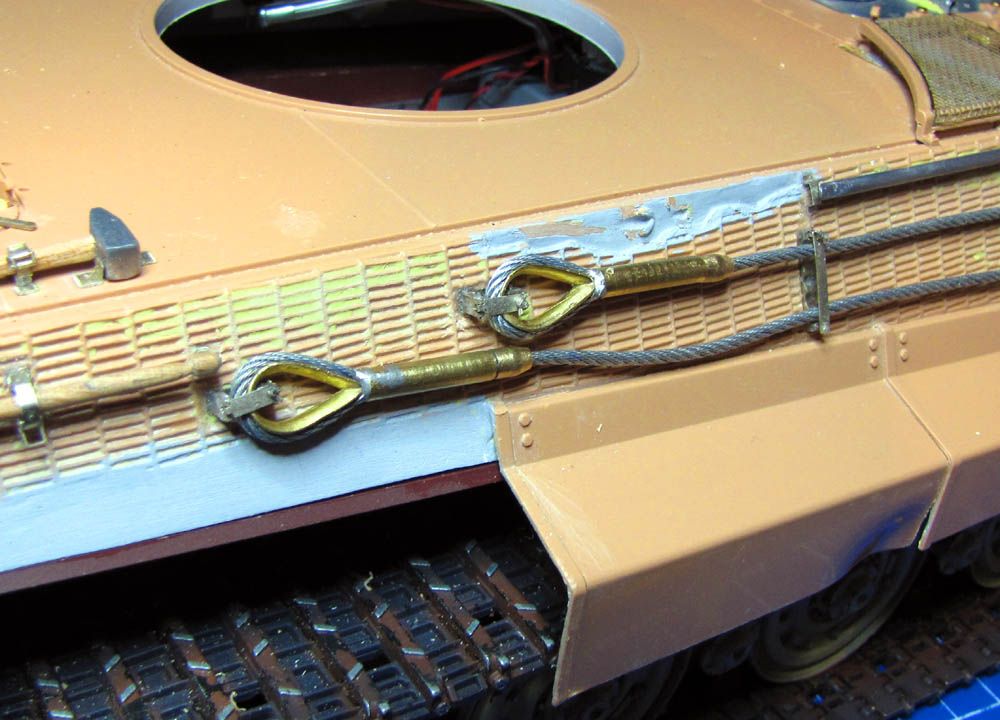
The steel cables were quite hard to bend to shape, even using heat, and to keep everything together I soldered tubes and eyelets too (it doesn't tell you to do this in the instructions though). I found it best to shape them by using the old plastic cables as a template and then a little adjustment on the tank (I need to add the side fender fixings still as you can see).
The crowbar, lifting handle, and wire cutters have been re-worked and will need painting too. Here can also be seen the re-worked anti-mine grills now in place and you might just be able to make out the seriously pain in the butt wingnuts on the clasps. The inset picture shows the detail of the engine hatch lock (supplied by DKLM);
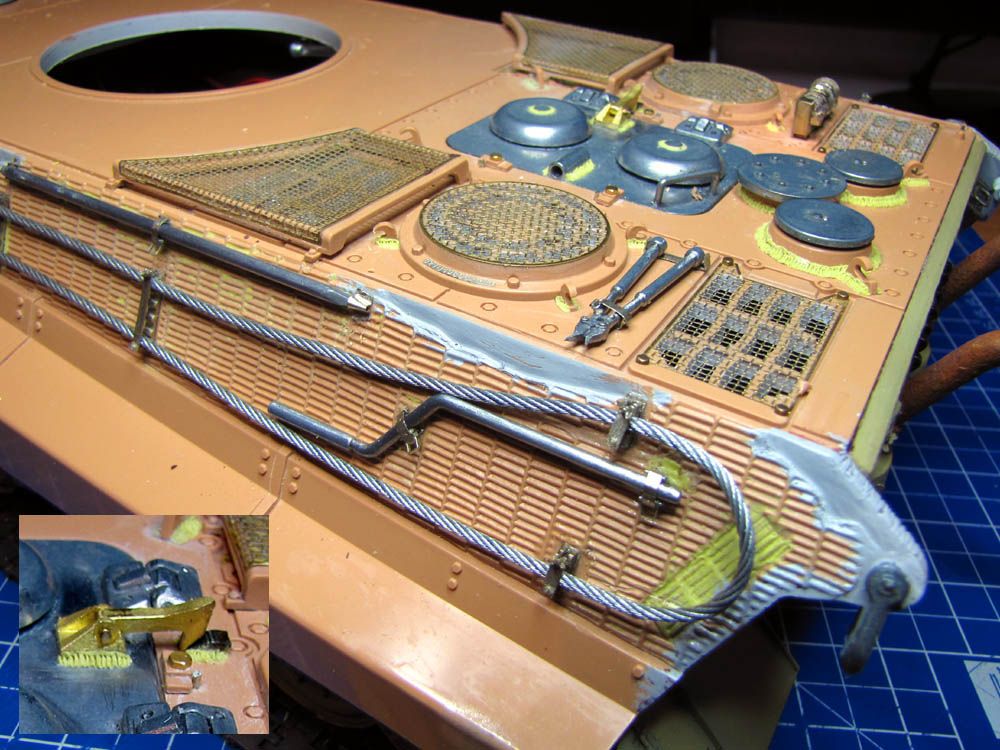
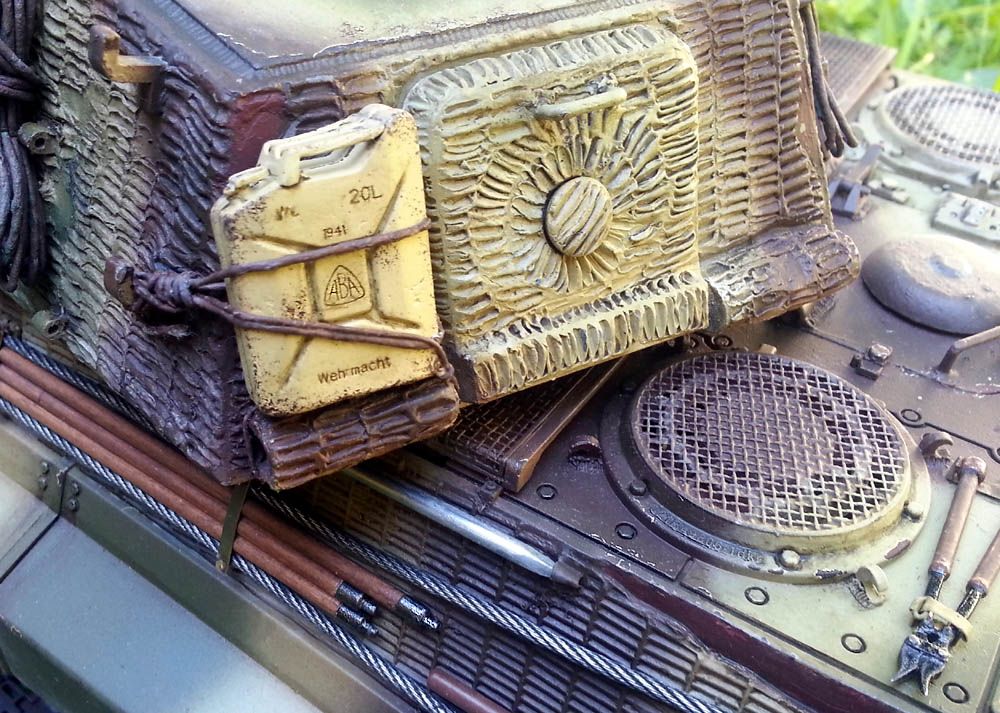
Next is fire extinguisher and Schumo antenna mount and notice the serial number on the engine fan vent. The over flow pipe was proving tricky until someone suggested using solder instead of wire (doh, the simple ideas are sometimes the best for sure!). Oh and did I mention those pesky wingnuts........?

And here is the axe and cables, etc on the other side.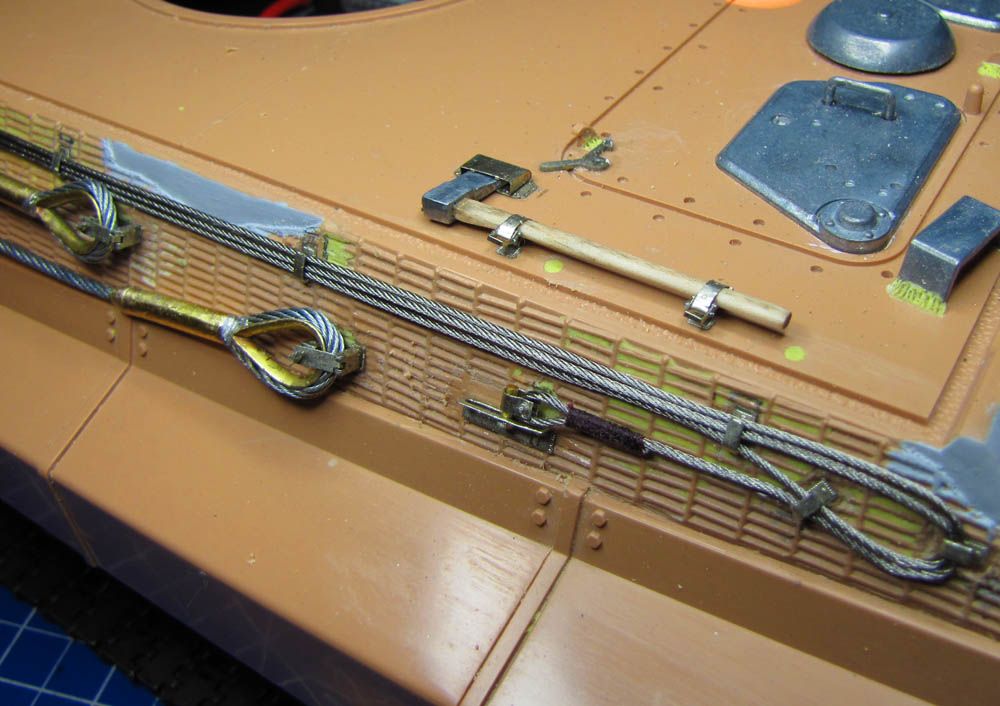
I am presently missing an antenna tube and barrel cleaning rods but otherwise it's pretty much ready for priming.
Well I thought I would give a little update; - been working on the upper hull detailing and progress has been slow to say the least. I expected this as my first build, working with some of the photo-etch has been a challenge to say the least. However I have got most of what I planned completed now and will hopefully be able to move on to painting and weathering soon. In the following picture new feature include the front fenders which I spent some time double soldering to make strong as this will be working RC tank not a display piece (mostly). As I mentioned before I kept the plastic side fenders and this did present one or two problems but it worked out ok in the end;

Here are the spade and sledge hammer in more detail. The handles are from hard wood and all the clasps work like the real ones - which I think is quite cool! (little things please little minds

The steel cables were quite hard to bend to shape, even using heat, and to keep everything together I soldered tubes and eyelets too (it doesn't tell you to do this in the instructions though). I found it best to shape them by using the old plastic cables as a template and then a little adjustment on the tank (I need to add the side fender fixings still as you can see).

The crowbar, lifting handle, and wire cutters have been re-worked and will need painting too. Here can also be seen the re-worked anti-mine grills now in place and you might just be able to make out the seriously pain in the butt

Next is fire extinguisher and Schumo antenna mount and notice the serial number on the engine fan vent. The over flow pipe was proving tricky until someone suggested using solder instead of wire (doh, the simple ideas are sometimes the best for sure!). Oh and did I mention those pesky wingnuts........?

And here is the axe and cables, etc on the other side.

I am presently missing an antenna tube and barrel cleaning rods but otherwise it's pretty much ready for priming.
Re: Another Torro Pro-Metal King Tiger
Well, I had a nice surprise from the postie so I decided to take a break from all the detail work on the upper hull, return to the lower hull/chassis, and replace the Torro/Taigen electronics with this nice new controller from Clark:
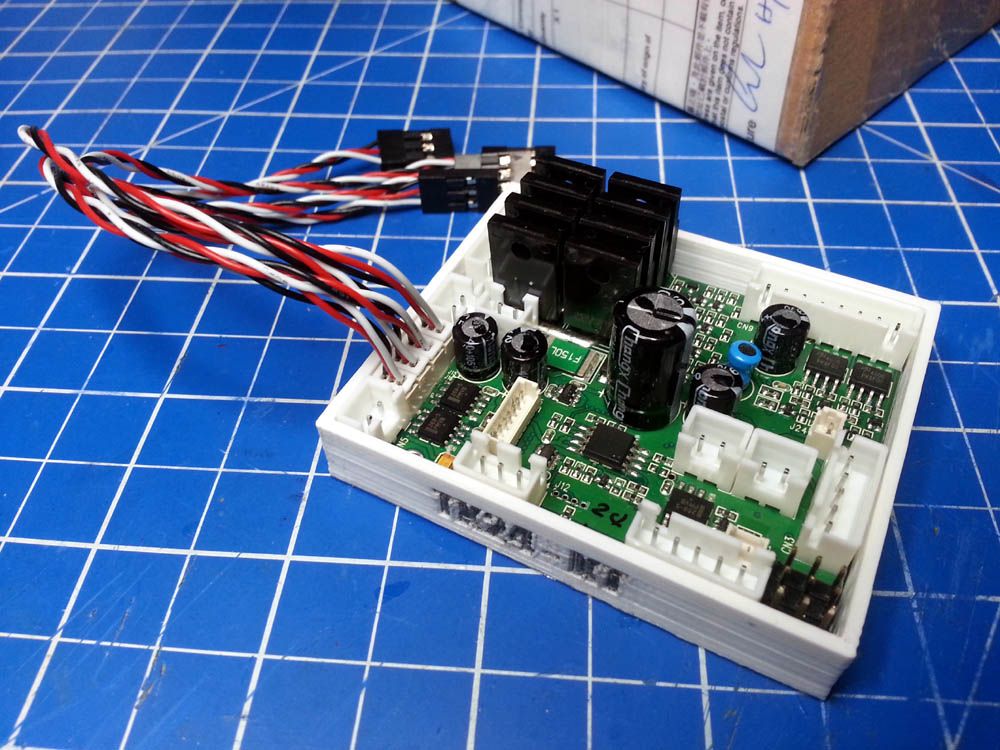
This is the relatively new TK24 tank control board supplied by DKLM (excellent service) . Essentially it is an upgraded TK22 board with a number of enhancements including improved engine sounds and transitions (fuzzy logic wot not, etc), proportional smoker output, neutral gear selection, and a 2nd machine gun (e.g. co-axil gun), etc. Here it is installed along with the voltage step-up board for the Tarr smoker (which now works brilliantly thanks to advice from Tao, Tankbear, and others on these forums);
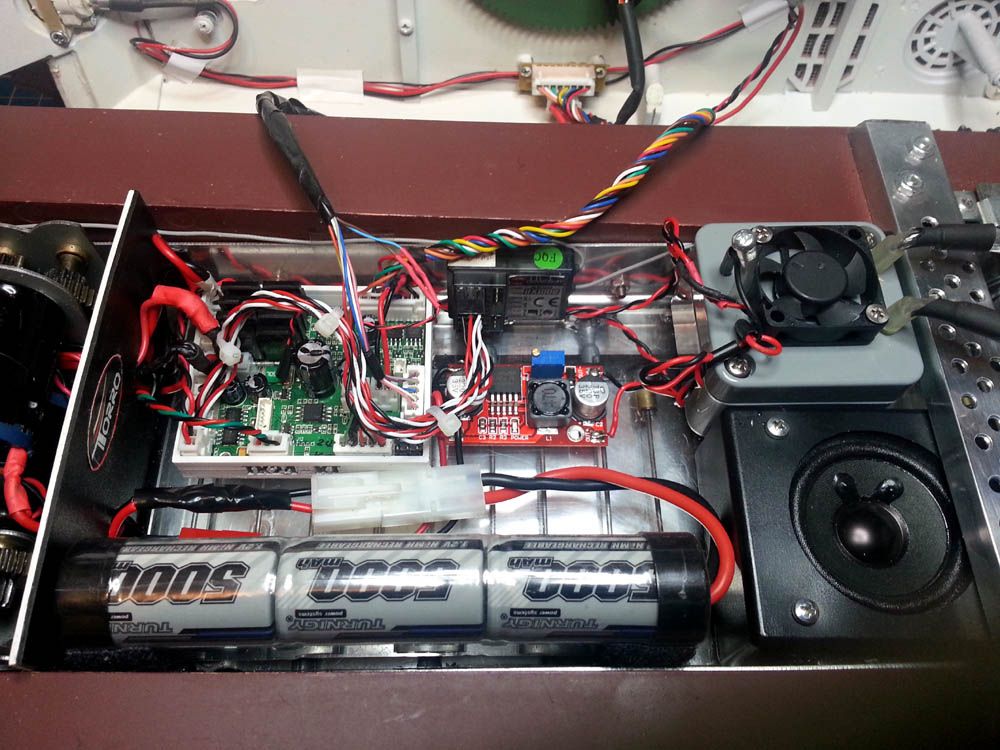
I have seen it suggested this is more or less a plug and play replacement (with a couple of small mods) for Taigen/HL electronics - REALLY!! This took me a couple of days to sort out, not least because of the poor Chinese wiring and the universal joint for the 360 turret traverse. In the end I just rewired it all according to the spec I gleaned from the Clark site. I opted to keep the Asiatam recoil unit but this is unreliable now and I plan to replace with a servo unit as soon as I can get around to it.
I had planned on waiting a bit before the electronics upgrade but what I will say is that I'm glad I did it now, despite the nightmare wiring marathon. The difference over the Taigen 2.4gz is night and day and the improvements over the TK22, whilst less dramatic, are significant and worthwhile (I particularly like the selectable neutral gear).
Anyway, back to the work in hand, detailing painting, etc.
Re: Another Torro Pro-Metal King Tiger
Having finished the detailing (for now) I am at last able to move to the final stages of my first build - Painting and Weathering. The following pics present a selection of the stages I take in the process.
I begun by treating all the metal parts with a thin coat of Mr Hobby Metal Primer before moving on to Vallejo German red oxide primer;
And here is the tank complete with red oxide primer (apologies for rubbish quality on this picture);
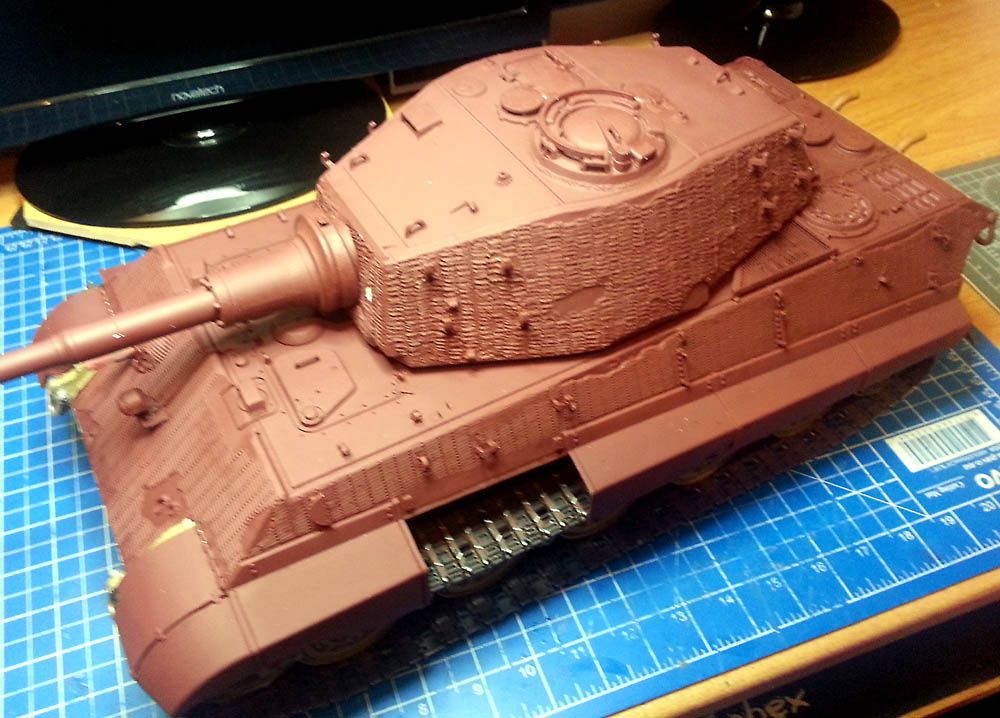
The next stage was to apply the base coat. For this I used Lifecolor's dunkelgelb from their camouflage set 1 for German tanks. The colors of this set are, for my inexperienced eyes, the most realistic but the paint itself was a pain to get through my airbrush. For me Mig Ammo paints have worked best (also Mig has no less than 3 different RAL 7028 dunkelgelb's!) but at this point I was already working with the Lifecolors (on wheels and rear armour) so I actually used some of the Mig Ammo (late '44) dunkelgelb I had for the a first coat and finished with the Lifecolor (if any of this makes sense!). I also did some pre-shading and modulation on the panels though it doesn't show well in the picture;
The base coat looks much lighter in this picture than it is, even though the Lifecolor dunkelgelb has a much more matt finish than the Mig version.
Moving on to the camo this presented me with my first big dilemma - I was committed to a three tone camo finish but in what pattern? Some would be easier to paint than others of course but, this aside, I wanted my first creation to look like a typical representation of a camo KT but at the same time a little unique. In the end I opted for a soft-edged broad 'tiger stripes' loosely based on the pre-Sept 1944 (Poland?) examples with zimmerit I had come across during my limited research; so not very unique in the end! For this I used Lifecolor's olivgrun (ral 8003) and rotbraun (ral 8017).
And here she is all factory fresh, included factory installed battle damage ;
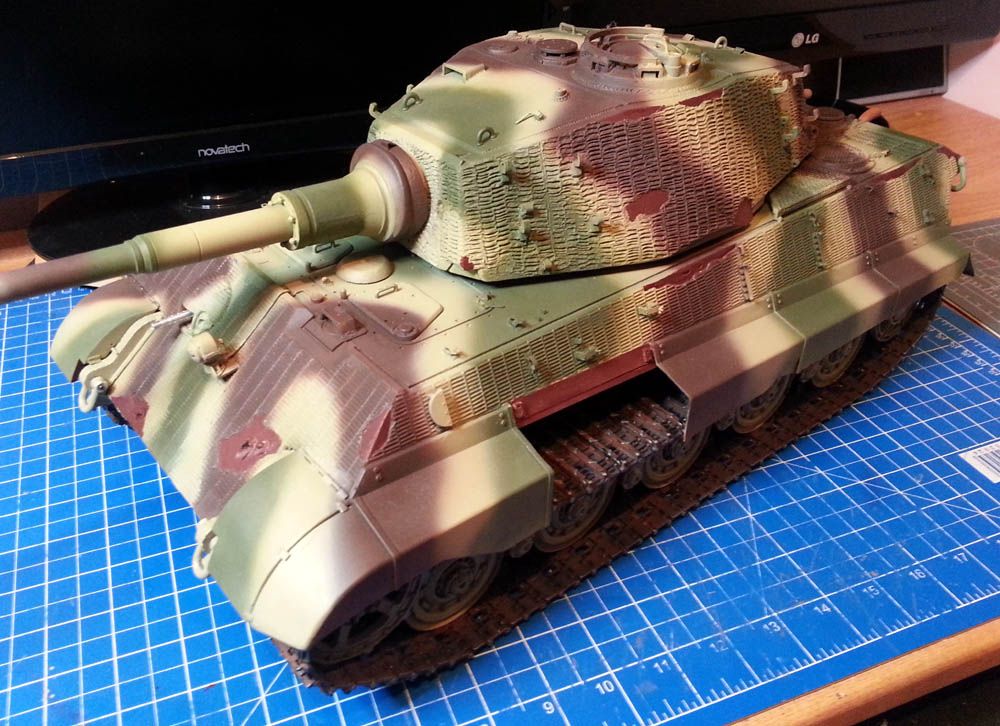
And again, with a few tools, but looking quite flat without weathering, etc;
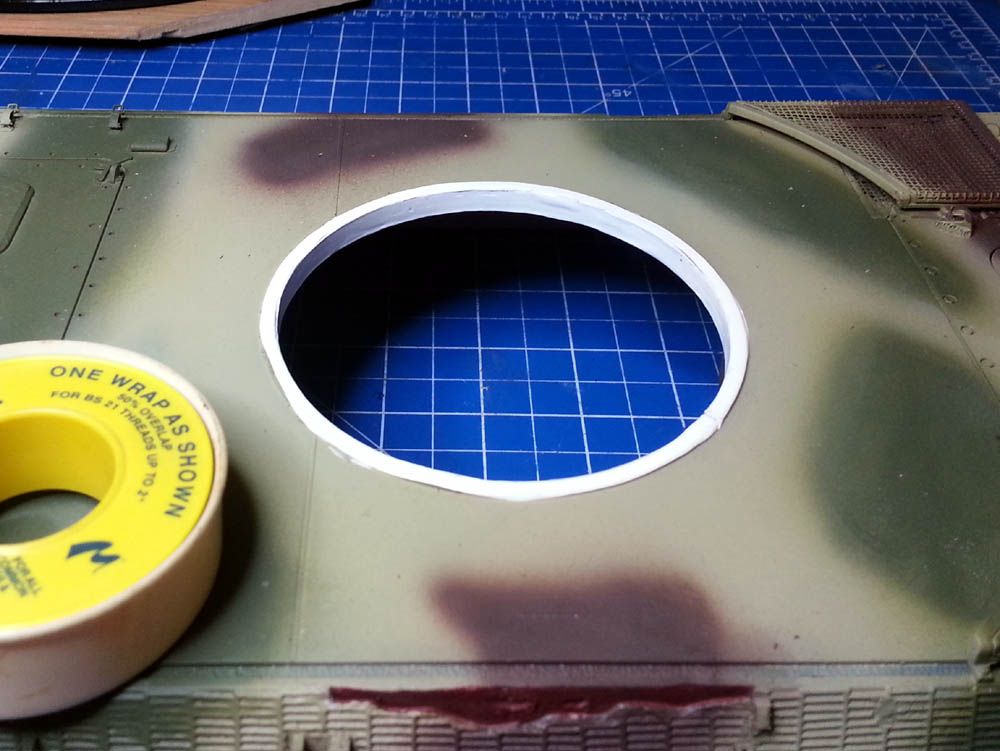
Since in doing this my first build and thread I had, in particular but by no means exclusively, newbies like myself in mind I thought to pop in this quick tip. Probably old hat to the veterans but I was pondering all manner of ways to make the turret run more smoothly on the hull (it is heavy and I found tends to grip the surfaces). After thinking of retro fitting roller bearings and all manner of other weightier projects I discovered this simple, almost cost free solution. By simply stretching PTFE tape (also called plumbers tape, pipe tape, thread tape, etc) around the inner and upper surfaces of the turret ring on the hull the turret spins very freely indeed. And the beauty is, if and when it wears out it can be easily and cheaply replaced;
Next I move on to the weathering and finishing (phew, at last!)
I begun by treating all the metal parts with a thin coat of Mr Hobby Metal Primer before moving on to Vallejo German red oxide primer;

And here is the tank complete with red oxide primer (apologies for rubbish quality on this picture);

The next stage was to apply the base coat. For this I used Lifecolor's dunkelgelb from their camouflage set 1 for German tanks. The colors of this set are, for my inexperienced eyes, the most realistic but the paint itself was a pain to get through my airbrush. For me Mig Ammo paints have worked best (also Mig has no less than 3 different RAL 7028 dunkelgelb's!) but at this point I was already working with the Lifecolors (on wheels and rear armour) so I actually used some of the Mig Ammo (late '44) dunkelgelb I had for the a first coat and finished with the Lifecolor (if any of this makes sense!). I also did some pre-shading and modulation on the panels though it doesn't show well in the picture;

The base coat looks much lighter in this picture than it is, even though the Lifecolor dunkelgelb has a much more matt finish than the Mig version.
Moving on to the camo this presented me with my first big dilemma - I was committed to a three tone camo finish but in what pattern? Some would be easier to paint than others of course but, this aside, I wanted my first creation to look like a typical representation of a camo KT but at the same time a little unique. In the end I opted for a soft-edged broad 'tiger stripes' loosely based on the pre-Sept 1944 (Poland?) examples with zimmerit I had come across during my limited research; so not very unique in the end! For this I used Lifecolor's olivgrun (ral 8003) and rotbraun (ral 8017).
And here she is all factory fresh, included factory installed battle damage

And again, with a few tools, but looking quite flat without weathering, etc;

Since in doing this my first build and thread I had, in particular but by no means exclusively, newbies like myself in mind I thought to pop in this quick tip. Probably old hat to the veterans but I was pondering all manner of ways to make the turret run more smoothly on the hull (it is heavy and I found tends to grip the surfaces). After thinking of retro fitting roller bearings and all manner of other weightier projects I discovered this simple, almost cost free solution. By simply stretching PTFE tape (also called plumbers tape, pipe tape, thread tape, etc) around the inner and upper surfaces of the turret ring on the hull the turret spins very freely indeed. And the beauty is, if and when it wears out it can be easily and cheaply replaced;

Next I move on to the weathering and finishing (phew, at last!)
Re: Another Torro Pro-Metal King Tiger
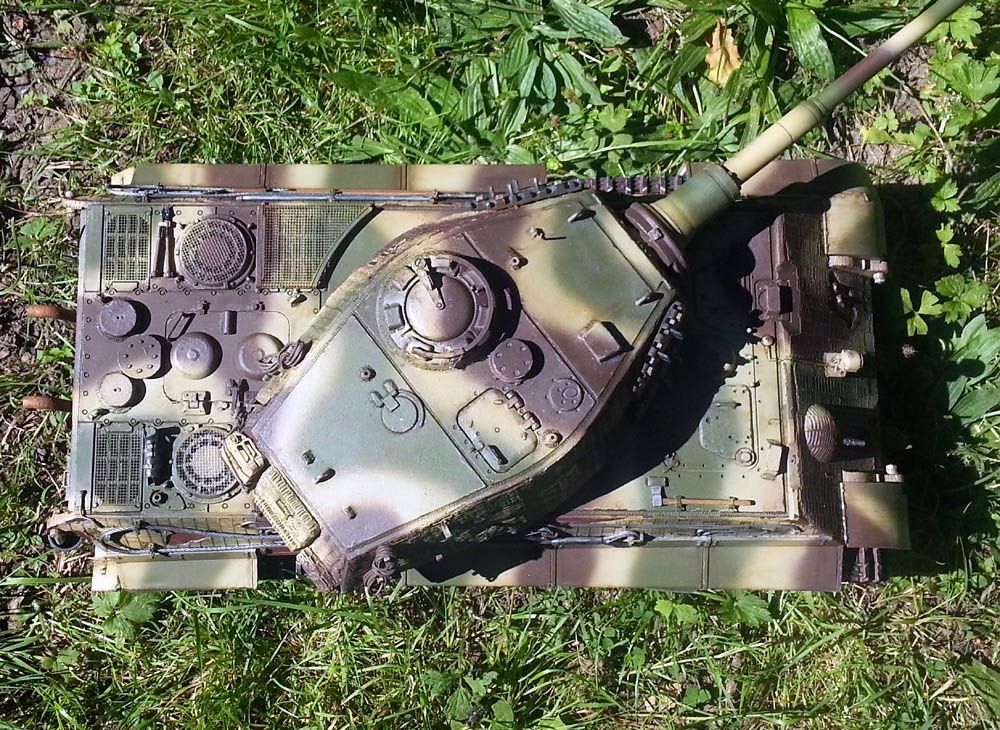
The following pictures are of a work in progress, as they say, as I am still tinkering here and there with the weathering.
Overall, however, I am pretty pleased with how my first effort has come out in the end. My aim was to weather it to look like a battle seasoned tank that had taken damage but not substantial. Additionally I decided to opt for armour weathered in a damp/wet (Euro?) environment rather than dry/dusty (though I have attempted to introduced some dust/grim effects that I thought would naturally occur anyway);
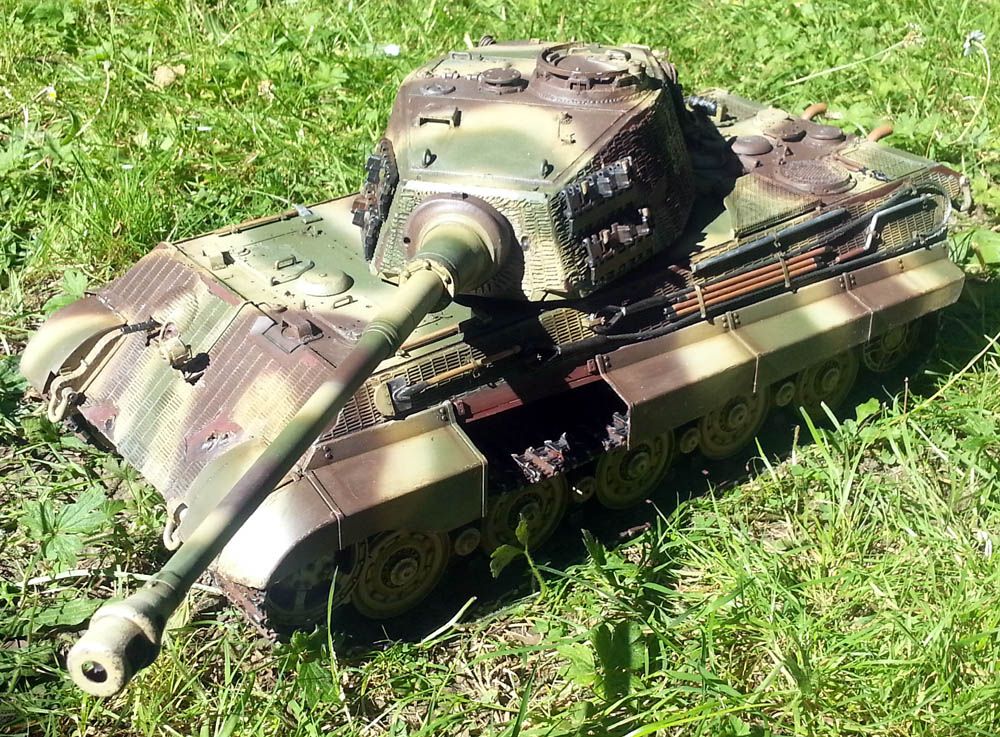
A king tiger soaking up the sun (on his first 'proper' outing)

Ready to rumble.
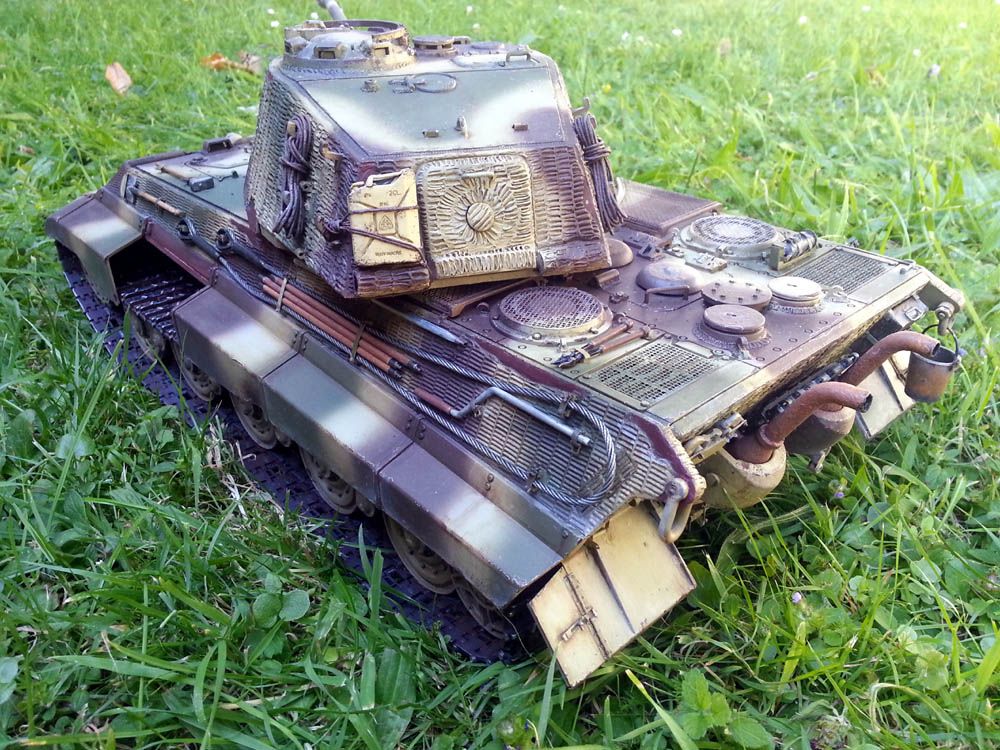
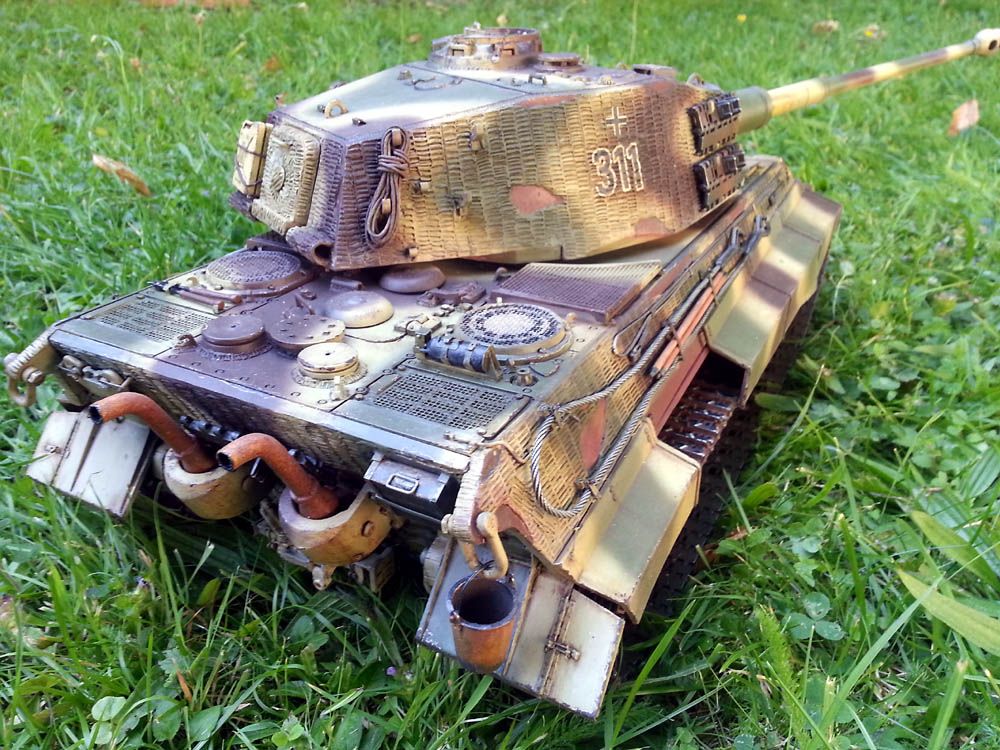
Force of nature (and rear view)
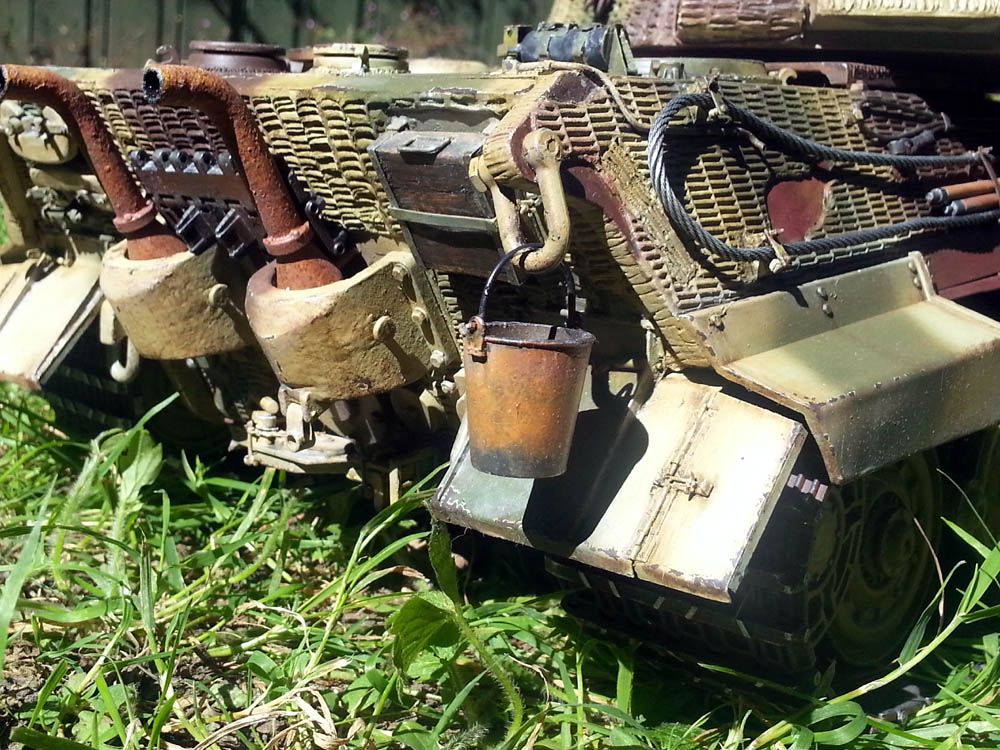
And here we have the obligatory (rusty) bucket!
I just liked the streaking rust effect I got here in particular.
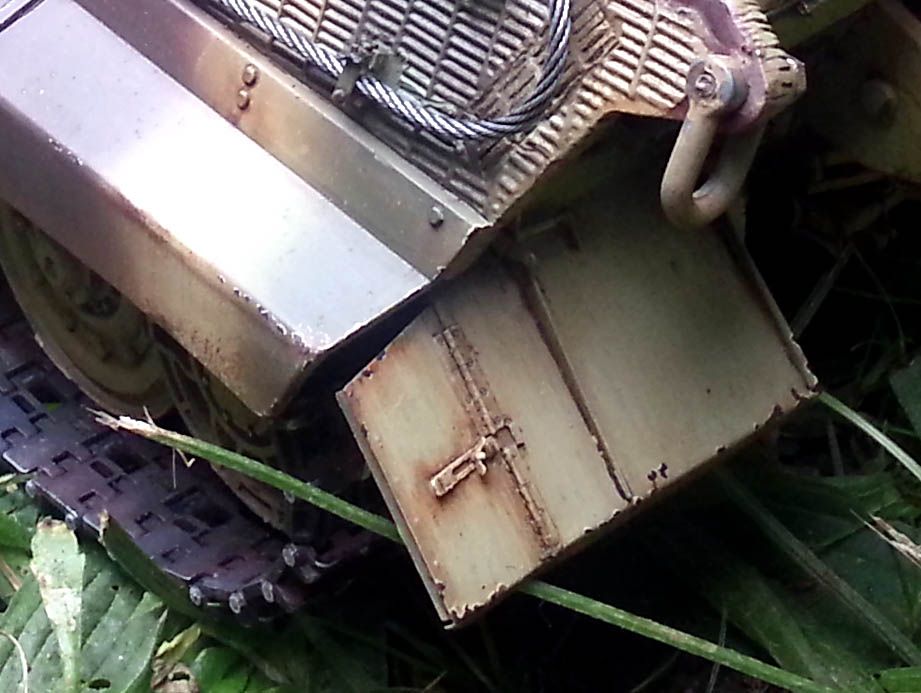
The colors are stronger than this picture suggests - the gap between the front and side fender is somewhat intentional as I have left the front fender free of it (normal) welding to the side (via the little connecting tabs). This was for ease of access in opening the hull to access the internal electronics, etc.

Commander's copola - I'm quite pleased with the chipping effects I got here (using the sponge technique and Mig chipping effect). The little chain on the far side holds the tiny padlock for the gunner's hatch but unfortunately I forgot to take a picture of it .
.

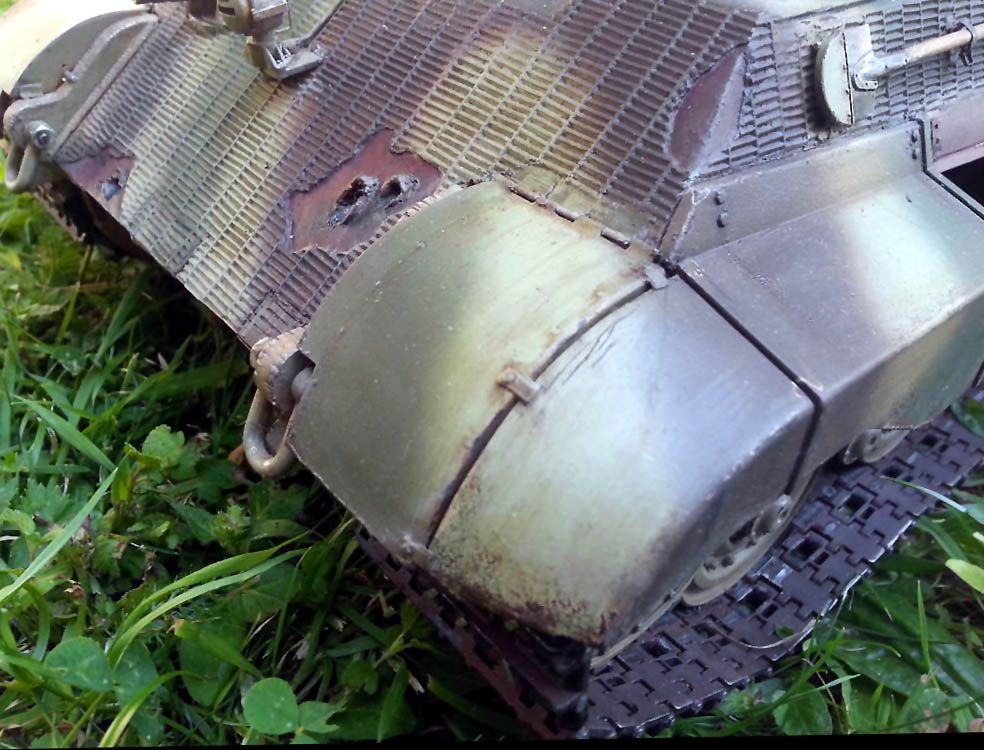
Impact damage to the lower portion of a side fender.

Starting up - Tarr MkII with heater voltage stepped to 8.1v connected direct to battery via main switch (fan proportional from the Clark board).
And that's it for now. I'll update when I get around to upgrading to servo recoil and elevation (and I'm thinking of trialing the Benedini TBS with the TK24, although it sounds pretty good as it is).
Overall, however, I am pretty pleased with how my first effort has come out in the end. My aim was to weather it to look like a battle seasoned tank that had taken damage but not substantial. Additionally I decided to opt for armour weathered in a damp/wet (Euro?) environment rather than dry/dusty (though I have attempted to introduced some dust/grim effects that I thought would naturally occur anyway);

A king tiger soaking up the sun (on his first 'proper' outing)

Ready to rumble.

Force of nature (and rear view)


And here we have the obligatory (rusty) bucket!

I just liked the streaking rust effect I got here in particular.

The colors are stronger than this picture suggests - the gap between the front and side fender is somewhat intentional as I have left the front fender free of it (normal) welding to the side (via the little connecting tabs). This was for ease of access in opening the hull to access the internal electronics, etc.

Commander's copola - I'm quite pleased with the chipping effects I got here (using the sponge technique and Mig chipping effect). The little chain on the far side holds the tiny padlock for the gunner's hatch but unfortunately I forgot to take a picture of it


Impact damage to the lower portion of a side fender.


Starting up - Tarr MkII with heater voltage stepped to 8.1v connected direct to battery via main switch (fan proportional from the Clark board).
And that's it for now. I'll update when I get around to upgrading to servo recoil and elevation (and I'm thinking of trialing the Benedini TBS with the TK24, although it sounds pretty good as it is).
Re: Another Torro Pro-Metal King Tiger
Well done Mr Phibes! 
Greeting Hotte
IG-Panzerjäger Berlin
HL Tiger I late (ElMod)
Torro Kingtiger (ElMod)
Tamiya Tiger I early (ElMod)
Tamiya Panther G (ElMod)
The thinking is allowed to all people, but many are spared. (Curt Goetz 1888-1960)
IG-Panzerjäger Berlin
HL Tiger I late (ElMod)
Torro Kingtiger (ElMod)
Tamiya Tiger I early (ElMod)
Tamiya Panther G (ElMod)
The thinking is allowed to all people, but many are spared. (Curt Goetz 1888-1960)
-
Raminator

- Warrant Officer 2nd Class
- Posts: 1309
- Joined: Tue Aug 11, 2015 9:57 am
- Location: Newcastle, Australia
Re: Another Torro Pro-Metal King Tiger
Awesome progress, Doctor. It looks fantastic, something to be proud of for sure.
I can't believe how quickly and completely you've brought everything together, it inspires me to get off my arse and make some more time for my own projects.
I can't believe how quickly and completely you've brought everything together, it inspires me to get off my arse and make some more time for my own projects.
