I have been wanting the taigen hull for the longest time. As usual, money's tight as it is for many of us, $100 is a not inconsiderable sum unfortunately-so that hull will have to wait indefinitely. in the meantime though, I wanted my metal tracks to work and quit climbing inside the rear idler all the time.

I got metal tracks at a Matomart/Ali Express sale for $50 shipped. I like the aesthetics, the weight and heft. But I think maybe the metal tracks are one of those things that when you don't have them on your tank, you almost feel like you have to have them,until you actually have them...they'll probably be the last metal set I ever buy for any tank. BTW i was looking on that site today, and they have the new sealed pin Tiger 1 metal tracks available now for $58 SHIPPED...

oh well! So my goals for this project, quit throwing tracks and keep the pin maintenance to a minimum. And do it all as cheaply as possible.
As for the pins, I simply drive the tank and inspect the pins after every run. So whatever pins are sticking out at the en, they get a small drop of CA glue and then shoved back in, and that's that! The number of walking pins does seem to be decreasing at least. Two or three unglued pins left over for track removal should work, just need to remember to mark them for easy identification I think...
To address the track throwing problem.the left side has a tendency to jump inside the rear idler. Removed one track each side from 99 to 98, but the tracks still jumped the idler. Finally I just did what everyone says to do, removed one more to leave 97 tracks each side, and knock wood, this seems to have fixed it. Even fast turns and climbs etc. and the tracks stay put.
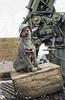
The tracks are of course very heavy, and that fact plus an all plastic hull, made me want to reinforce the hull to minimize flex and possible cracking of the plastic in future. Before I got the metal tracks, I had already glued some hollow square carbon fiber on the bottom of the hull (interior hull space always at a premium) in a sort of "ladder" pattern...not sure what good this did, if any, it was probably just a waste of time- I'd have been better off to simply glue and screw some 1/16" sheet metal underneath instead. But I thought I'd try some more metal reinforcing. I already had one cross brace on the front of the hull, made from 1" x 1/8" thick aluminum bar stock. To this I added a second brace, immediately in front of the rear hull...then i found some L-shaped alumin that cost $3.50 for 3 feet. I used dremel, file and hacksaw to cut these to shape and I glued and screwed it inside the hull and fenders. I found some nice looking cap screws for a finishing touch, they are not in the photos but to be added back later.
(BTW for these images I switched image hosts, I've given up on Photobucket, they have become buggy recently: pages coming up in tiny font size, pages freezing and otherwise being problematic, so I gave up and just switched to Tinypic).

One of the two pieces cut and painted, They fit in between the front and rear braces, on the hull and fender edges. The idea to reduce or eliminate hull flex. The slot in the middle is to clear the magnets that are meant as hull hold downs...I sanded, primed and painted the braces but after all that handling, filing, gluing etc the paint did not really come out looking nice. they need a touch up, by brush I think.

Installed. It occurred to me that I could have put some more thought to this and made the entire square framework as one type of modular unit. Would have been neater and minimize the number of screws, instead of this glorified erector set I managed to create. But I wanted the hull braces to be removable but the side braces are permanent, so perhaps this is the best layout after all. I'll be adding back the screws and some cap nuts I bought (primarily to hold it all together while the glue dried as the clamps I have on hand could only reach so much). Even if the cap screws do give the inside a bit of a WW1 tank appearance

. I used Gorilla glue since it gives generous working time, and does not heat up too much as it dries. Sometimes I will use CA glue on the edges of the material along with the Gorilla if I don't want the piece to move while drying. Even JB weld seems to be hit or miss for plastic to plastic or plastic to metal, I have sometimes applied the JB weld, then the part simply peels off the next day

!

So this whole hull project cost me about $10 not including parts and fittings I had already.
To prevent the gearbox screws eventually working loose from the plastic,which seems inevitable considering the heavy tracks, next step I am going to do is to drill straight through the gearbox mounting holes and add long screws and washer to hold the gearboxes in place. I have looked all over the web for those neat steel gearbox mounting plates- but no one seems to sell them except as part of the gearbox sets.
As for the King tiger-that's next on the list of course, but after painting this tank more times then I can count, I am in no hurry to botch it once more. I'm planning to add metal gearboxes before I paint. The zimmerit was the missing touch and should have added that first but choice of the camo scheme is just as important...here's some of camo schemes I am considering, your feedback is welcome! (If by some chance I nicked anyone's tank images, and you don't like it, please pm me or otherwise let me know and i will take the images down.) Also I have a small collection of camo but by no means comprehensive, anyone having any noteworthy, to you, camo schemes if you have time to put it up, I'd like to see more..the more the better.
#1

#2

#3

#4

To get the metal gearbox for the King Tiger, I cannibalized the metal gearboxes from my Panzer III (finally got THAT to function 100% now too, after soldering in a complete turret female connector and wires-but that's a story for another post!) So the Mark III is just using the plastic gearboxes now. It was just a matter of swapping the output shafts. It took me a while to realize that all these HL gearboxes are the same, as far as I can tell, the only apparent difference being long shafts or or short. The people who sell the gearboxes ought to just include one pair each type of shaft with every gearbox set they sell you, rather then waste time and just confuse people listing which type of tank it's supposed to be for. If there's any difference besides shaft length between these gearboxes, I'd like to know what the difference could be.