Heng Long Pershing Rebuild
-
PainlessWolf

- Colonel
- Posts: 7864
- Joined: Sun Feb 26, 2012 9:09 pm
- Location: Southern Colorado Rocky Mountains
Re: Heng Long Pershing Rebuild
Nothing in the Post today tho' I note that the metal idlers and mounts are on their way from Oz. I'm going to have to order two more metal wheels to replace the first pair of road wheels as well. I cannot see any way short of drilling out the center caps on these old style wheels to salvage them enough to even use as stowage. I wanted to weight down the front of the tank a little so it's not a bad thing. I may even replace all of the road wheels and suspension arms with the metal ones in the future if I go full metal on with tracks and sprockets. I don't see it happening right now but the option of removable rubber tires like the Tamiya will make painting these metal ones a lot easier. Tonight I removed the rest of the plastic radiator cap and mounted Woz's amazin' 3D printed cap and hinges in it's place. I searched for a bit to find appropriate metal pins to keep the cap on once the hinges were glued on and came across a large paper clip that worked out great. After that, I put Tamiya's two piece front tow hooks on the HL mounts and started filing down the HL frogeye LEDs in the headlights to mount Tamiya's ring and lens. I'll have to finish that up tomorrow night. Pics:
- Attachments
-
- A careful start filing down the HL leds to make room for the Tamiya lens and ring. Tamiya also provides black out light lens on the 'E' sprue to further dress up the lights.
- A careful start filing down the HL leds to make room for the Tamiya lens and ring. Tamiya also provides black out light lens on the 'E' sprue to further dress up the lights..JPG (80.52 KiB) Viewed 4028 times
-
- Simple two piece Tamiya tow hooks attach directly to the HL mounts with no modding needed.
- Simple two piece Tamiya tow hooks attach directly to the HL mounts with no modding needed..JPG (95.27 KiB) Viewed 4028 times
-
- The cap and hinges were hand drilled with my Yankee drill and a #61 bit while still mounted on the plastic 'paper' they came on.
- The cap and hinges were hand drilled with my Yankee drill and a #61 bit while still mounted on the plastic 'paper' they came on..JPG (88.61 KiB) Viewed 4028 times
-
- Going back to my scribing kit, I used a flat blade and carefully shaved the rest of the remnants off then sanded with very fine grit paper to smooth it out.
- Going back to my scribing kit, I used a flat blade and carefully shaved the rest of the remnants off then sanded with very fine grit paper to smooth it out..JPG (95.85 KiB) Viewed 4028 times
-
- I used the Dremel with a small sanding tube and removed most of the cap and hinges.
- I used the Dremel with a small sanding tube and removed most of the cap and hinges..JPG (84.71 KiB) Viewed 4028 times
-
- Starting with the molded cap with most of the antenna tower already shaved off.
- Starting with the molded cap with most of the antenna tower already shaved off..JPG (82.02 KiB) Viewed 4028 times
...Money!? What's that!?...
Re: Heng Long Pershing Rebuild
Still lots of work done Painless... really like the dimension Woz's cap adds ... think I might have to redo at least one of my Shermans lol..... it looks terrificPainlessWolf wrote:Nothing in the Post today tho' I note that the metal idlers and mounts are on their way from Oz. I'm going to have to order two more metal wheels to replace the first pair of road wheels as well. I cannot see any way short of drilling out the center caps on these old style wheels to salvage them enough to even use as stowage. I wanted to weight down the front of the tank a little so it's not a bad thing. I may even replace all of the road wheels and suspension arms with the metal ones in the future if I go full metal on with tracks and sprockets. I don't see it happening right now but the option of removable rubber tires like the Tamiya will make painting these metal ones a lot easier. Tonight I removed the rest of the plastic radiator cap and mounted Woz's amazin' 3D printed cap and hinges in it's place. I searched for a bit to find appropriate metal pins to keep the cap on once the hinges were glued on and came across a large paper clip that worked out great. After that, I put Tamiya's two piece front tow hooks on the HL mounts and started filing down the HL frogeye LEDs in the headlights to mount Tamiya's ring and lens. I'll have to finish that up tomorrow night. Pics:
ALPHA
-
PainlessWolf
- Colonel
- Posts: 7864
- Joined: Sun Feb 26, 2012 9:09 pm
- Location: Southern Colorado Rocky Mountains
Re: Heng Long Pershing Rebuild
Alpha, thank you. Yes, Woz's work is really a boon and looks much better than the molded caps. It is fully workable and opens either side by pulling a pin. The antenna port it covers might make a decent charge port one of these years. Nothing in the post today so I got started again on the headlights and continued work on the upper deck. Pics:
- Attachments
-
- Last job for the evening was drilling for and gluing into place all of the stowage bin handles from Tamiya.
-
- I added the rest of the torsion bar hinge for the hatches cut to length out of brass rod.
-
- After painting, Tamiya's fiber optic rod will be used for the flash effect.
- After painting, Tamiya's fiber optic rod will be used for the flash effect..JPG (89.82 KiB) Viewed 4017 times
-
- After trimming and drilling both components to match the Tamiya barrel diameter, it all goes together to make a better looking mg.
- After trimming and drilling both components to match the Tamiya barrel diameter, it all goes together to make a better looking mg..JPG (96.83 KiB) Viewed 4017 times
-
- I took a tip from HL and used rubber cement to keep the led in place.
- I took a tip from HL and used rubber cement to keep the led in place..JPG (94.23 KiB) Viewed 4017 times
-
- Tamiya barrel mated up with the brass led carrier.
-
- Components to make a more realistic bow mg.
- Components to make a more realistic bow mg..JPG (87.32 KiB) Viewed 4017 times
-
- Completed headlights with Tamiya ring and lens and blackout cover.
- Completed headlights with Tamiya ring and lens and blackout cover..JPG (81.09 KiB) Viewed 4017 times
-
- Closeup of the sanded led.
- Closeup of the sanded led..JPG (71.93 KiB) Viewed 4017 times
-
- Filed and sanded down, the HL leds look almost like regular headlights
- Filed and sanded down, the HL leds look almost like regular headlights.JPG (79.48 KiB) Viewed 4017 times
...Money!? What's that!?...
-
PainlessWolf
- Colonel
- Posts: 7864
- Joined: Sun Feb 26, 2012 9:09 pm
- Location: Southern Colorado Rocky Mountains
Re: Heng Long Pershing Rebuild
Nothing in the post today. That's not all bad since I am feeling a little under the weather and didn't want to repeat last night's session. I contented myself with continuing to add upper deck detailing and cut out the engine grill stops from pvc strip and glued them on. Pic:
- Attachments
-
- Engine grill stops. I didn't even know that these were needed until I read through the Squadron Signal Book as neither Tamiya nor Heng Long added them.
...Money!? What's that!?...
Re: Heng Long Pershing Rebuild
I didn't check the tracking Painless... hopefully the stuff I sent will be there by friday 
ALPHA
ALPHA
-
PainlessWolf
- Colonel
- Posts: 7864
- Joined: Sun Feb 26, 2012 9:09 pm
- Location: Southern Colorado Rocky Mountains
Re: Heng Long Pershing Rebuild
Good Morning,
No worries, Alpha, I am watching the metal idlers and arms shipment crawl it's way here from Oz and Tank Army. I would _love_ to find those parts here in the States or in the UK so shipping would go quicker. As I now have to order a couple more of the metal road wheels, wanting to find them closer is even more of a thing. I figure that once the first shipment gets here and I see what they are like, I will go from there. RCTank.de has them as well but then I am dealing with the Exchange Rate then.
regards,
Painless
...Money!? What's that!?...
-
Jake79
- Warrant Officer 2nd Class
- Posts: 1062
- Joined: Mon Aug 11, 2014 9:10 pm
- Location: Essex,Colchester, UK
Re: Heng Long Pershing Rebuild
Hey Painless
Really like the look of those head lights, I didn't even know you could buy such things, they make such a difference, nice work..
Jake
Really like the look of those head lights, I didn't even know you could buy such things, they make such a difference, nice work..
Jake
Tamiya: 2 King Tigers
H/L,Taigen :Initial Tiger 1, Panzer III, Kv 2, Panther G, Bulldog, Leo 2A6
H/L,Taigen :Initial Tiger 1, Panzer III, Kv 2, Panther G, Bulldog, Leo 2A6
Re: Heng Long Pershing Rebuild
Yeah it's hard when it comes to heavy bits...reason I like Dave...he always tells you all the details in advance....PainlessWolf wrote:Good Morning,
No worries, Alpha, I am watching the metal idlers and arms shipment crawl it's way here from Oz and Tank Army. I would _love_ to find those parts here in the States or in the UK so shipping would go quicker. As I now have to order a couple more of the metal road wheels, wanting to find them closer is even more of a thing. I figure that once the first shipment gets here and I see what they are like, I will go from there. RCTank.de has them as well but then I am dealing with the Exchange Rate then.
regards,
Painless
ALPHA
-
PainlessWolf
- Colonel
- Posts: 7864
- Joined: Sun Feb 26, 2012 9:09 pm
- Location: Southern Colorado Rocky Mountains
Re: Heng Long Pershing Rebuild
Jake,
Thank you! One of the first things I do when researching a redo or build is see if there are sprues of Tamiya or Schumo parts for the tank. I build what I cannot locate ( or afford ) but have had a lot of luck with Tamiya parts working on HL, Mato or Taigen tanks to help detail them out.
regards,
Painless
...Money!? What's that!?...
-
PainlessWolf
- Colonel
- Posts: 7864
- Joined: Sun Feb 26, 2012 9:09 pm
- Location: Southern Colorado Rocky Mountains
Re: Heng Long Pershing Rebuild
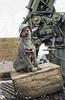
Great day for the Post! It's like time stepped forward and delivered the metal idlers and suspensions as well as Alpha's unique turned brass barrel, buckets, 8 pin cable and a Tamiya 1/35 Stug  I will finish building this beautiful kit, Alpha and use it as a research tool for a Taigen Stug. *bows* Thank you, my Friend. For work, I backed and filled the upper deck mounting holes and discovered that HL has made a couple of changes over the intervening years in their Pershing. Doing a test fit, I saw that the single central mount in the rear between the gearboxes turned into dual mounts on the new upper. I sawed and sanded them away and did the test fit. Six screws will see the two hulls mated as well as seven ( or eight ) ever did. Finishing up, I drilled as small a hole as possible in the caps on the front road wheels and removed them with a phillips head driver. Going to removable caps on their road wheels was one of the best changes HL ever did, that and dropping the use of push rivets to hold suspension arms in place. The new metal arms use hex screws. Now, I need to order two more of the metal wheels and once all are mounted, they will balance the weight of the gearboxes in back pretty well. Pics:
- Attachments
-
- Nearly a decade separates the upper and lower hulls. Not bad at all, HL.
- Nearly a decade separates the upper and lower hulls. Not bad at all, HL..JPG (85.32 KiB) Viewed 3988 times
-
- a nearly perfect fit
- a nearly perfect fit.JPG (99.8 KiB) Viewed 3988 times
-
- a little saw and sand was needed on the new rear upper but it resulted in...
-
- Super nice Tamiya with an interior, workable suspensions and a metal barrel.
-
- and lastly a partially built Stug which I will be happy to complete.
-
- two buckets, one fabric for the Pershing and one copper for a future tank build as well as the eight pin cable for the tank
-
- a one of a kind turned air soft barrel for the Pershing which once mounted will correct the length and diameter of HL's main gun on the tank
-
- Classic Stug packaging from Alpha contained...
-
- Metal idlers and suspension arms
-
- Heavy Metal from Tank Army!
...Money!? What's that!?...
