Page 1 of 1
Surprise another Panther G
Posted: Tue May 22, 2012 8:42 pm
by FreakyDude
So I was in a hobby shop looking for a plane when I spot this Panther G, I asked how much guy says 120 as is, I say whats wrong with it, guy says dunno. One of my patrons asked me to sell it so I scoop it up thinking this is either a prize or a pile of parts.

Both the RX18 and reciever boards are bad and all the extra parts were put on then broken off. You can tell cuz all the holes are filled with plastic bits.

So no problemo I figure what the heck I don't have a Panther and I need a tank for some IR battles.

Replaced both RX18 and reciever board
Drilled a 21/64 hole in both idlers and pressed 2 pieces traxxas sealed bearings (Part 5114 I believe ) in each wheel. An inner and an outer cost $5.49 per pair, see pic below super easy mod.
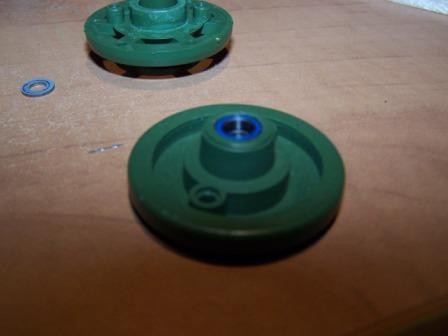
- Panther 008.jpg (15.7 KiB) Viewed 2014 times
then as always I add a fan, and 7 amp fuses to the motors, On this one I built a box for the fuses to sit on and placed them inside the tank.
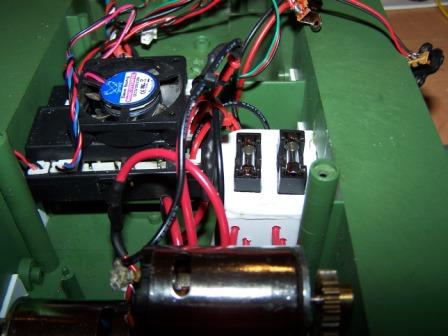
- Panther 006.jpg (28.06 KiB) Viewed 2014 times
I have them inside as I plan on using rare earth magnets on the hull for easy access- ergo no need to keep undoing screws to get at the insides.
3 to 1 series 2 mato gear box goes in

- Panther 001.jpg (25.61 KiB) Viewed 2014 times
I have the Mato metal wheels and suspension arms, stronger springs from Asiatam as well.

- Panther 003.jpg (28.5 KiB) Viewed 2009 times
while i was doing this I also cut small bits of plasticard and closed off the slots for the suspension arms. This will help keep the dust out of the hull as I plan on having this tank as a dirt runnin, hill climbing beast.

- Panther 004.jpg (17.77 KiB) Viewed 2009 times
Re: Surprise another Panther G
Posted: Tue May 22, 2012 9:06 pm
by FreakyDude
Now i really hate the switches being located on the bottom of the tank so they gotta be moved. To the boxes at the back of the Panther with them.

- Panther 014.jpg (19.12 KiB) Viewed 2010 times

- Panther 015.jpg (19.2 KiB) Viewed 2010 times
First fix the light.

I made the cover from a piece of thin aluminum and the hood from Tamiya 2 part epoxie. sands easily but don't wait till it's completely hard, then it is a killer to shape by sanding and filing.

- Panther 012.jpg (18.3 KiB) Viewed 2010 times
Then as I am short an MG I need to make one and while there may as well put a decent weld line around it. This was made from an aluminum tube and again the epoxie, not finished yet but you clearly see it is getting close.

- Panther 011.jpg (15.82 KiB) Viewed 2010 times
Re: Surprise another Panther G
Posted: Tue May 22, 2012 9:25 pm
by FreakyDude
As I am detailing the outside the wooden jack box from HL really looks sad, So 4 pieces of 1/4" x 3/4" balsa glued together with some 1/8" ends glued on. Sand/cut to size and you have a real wooden jack stand.
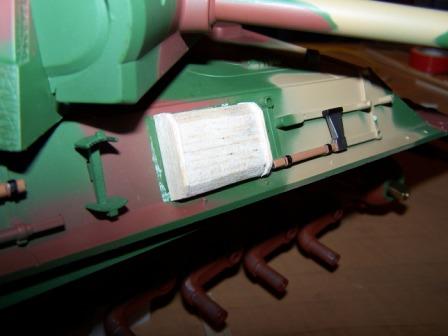
- Panther 013.jpg (20.39 KiB) Viewed 2008 times
Now the gun cleaning case = This I give Jeff1101 hats off to as I pretty well copied his post from earlier "
http://www.rctankwarfare.co.uk/forums/v ... =22&t=8956
Cut the handles off and replaced them, and put an aluminum tube on the side, from the research I did their are tubes attached on the G's gun cleaning case and depending on the picture it is what appears to be angled bar or a tube. I chose tube cuz it looks better. I also gouged out some chunks of my gun case and sanded lightly them hoping my cleaner case would look like it has battle damage after paint, maybe it works maybe it don't.

- Panther 010.jpg (23.52 KiB) Viewed 2008 times
Now to add some wire to the grills. This is just a small weave aluminum mesh used mainly to keep the bugs out, you can get it real cheap at the local hardware store and it is real aluminum so after paint it looks good.
Cut to size, glue in place and make a frame around it. For my frame I am using .040 1/4 round sheet styrene. Its thin enough to really not be too obtrusive yet it still looks like their is a frame.

- Panther 009.jpg (24.36 KiB) Viewed 2008 times
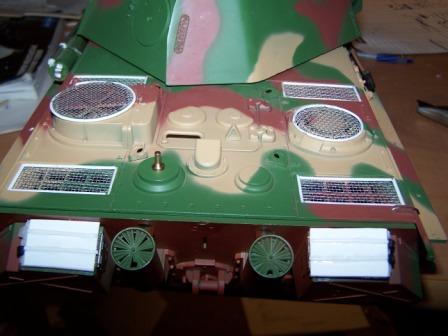
- Panther 016.jpg (25.6 KiB) Viewed 2008 times
On the storage boxes and you can't see them clearly here I used the ends of small zip ties, cut them in half for proper thickness then cut the tie part off and glued them to where the clasps would be on the storage box. They look close enough like a lock so that wasn't bad.
I'll get a couple more pics tonight as I have moved the hatch locks to the correct position and the antanae as well.
For now I will touch up the areas that are not 100% before I move onto the next thing which will be the welds on the hull.
Re: Surprise another Panther G
Posted: Tue May 22, 2012 10:11 pm
by Reaper332
Lookin good mate.......
Keep the pics coming.
Re: Surprise another Panther G
Posted: Tue May 22, 2012 10:40 pm
by Red Devils
Looking sharp Freaky, liking the extra details. Doing the same to a HL Tiger. Later dude. VP
Re: Surprise another Panther G
Posted: Sun Jul 08, 2012 2:44 am
by FreakyDude
skipped a lot of steps but here is where we sit, painted and into the weathering, All the grey spots will eventually be weathered areas, i always paint spots a color i can pick out easy.
I have converted this from BB to IR and am using the Mako and ATRC boards along with the pothead volume control and an RC2HL 2.4 ghz reciever board.
Re: Surprise another Panther G
Posted: Sun Jul 08, 2012 2:47 am
by FreakyDude
Here are a few more, next project is already underway.
Re: Surprise another Panther G
Posted: Sun Jul 08, 2012 4:17 am
by Red Devils
That's a beauty buddy, well done. Patricia's Lead the Way!!!
Re: Surprise another Panther G
Posted: Sun Jul 08, 2012 8:55 am
by jeff1101
Nice side skirts. Did you scratch build them?
Re: Surprise another Panther G
Posted: Sun Jul 08, 2012 5:14 pm
by FreakyDude
yes the shurzen are scratch built, I tried metal first but unfortunately don't have anything accurate enough to punch the mount holes so I used pastic card. The hangars are made from brass. I might remove a plate from each side. it may look better with a plate torn off.