Building the KT was habit-forming.....so now starting a Tiger 1...
Building this as a Tiger 1 that was supposedly captured by the Polish Resistance Forces in Warsaw in August, 1944, as the Russians were advancing on Warsaw in the eastern suburb of Praga. There are some unsubstantaited references to a captured Tiger, but no hard facts. So the build is perhaps fictional. The finish will include a rough hand painted PRF flag over the turret number to help with the fiction...
Threads on all this also at:
http://www.rcuniverse.com/forum/m_10345259/tm.htm" onclick="window.open(this.href);return false;
http://www.rcuniverse.com/forum/m_10361113/tm.htm" onclick="window.open(this.href);return false;
Started build with addition of a custom adjustable tensioner with a water-sealing O-ring, beefed up chassis and gearbox mounts (aluminum plate under chassis and aluminum rails inside, brass tube as front brace), sealed drive shafts (with rubber washer and nylon bushing siliconed in place)), and some Heng Long metal tracks that fit well.
Next is finishing the wheels.
Captured Tiger 1
Re: Captured Tiger 1
WHEEL PREPARATION
Early road wheels with rubber tires were built per Tamiya instructions. Kit road wheel bushings were used. Finished the wheels using "salt weathering" and chalks to get chipping/rusting paint effect. The rubber tires were shaken in a bag of dark brown chalk powder to dull and stain them. Worked OK and the color doesn't come off with plain water.
The metal track was soaked in a hot vinegar solution that turned them dark gray and took off the shine in prep for chalk weathering (rust) and clear dullcoat.
Added ball bearings inside the idler wheels as they take a heavy lateral load.
Base color is spray can Tamiya dunkelgelb. For primer, used spray Krylon Camo paint, Khaki. Bonds to plastic and is a bit lighter color than the Tamiya dark green. The lighter color primer minimizes use of the expensive Tamiya paint and gives a bit lighter finish color if the Tamiya is used lightly.
Next is building and fitting internal chassis components.
- Attachments
-
-
-
-
-
-
[ICE]monkey

- 2nd Lieutenant
- Posts: 2669
- Joined: Wed Sep 10, 2008 5:58 pm
- Location: pluckley ,ashford ,kent
Re: Captured Tiger 1
looking nice, great job with the wheels

Re: Captured Tiger 1
Nice work, wheels look great 
Hey man....I just ride 'em, I dunno what makes 'em work.
Woof woof woof !
Woof woof woof !
-
Andy in Cheltenham
- Corporal
- Posts: 427
- Joined: Mon Sep 21, 2009 12:54 pm
- Location: Tewkesbury
Re: Captured Tiger 1
Salt weathering? do explain...
Re: Captured Tiger 1
Salt weathering -
1. Paint a "rust" base coat - vary reddish brown, oranges - whatever colors you want to show as rust in the finished piece. Let paint dry.
2. Dab surface with drops of water here and there. Sprinkle heavily with salt, allowing crystals and clumps of salt to stick where you want rust to show. Gently shake off excess salt. Adjust the remaining sticking clumps as needed with a cotton bud or toothpick. Let dry.
3. Paint a base color, right over the sticking salt clumps. In this model it was the first tank color of german gray. Let dry thoroughly.he
4. Reapeat the salting step where you want gray to show through the final coat. (Here you can also use patchesof rubber cement method rather than salt to get larger patchesof flaked off paint.) Allow to dry.
5. Paint final color. In this model dark yellow was the final color over the original gray tank color. Let dry.
6. Use wet cotton buds and warm water to gently scrub through the paint layers to expose and dissolve away the salt. As the salt is removed, it exposes the rust and gray layers, simulating peeling/chipping paint and rust spots.
7. Add rust weathering around the spots with chalks and or drybrushing. Finish with final clearcoat.
Not as hard as it seems from the description, but does take patience and a couple practice runs. Number of layers and paint colors need to be planned to get the desired final effect.

Re: Captured Tiger 1
Excellent Dan, as always you have found a way to improve the The Tiger. Not real clear on the bearings and idler bushings as far as where to purchase? The rubber seal idea is something I am working on with my KT build. If you can would you e-mail the retailer to me? The wheels look very.very good. Your eye for details is very keen and shows.
Blake
Blake
Re: Captured Tiger 1
Thank you all for the comments.Saxondog wrote:Not real clear on the bearings and idler bushings as far as where to purchase? The rubber seal idea is something I am working on with my KT build. If you can would you e-mail the retailer to me?
Sax - the ball bearings are R/C car bearings from the local hobby shop. 4x8mm sealed, $1.50 each. Used 4, two in each idler.
Idler parts are all made from short pieces of sch 80 brass pipe that I have from making canon barrels for my ship. I forget the pipe sizes, but can look it up. Got the pipe at a local plumbing supplier. A new axle was made from a long carriage bolt. The idler bushing is a nylon bushing from the hardware store. I cut a groove for an o-ring on the inner brass piece to provide a water seal.
The drive shaft seal is a rubber fender washer capped with a nylon bushing - again, about $2 worth of parts from the hardware store. Sizes are shown in the pictures.
-
Andy in Cheltenham
- Corporal
- Posts: 427
- Joined: Mon Sep 21, 2009 12:54 pm
- Location: Tewkesbury
Re: Captured Tiger 1
Thanks for the clear description on salt weathering. I'll give it a go. I was thinking of latex, but might be better off with your method.
Re: Captured Tiger 1
Update on prototype history and new pics
Thanks to a lot of help, found the prototype info to build what I think will be an interesting Tiger 1 model. Sorry for the long post, but wanted to post a recap of the history in appreciation for all the research help I got from others. Some build pics and methods used also posted.
This tank will represent a prototype based on the following historical account put together from a number of sources. There is some conjecture here, but it reflects as accurately as possible the information from various historical references.
By August, 1944, the Russians were pushing the Germans back toward Warsaw. To make matters worse, the Polish Home Army, Armia Krajowa (AK) launched the Warsaw Uprising that further challenged German resources. And, added to all that was a direct order from Hitler to completely destroy the city of Warsaw – a huge job in itself.
On July 31, 1944, five Tiger 1’s were delivered to Praga/Warsaw by rail, destined to resupply 3rd Panzer Division SS Totenkopf . Instead they were pulled into service in Warsaw to help control the uprising and to use their firepower to help level the city.
The tanks came under attack in the close urban battlescape. They were then ordered to make way toward the city center. The streets were clogged with debris. The Polish AK slowed the German tanks with barriers built from all the rubble and quickly learned to deal with the tanks with Molotov cocktails and a variety of captured weapons. On August 1st and 2nd, two Tigers were destroyed and one was captured and used for two days by the AK.
The Tiger 1's were "repair tanks", likely of various vintage and state of condition, and likely quickly repaired for return to service. A picture of one of the Warsaw Tigers shows features that place it in a narrow production window, right at the transition from early to mid-Tiger. This is the tank picture used to determine the model features.
The tank in the picture has Feifels, a low cupola and possibly two headlights. It likely had rubber tired wheels and likely didn’t have zimmerit given its production window. It probably was returned to service after hasty repair with some power plant maintenance, some patches and a quick and dirty plain dunkelgelb paintjob. The cupola was changed out – probably due to damage to the original, but the turret air vent would have been left alone – why bother with the cutting job. The loaders periscope was likely added though as a necessary visibility improvement.
So that’s how I’m building it - a mix of features based on the Warsaw account, a repair service overworked and undersupplied, and the single picture of a Tiger 1 that had seen a tough life.
Since it’s being built as a captured tank, damage is added to the model. Maybe a bit corny or oveboard, but I tried to simulate a hit with a Molotov cocktail in an engine hatch, a burning shell hit in a Feifel vent and some additional hits from weapons not quite heavy enough to stop a Tiger. Old armor hits, just painted over in the repair shop were also added. The damage would have caused the crew to abandon the tank (in a very tough neighbohood!), but may have been light enough to allow the AK to get her going for a couple of more days.
I may have overdone the effects, but I enjoyed doing it!
The welds were done with acrylic bathtub caulk (no silicone!) – easy to work with, easy to re-do if necessary (wash off with water) and paintable. Applied with a syringe with a thin brass tube. "Beading” added with a pointed tool after the caulk partially set up.
The shell hits were done with Dremel cutting bits, but mounted in a temperature controlled soldering pencil rather than a Dremel. At just the right temperature, the tools cold be used to slowly deform the plastic to look something like a shell hit (I think...).
The paint chips, fire damage, layers of primer, original gray and latest quick coat of dunkelgelb effects were done with the “salt method”, toothpaste method and chalks. I tried rubber cement as a mask, etc, but it wasa pain to use and hard to remove. Toothpaste turned out to be excellent – easy to apply and remove and re-do if desired. Stays in place and can be applied in many ways. Best is that it stays soft under the paint layers, and a wash under warm water and light rubbing from a very soft toothbrush (after the pint has dried) easily removes it and leaves a great pattern. The toothpaste basically dissolves and washes itself away. Really works great.
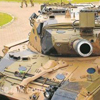
Here are some pics of the hull – pretty much finished except for detail parts. Turret is next.
Hull has lights, remote start/stop, smoke, moving MG, momentum control, volume control, etc.
Hope you like the prototype idea – kind of unique. Critique on the build is always welcome.
Thanks to all who helped dig out the historical information – with special thanks to Rivetcounter who pursued this to the end….
(reference material and pics in attached PDF)
Thanks to a lot of help, found the prototype info to build what I think will be an interesting Tiger 1 model. Sorry for the long post, but wanted to post a recap of the history in appreciation for all the research help I got from others. Some build pics and methods used also posted.
This tank will represent a prototype based on the following historical account put together from a number of sources. There is some conjecture here, but it reflects as accurately as possible the information from various historical references.
By August, 1944, the Russians were pushing the Germans back toward Warsaw. To make matters worse, the Polish Home Army, Armia Krajowa (AK) launched the Warsaw Uprising that further challenged German resources. And, added to all that was a direct order from Hitler to completely destroy the city of Warsaw – a huge job in itself.
On July 31, 1944, five Tiger 1’s were delivered to Praga/Warsaw by rail, destined to resupply 3rd Panzer Division SS Totenkopf . Instead they were pulled into service in Warsaw to help control the uprising and to use their firepower to help level the city.
The tanks came under attack in the close urban battlescape. They were then ordered to make way toward the city center. The streets were clogged with debris. The Polish AK slowed the German tanks with barriers built from all the rubble and quickly learned to deal with the tanks with Molotov cocktails and a variety of captured weapons. On August 1st and 2nd, two Tigers were destroyed and one was captured and used for two days by the AK.
The Tiger 1's were "repair tanks", likely of various vintage and state of condition, and likely quickly repaired for return to service. A picture of one of the Warsaw Tigers shows features that place it in a narrow production window, right at the transition from early to mid-Tiger. This is the tank picture used to determine the model features.
The tank in the picture has Feifels, a low cupola and possibly two headlights. It likely had rubber tired wheels and likely didn’t have zimmerit given its production window. It probably was returned to service after hasty repair with some power plant maintenance, some patches and a quick and dirty plain dunkelgelb paintjob. The cupola was changed out – probably due to damage to the original, but the turret air vent would have been left alone – why bother with the cutting job. The loaders periscope was likely added though as a necessary visibility improvement.
So that’s how I’m building it - a mix of features based on the Warsaw account, a repair service overworked and undersupplied, and the single picture of a Tiger 1 that had seen a tough life.
Since it’s being built as a captured tank, damage is added to the model. Maybe a bit corny or oveboard, but I tried to simulate a hit with a Molotov cocktail in an engine hatch, a burning shell hit in a Feifel vent and some additional hits from weapons not quite heavy enough to stop a Tiger. Old armor hits, just painted over in the repair shop were also added. The damage would have caused the crew to abandon the tank (in a very tough neighbohood!), but may have been light enough to allow the AK to get her going for a couple of more days.
I may have overdone the effects, but I enjoyed doing it!
The welds were done with acrylic bathtub caulk (no silicone!) – easy to work with, easy to re-do if necessary (wash off with water) and paintable. Applied with a syringe with a thin brass tube. "Beading” added with a pointed tool after the caulk partially set up.
The shell hits were done with Dremel cutting bits, but mounted in a temperature controlled soldering pencil rather than a Dremel. At just the right temperature, the tools cold be used to slowly deform the plastic to look something like a shell hit (I think...).
The paint chips, fire damage, layers of primer, original gray and latest quick coat of dunkelgelb effects were done with the “salt method”, toothpaste method and chalks. I tried rubber cement as a mask, etc, but it wasa pain to use and hard to remove. Toothpaste turned out to be excellent – easy to apply and remove and re-do if desired. Stays in place and can be applied in many ways. Best is that it stays soft under the paint layers, and a wash under warm water and light rubbing from a very soft toothbrush (after the pint has dried) easily removes it and leaves a great pattern. The toothpaste basically dissolves and washes itself away. Really works great.
Here are some pics of the hull – pretty much finished except for detail parts. Turret is next.
Hull has lights, remote start/stop, smoke, moving MG, momentum control, volume control, etc.
Hope you like the prototype idea – kind of unique. Critique on the build is always welcome.
Thanks to all who helped dig out the historical information – with special thanks to Rivetcounter who pursued this to the end….
(reference material and pics in attached PDF)
- Attachments
-
-
-
-
-
-
-
-
-
-
