Page 1 of 1
Show us you're detailing Techniques
Posted: Mon Dec 13, 2010 6:07 pm
by Wizzard033
I think it would be a great service to all of us modelers new to 1/16th scale tanking and/or modeling all together if anyone would post their detailing techniques, tricks, battle damage, "How To's", and links on the subject here for everyone to find. I used the DAK painting guide to great success but found when it came to the detailing, pastels, and battle damage processes it was very vague. I'm also unsure where to start with painting detailing tracks and cables, tools and such. So everyone post your techniques and ideas here with pictures if possible.

Re: Show us you're detailing Techniques
Posted: Mon Dec 13, 2010 8:45 pm
by oldfeller
Hi Wizzard033
If you looked at my post " my first worked on hl tiger tank" you can see how I done it, like I said i used a candle to heat up the sides it was a bit hot "no sense no feeling

" then bent into shape with my fingers, then used a rimmel to put dents in then painted them silver then a bit of rust effect added, I also used a heat gun but I would no advise this as I was lucky

. The cables I've painted over with black gloss "thats what I had at hand" then when still wet dabbed on rust with a cotton bud, I found this idea by being lasy I used the wirewool with water to rub off the tranfers to paint my tank, not cleaning up I left the wirewool rusting in the water when the water had dried off it left a scum "rust".
Gerwyn
Re: Show us you're detailing Techniques
Posted: Mon Dec 13, 2010 11:33 pm
by Saxondog
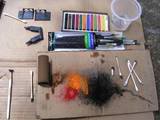
I use chalk pastels for coloring of exhaust,tools,cables and the seams and weld lines on my tanks. But I also use Enamel paints which most do not. I am not sure how this method would work with acrylics or water based paints.
The effect is a little messy but does works very well,the following link shows my Tiger as I colored and weathered it. The Gray Base color and light Gray scribbling being the only paint used. The darker seams and detailing was pastel dust rubbed into and on the base colored sections then the Floor polish,varnish method was used.
The exhaust pieces were the most challenging, but the coloring is all pastel dust bonded with floor polish and sealed with varnish.
- Chalk Pastel Method.jpg (4.33 KiB) Viewed 3988 times
- th_paintingandweathering023.jpg (3.62 KiB) Viewed 3988 times
http://s675.photobucket.com/albums/vv11 ... eathering/" onclick="window.open(this.href);return false;
Re: Show us you're detailing Techniques
Posted: Tue Dec 14, 2010 2:48 am
by Saxondog
Another technique,which I used but did not originate is baking soda finish. This creates a more supple look,more like steel and less like painted plastic. I used the standard kitchen flour sifter and sprinkled the soda onto the wet painted surface. I must say this finish looks very realistic. and changes the top deck surface,looking more like a steel machine.Saxondog
http://www.rctankwarfare.co.uk/forums/v ... oda#p49047" onclick="window.open(this.href);return false;
Re: Show us you're detailing Techniques
Posted: Tue Dec 14, 2010 6:14 am
by Wizzard033
@ oldfeller
I had the same idea Gerwyn. I used a lighter to warm some areas of my fenders and warped them. I also like the idea of using silver in the battle damaged areas. I airbrushed black on mine but I've seen the silver and I thought that looks more correct.
@Saxondog
Do you spray the polish on then dust with the pastels and an old paint brush or some such? I haven't been able to find the floor polish so far but I have the day off tomorrow and I plan to look in a few more places.

Re: Show us you're detailing Techniques
Posted: Wed Dec 15, 2010 2:39 am
by Saxondog
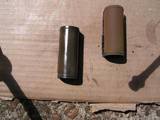
I used several tools, too apply a darker amount I would use a q-tip, for overall weathering a soft but large paintbrush. On the exhuast guards like the picture showing one with the rust color rubbed into the plastic. But the plastic was lightly sanded,all up and down creating grooves and feathering the plastic so the dust would grip in the grooves.
Then a very light mist of floor polish, if you spray to heavy it will run creating dark lines.then after drying a single light coat of the varnish,just to dull the shine some what. Now on the Jagdpanther I chose to wipe with a paper towel Plastistruct liquid glue on the exhuast round guards,then spinkle the dust on while the glue was wet,After it dries I rubbed more dust onto the exhuast again. But this time I did not spray the floor polish,just let the glue bond it to the pipes.
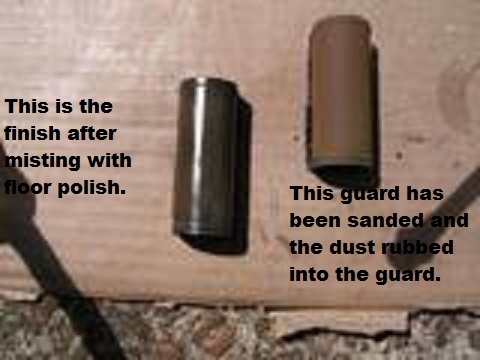
- TIGER EXHAUST GUARDS
- Exhuast guards weathering with pastel dust.jpg (50.93 KiB) Viewed 3964 times
 Viewed 3964 times")
- Jagdpanther EXHAUST GUARDS
Re: Show us you're detailing Techniques
Posted: Thu Jan 27, 2011 6:35 pm
by Delboy
ive come across a book called imperial armour model masterclass volume one by warhammer 40,000 and forge world
it has some great ideas on how to paint tanks
http://www.games-workshop.com/gws/catal ... rod1860111" onclick="window.open(this.href);return false; these could be used for 1/16 scale i guess
del
Re: Show us you're detailing Techniques
Posted: Thu Jan 27, 2011 10:45 pm
by Johnf
Hi Saxondog, Jadg Panther looks great. Not getting back to my Tiger build as early as I thought. My girlfriend decided to have a spectacular fall while skiing. Followed by hellicopter rescue. Got rescue on video. Broken Knee and some bruises. Great flying from the rescue crew. I was thinking if the rotors hit the slope do I get billed for that also.
Anyway back to painting. One method I found effective in creating rust effect on exhausts was mixing the pastel dust with light grey Tamiya texture paste and applying with a brush.

The gamesworkshop site has some useful modelling techniques on he site. I used to do some painting for their publications. Some of my marines are featured on how to paint space marines back inside cover.
Re: Show us you're detailing Techniques
Posted: Sun Aug 19, 2012 10:10 pm
by southjerseyarmour
hey all , i "rusted" my bulldog by first painting the areas i wanted to rust with white school glue,dries clear, (elmers in us) then using sand like you get for fish tank or play sand for sandbox i sprinkled it on waited for it to dry then used water color paint, burnt sienna, burnt umber, several shades red and finally black. you must be carefull tho, since the glue is water based, not to use too much water to thin your paint or the sand and glue will come off. if after painting you need more effect sprinkle on more sand while paint is wet,let dry continue painting. seal with matte finish clear and viola' a well rusted tank... will post some pics when camera returns...
Re: Show us you're detailing Techniques
Posted: Sun Aug 19, 2012 10:56 pm
by Saxondog
sound like a good idea, post pictures when you can. It sound simular to the baking soda sane casting finish some of us have tried on the Tiger top hull plate. Very interesting use of material as well.
Thanks for sharing.