1/16 RC M4A3E8 Korean war - Restoring Tamiya M4 with Takom kit - build

Post Reply
User avatar
lmcq11
2nd Lieutenant
Posts: 2657
Joined: Mon Dec 19, 2016 7:42 pm
Location: Quebec, Canada

Re: 1/16 RC M4A3E8 Korean war - Restoring Tamiya M4 with Takom kit - build

Post by lmcq11 »

Cast markings on the inside of the hatches... Looking good but a bit weird.

At this point, i am building the kit without checking if things are accurate or not. If a kit maker is putting cast marks in the inside of a hatch, i figure they have made their homework on a real life model and that such thing existed on that specific tank. There are too many Sherman variations anyway. Other than the main components, trying to check everything against some references is pointless.

Not sure why kit makers create periscopes in clear plastic. Is there really anyone that has the skills to paint them correctly, keeping the glass plastic in the tiny visor section perfectly clear, square, no scratch from masks... Maybe, but not me. Doesn’t mean I won’t try though.

1/16 RC M4A3E8 Korean war - Restoring Tamiya M4 with Takom kit - build
9.JPG (764.74 KiB) Viewed 3393 times

The ventilator between the two hatches has the only PE part of the whole kit. Rare to see a new armour kit with so little etched parts.

1/16 RC M4A3E8 Korean war - Restoring Tamiya M4 with Takom kit - build
10.JPG (862.15 KiB) Viewed 3393 times
1/16 RC M4A3E8 Korean war - Restoring Tamiya M4 with Takom kit - build
11.JPG (995.14 KiB) Viewed 3393 times
1/16 RC M4A3E8 Korean war - Restoring Tamiya M4 with Takom kit - build
12.JPG (1.1 MiB) Viewed 3393 times
1/16 RC M4A3E8 Korean war - Restoring Tamiya M4 with Takom kit - build
13.JPG (1.38 MiB) Viewed 3393 times

Regards, Louis
User avatar
Kaczor
Warrant Officer 1st Class
Posts: 1951
Joined: Fri May 18, 2018 9:58 am
Location: Ciechanow, Poland
Contact:

Re: 1/16 RC M4A3E8 Korean war - Restoring Tamiya M4 with Takom kit - build

Post by Kaczor »

lmcq11 wrote: Tue Nov 28, 2023 10:43 pm Cast markings on the inside of the hatches... Looking good but a bit weird.
Those are accurate but the foundry marking letters seem a bit too big.
page1-1285-full.jpg
page1-1285-full.jpg (89.72 KiB) Viewed 3375 times
Not sure why kit makers create periscopes in clear plastic. Is there really anyone that has the skills to paint them correctly, keeping the glass plastic in the tiny visor section perfectly clear, square, no scratch from masks... Maybe, but not me. Doesn’t mean I won’t try though.
Use thin Tamiya masking tape or liquid mask. They can also be painted separately and glued later.
User avatar
Herr Dr. Professor
Captain
Posts: 4110
Joined: Mon Apr 22, 2019 10:48 pm
Location: Southern Wisconsin USA

Re: 1/16 RC M4A3E8 Korean war - Restoring Tamiya M4 with Takom kit - build

Post by Herr Dr. Professor »

Louis, I believe you can paint those interior periscope lenses. As you know, you accomplish far greater all the time, driving me nuts with envy of your skills. Here's what I would do: If there is a raised edge around the part that should be clear glass, then I would come at it with a tiny bit of a paint on the tip of a #000 brush and work sideways around the clear. If there is no raised edge, I would do just as Kaczor suggests. I would measure the rectangle with an el cheapo pointy schoolchild's compass, transfer the dimensions to Tamiya masking tape, cut the rectangle with a sharp X-Acto knife, stick the tape in place, and squeeze it down firmly and carefully with my klutzy fingers. Or I could use a liquid mask, but sometimes that's as hard as painting freehand. For such detail, I would use Vallejo Model Color or Testor's Model Master (acrylic or enamel). I would not use Tamiya or Vallejo Model air, for these great paints are too thin for this purpose.
User avatar
lmcq11
2nd Lieutenant
Posts: 2657
Joined: Mon Dec 19, 2016 7:42 pm
Location: Quebec, Canada

Re: 1/16 RC M4A3E8 Korean war - Restoring Tamiya M4 with Takom kit - build

Post by lmcq11 »

Thank you Kaczor and Her professor.


Yes, for sure, having clear periscope glass is worth the attempt, and it involves cutting and putting a thin mask on the glass at the bottom of the visor, while the edges get painted. It's so small, seen here at maximum zoom with my Iphone.


1/16 RC M4A3E8 Korean war - Restoring Tamiya M4 with Takom kit - build
0a.png (1.23 MiB) Viewed 3340 times
1/16 RC M4A3E8 Korean war - Restoring Tamiya M4 with Takom kit - build
0b.png (486.42 KiB) Viewed 3340 times


The following post is for the engine deck.

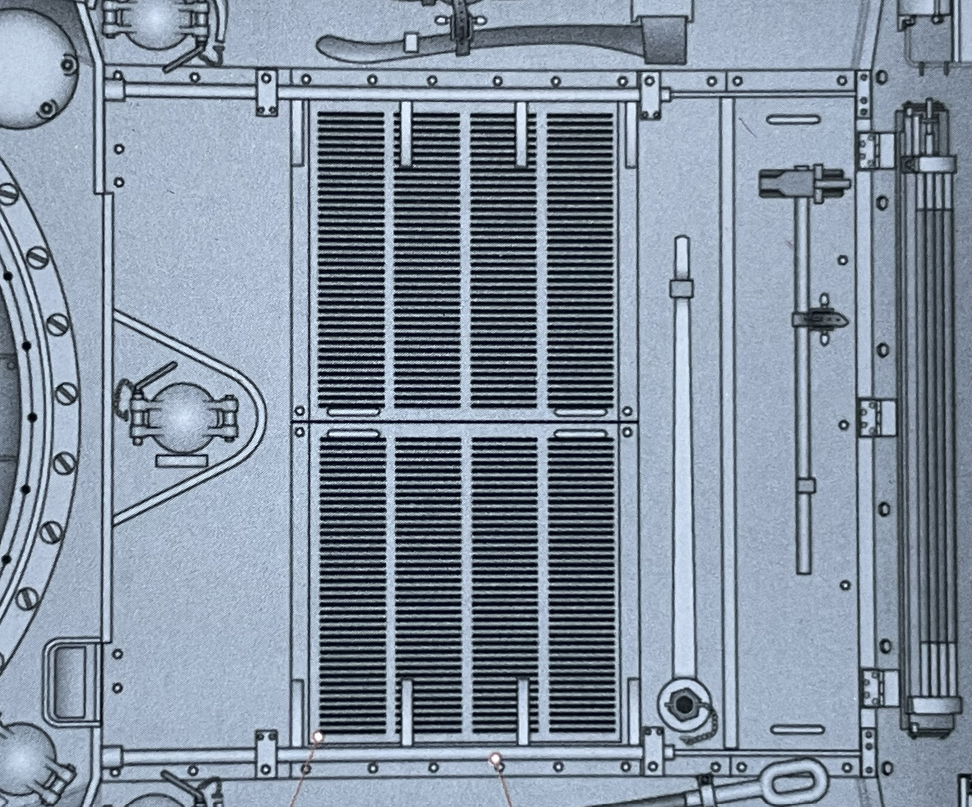
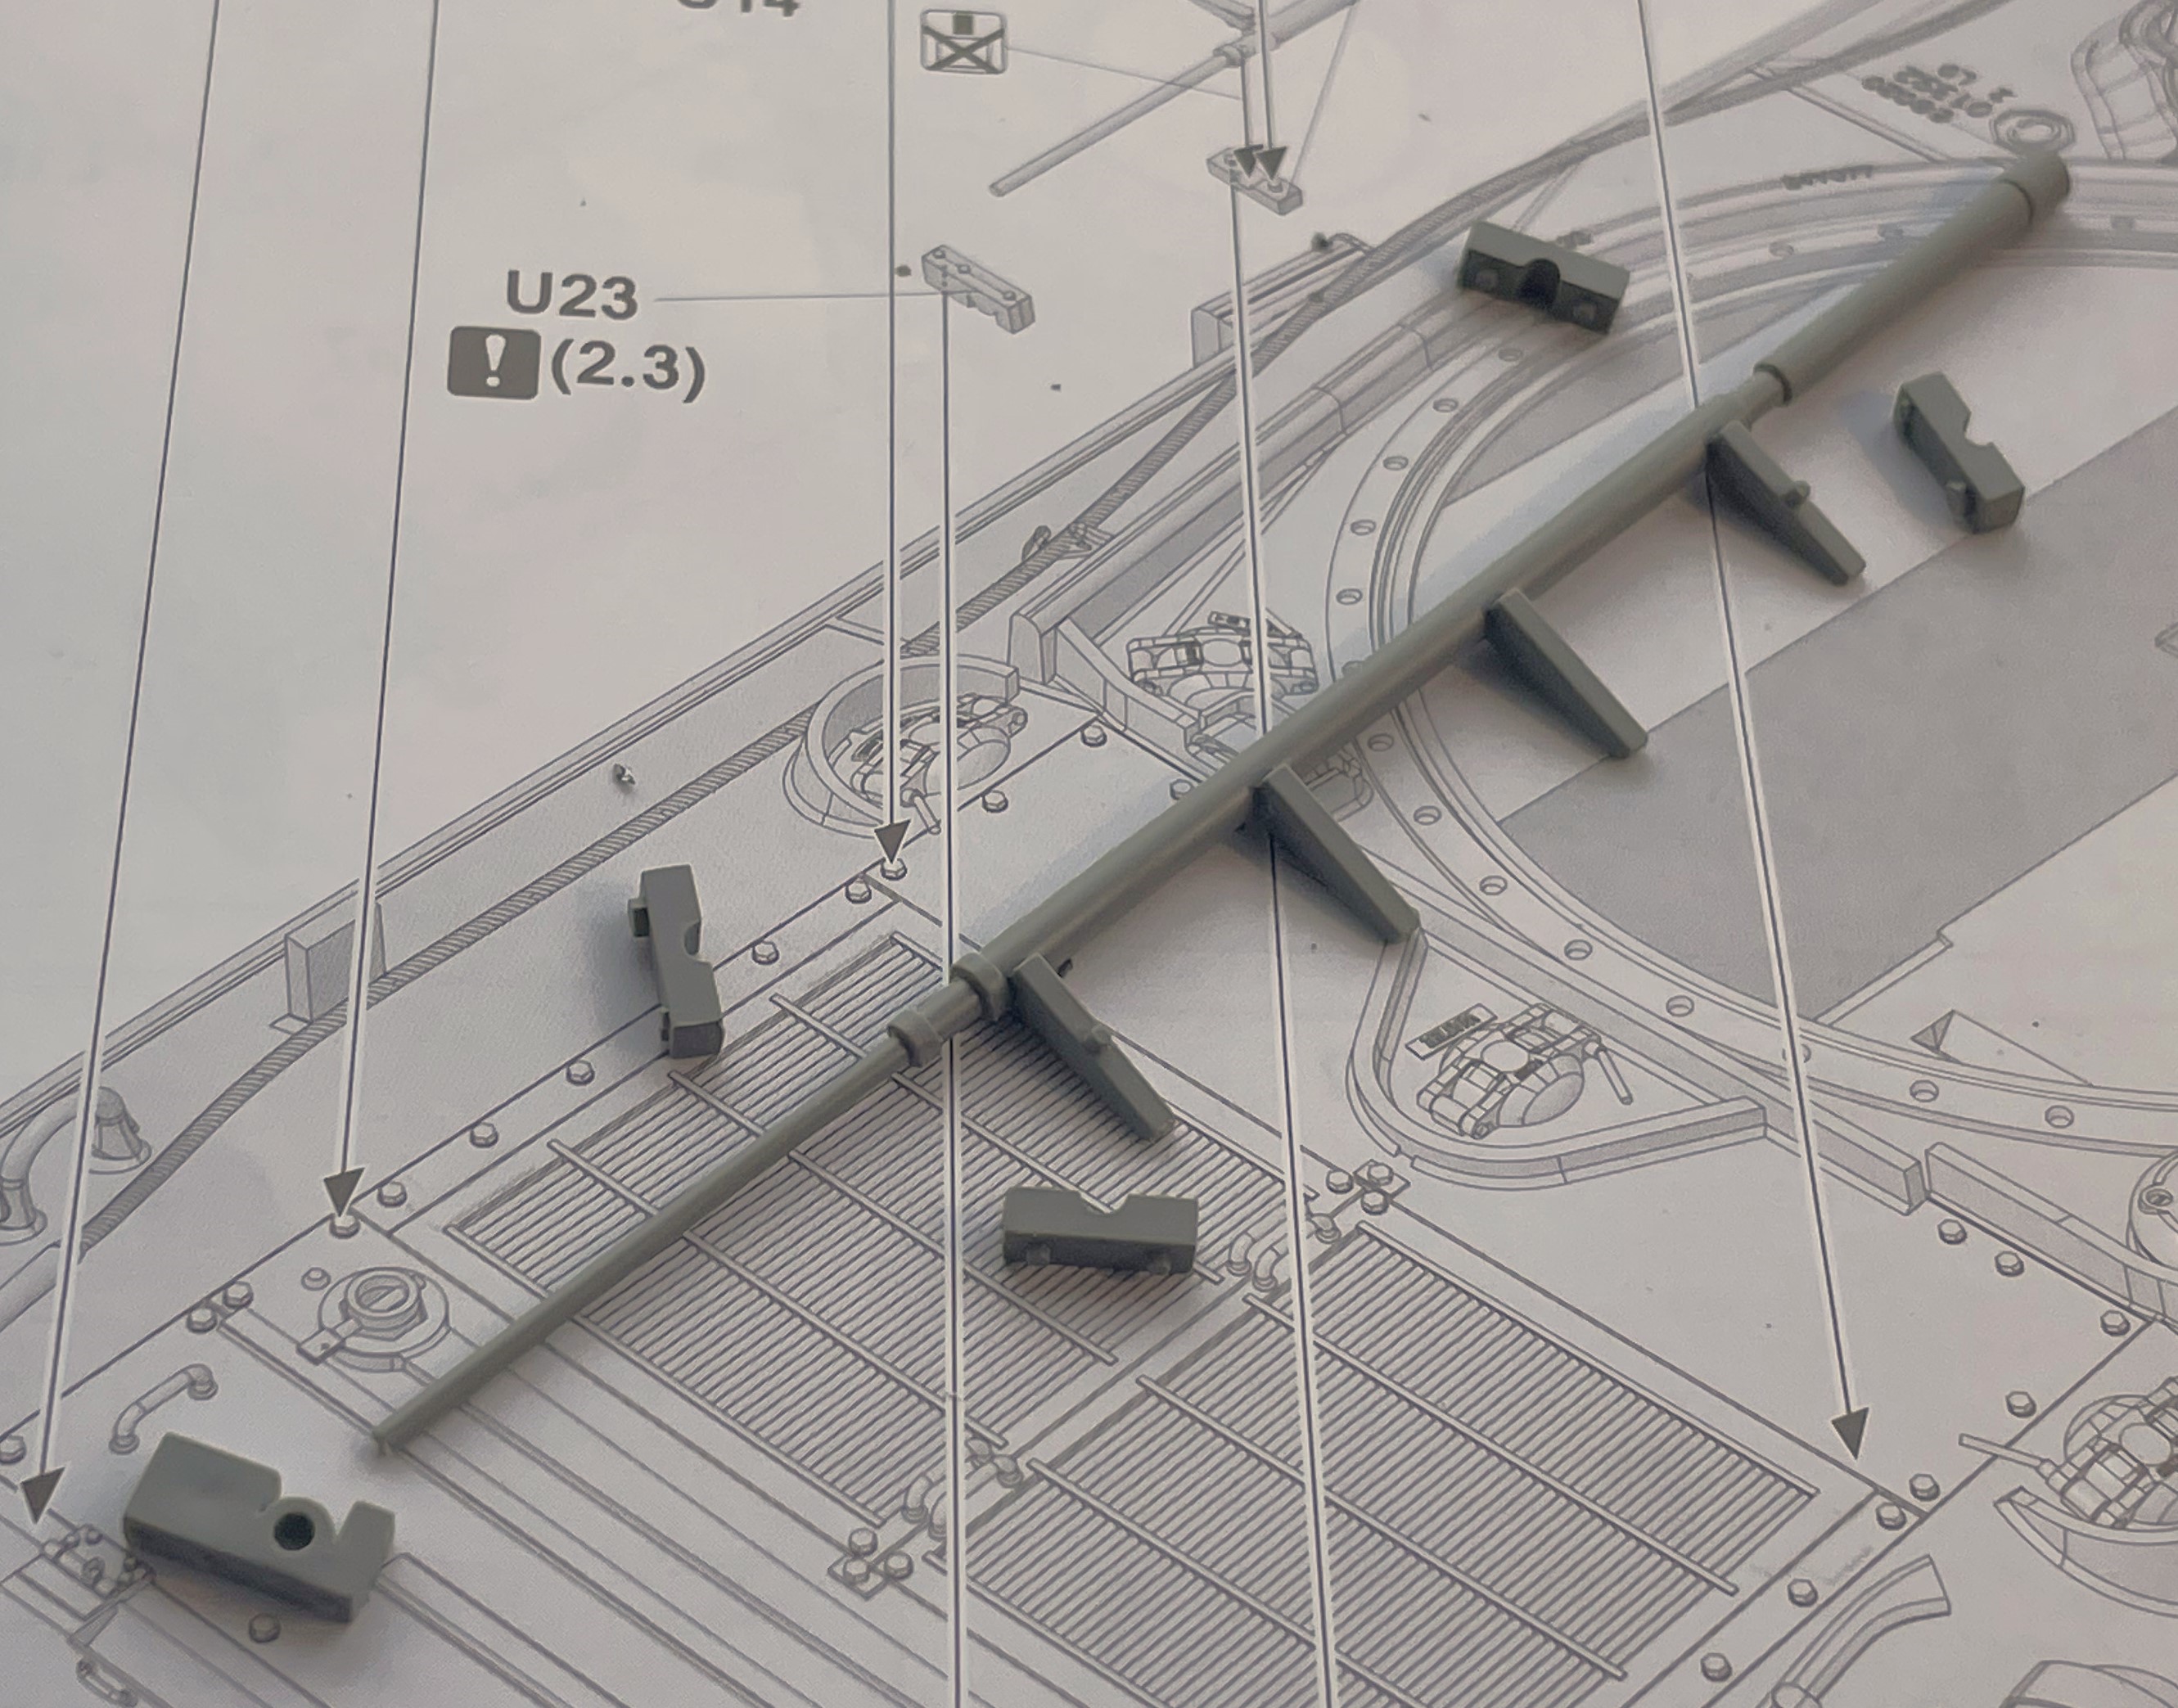
As shown in the Son of Sherman book, the very late model Sherman had a new large hinge design running along the edge of the top plate instead of the 4 small hinges connected directly to the grills.

Most guys will obviously select the simpler WW2 style but since this is my 15th 1/16 scale Sherman (yes i just counted 15 Sherman chassis based vehicles), I do not miss the opportunity to have something different on each of them. I already have 2 Nick Aguillar conversions of the M4A3E8 so this is the third one...

1/16 RC M4A3E8 Korean war - Restoring Tamiya M4 with Takom kit - build
1.png (1.48 MiB) Viewed 3340 times

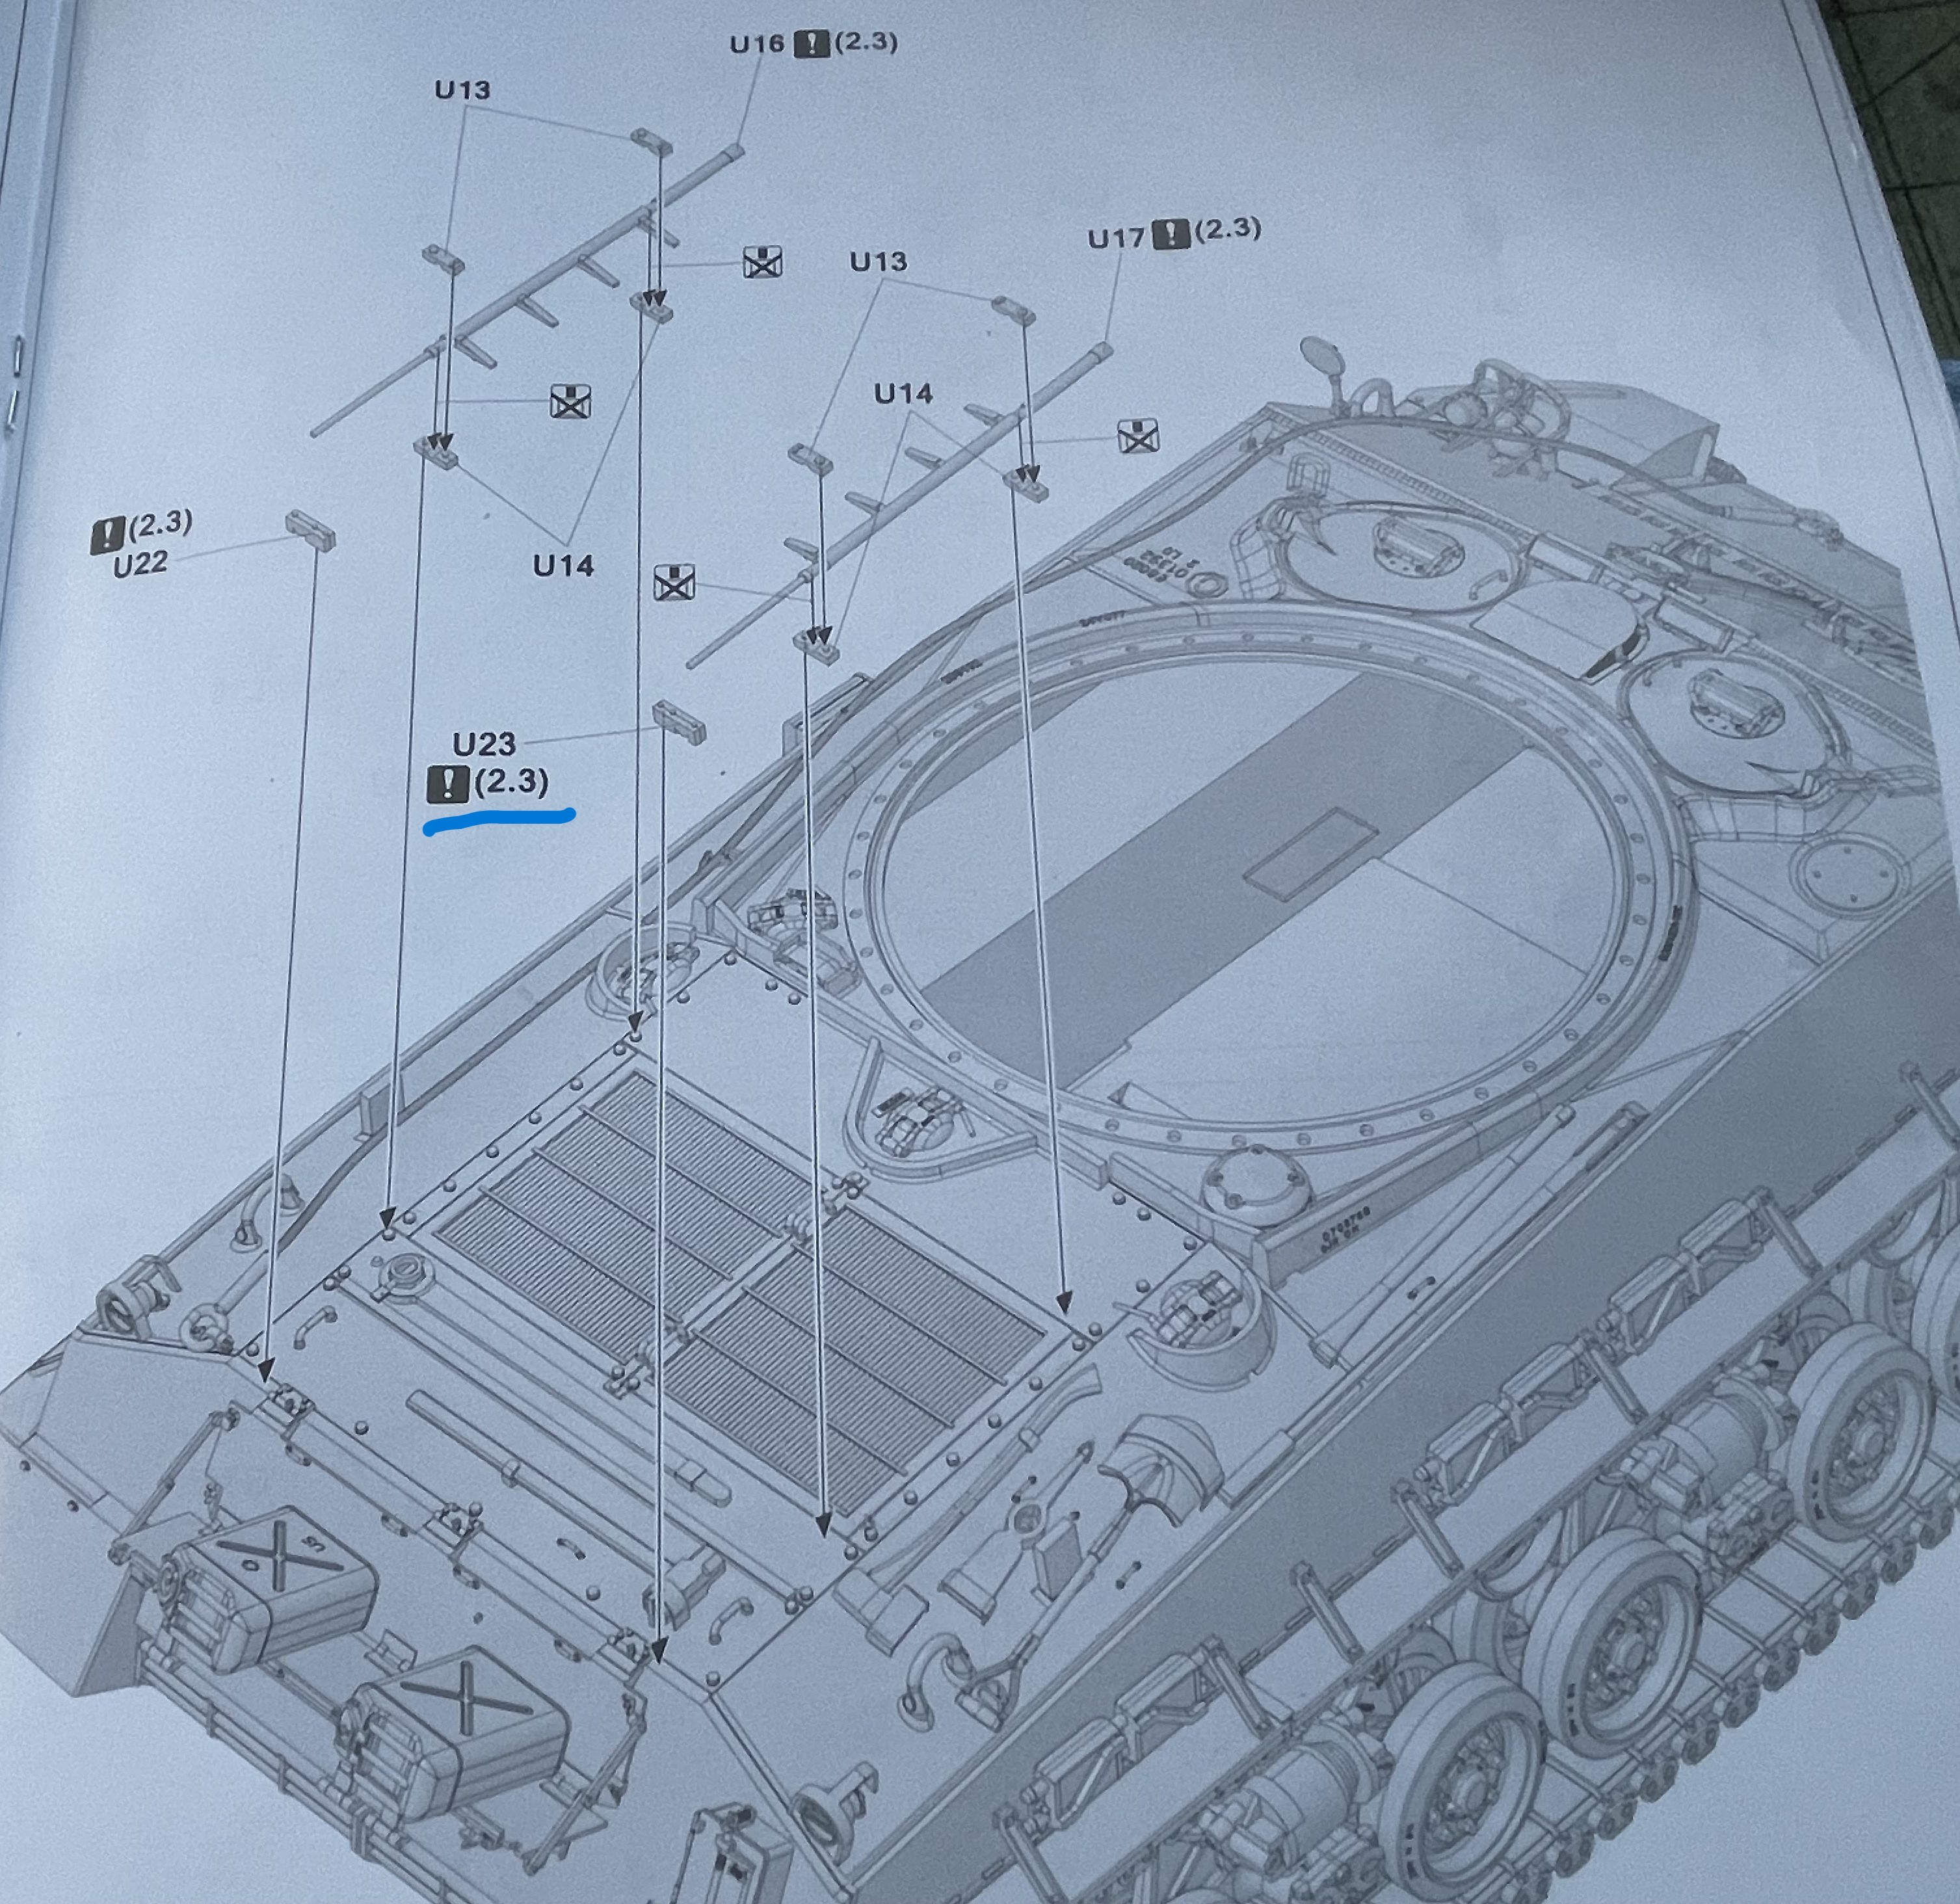
Takom provides the parts for both WW2 and Post war variants. They have the builder drill the placement holes for them depending on the decision.

The instructions could be clearer but i finally managed to understand what the (1,2,3,4,5) numbering meant next to some steps. There are 5 color/decal placement graphs at the end of the instructions. The first colored graph is for a WW2 Sherman, followed by 2 Korean war Shermans, and then 2 more WW2 Shermans. The graphs are not named or numbered but if you follow the sequence, having (2,3) next to a instruction step means that it applies to the Korean war Shermans that are in the second and third spot of the color instructions. It took me three weeks to figure it out... Maybe i am slow but it could have been clearer.

1/16 RC M4A3E8 Korean war - Restoring Tamiya M4 with Takom kit - build
2.JPG (1.85 MiB) Viewed 3340 times

These are the parts for one hinge.

1/16 RC M4A3E8 Korean war - Restoring Tamiya M4 with Takom kit - build
3.JPG (948.55 KiB) Viewed 3340 times

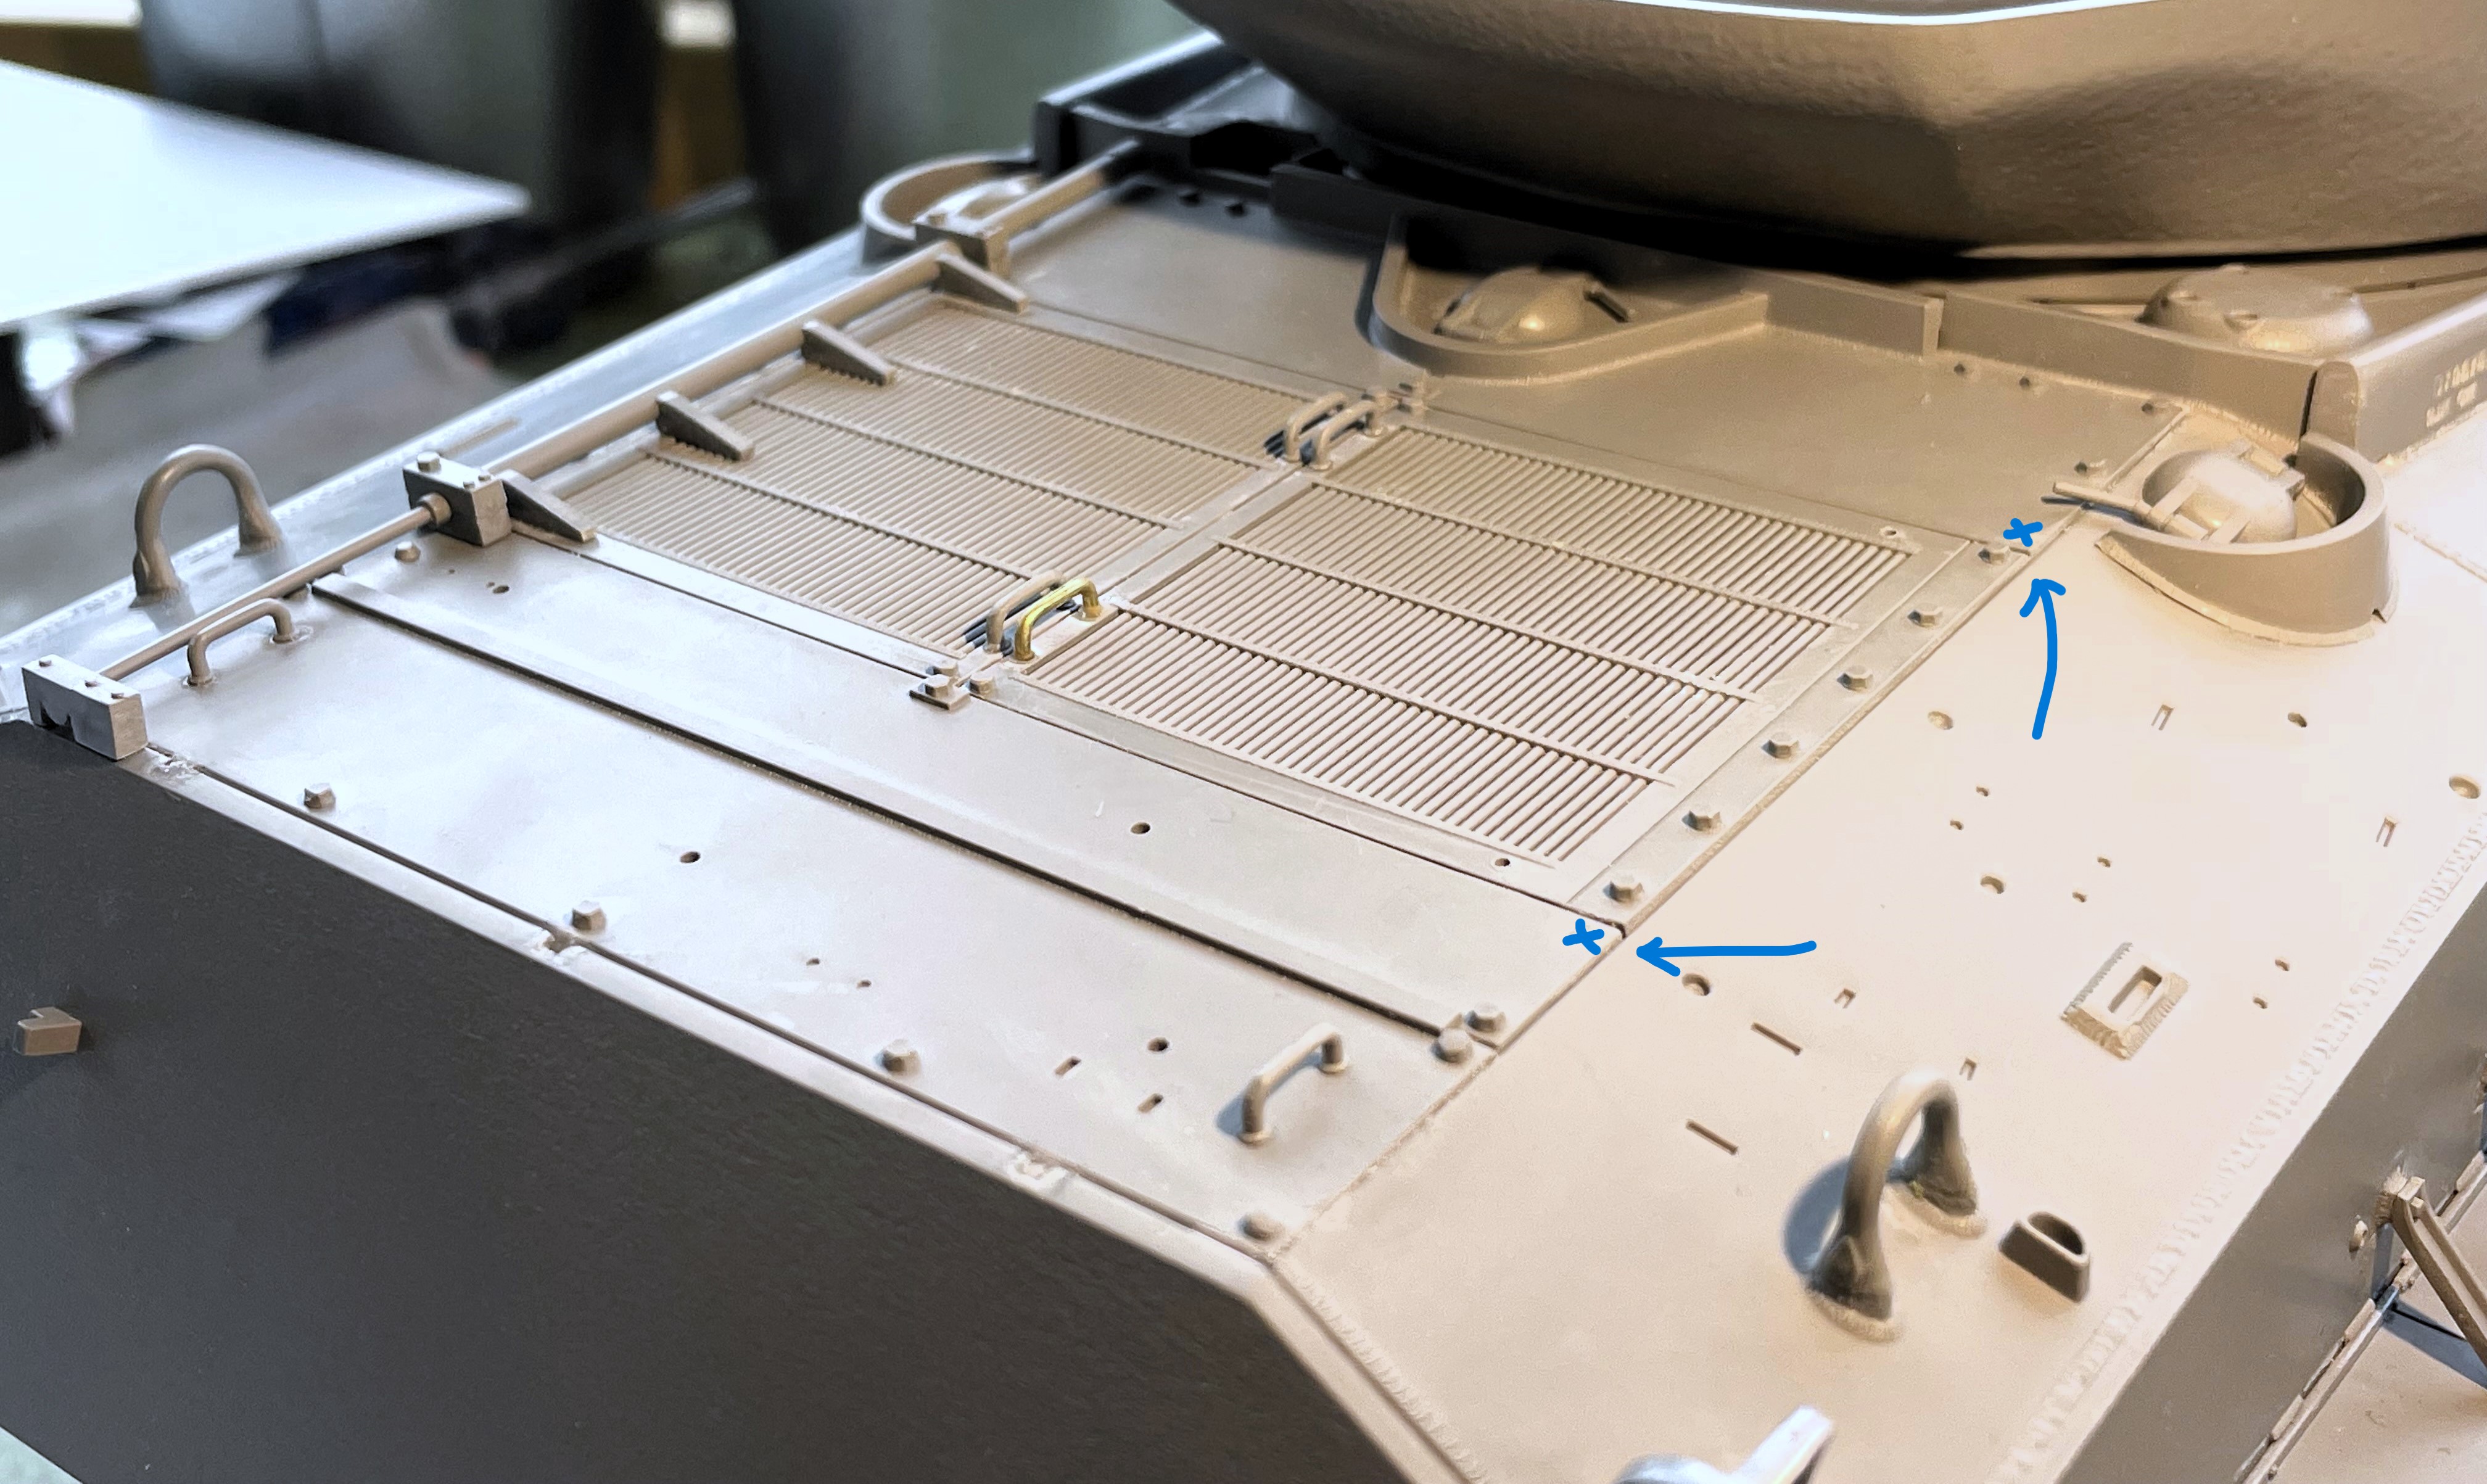
The hinge can be made operable if the builder does not put glue on the joints between the rod and the two block mounts that hold the rod in place.

1/16 RC M4A3E8 Korean war - Restoring Tamiya M4 with Takom kit - build
4.JPG (1018.66 KiB) Viewed 3340 times

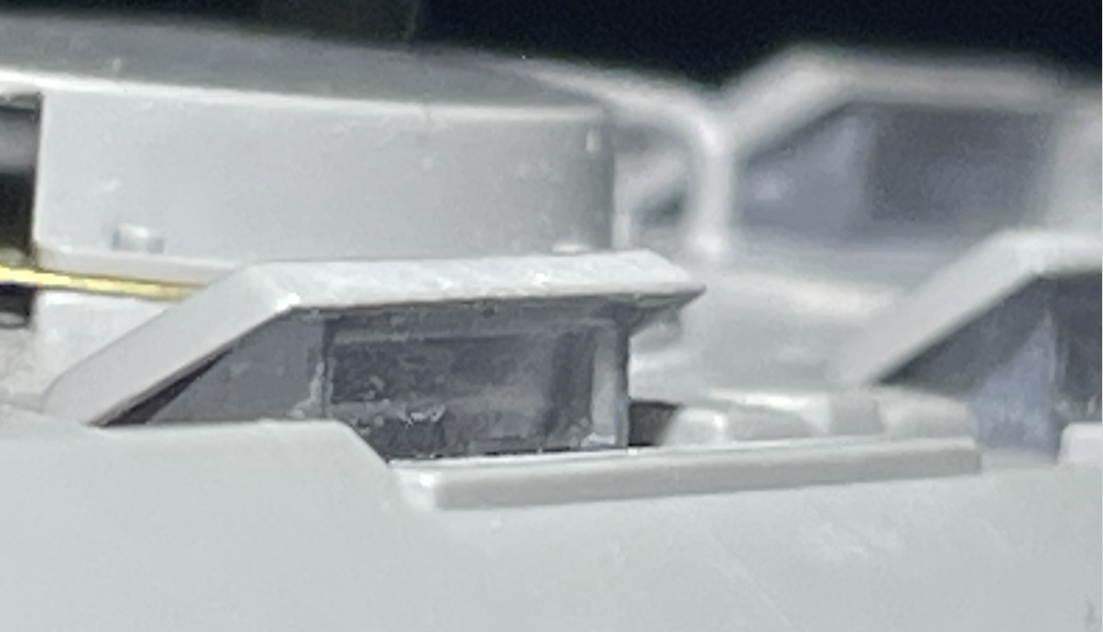
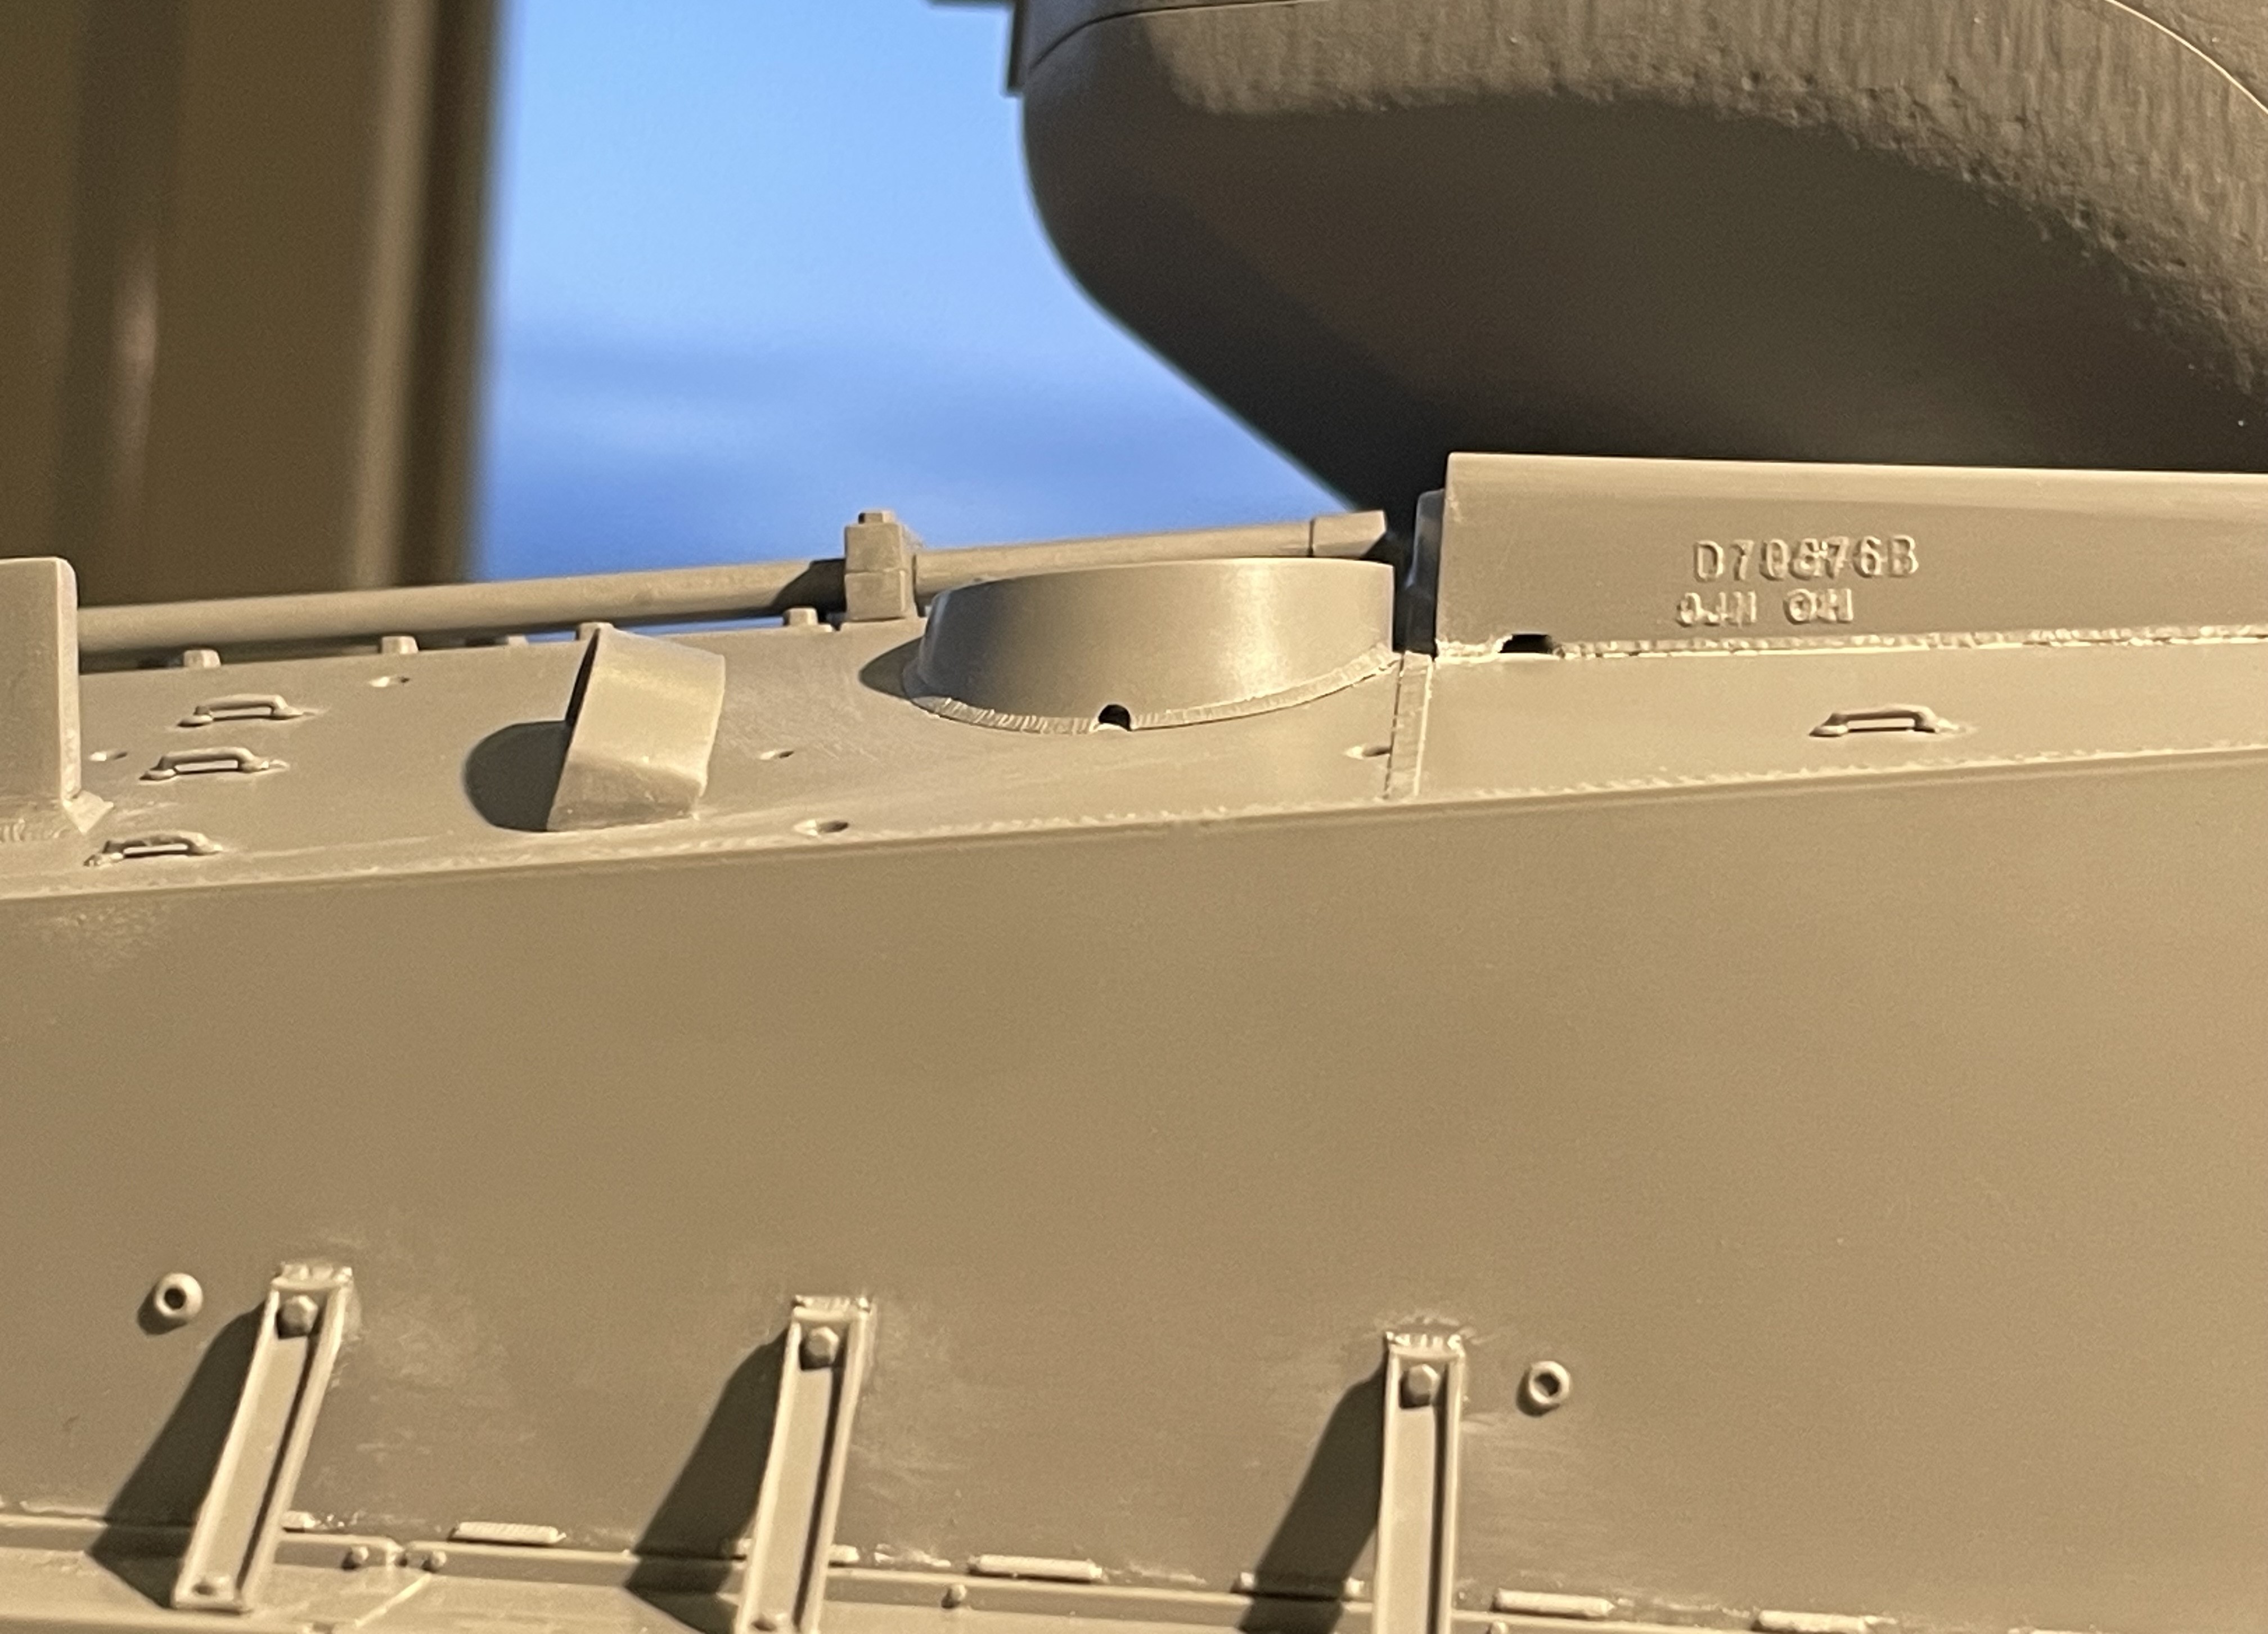
As the two block mounts each replace a bolt on the top plate, the bolt head need to be removed, something the instructions do not mention and could lead to some confusion, shown above asking the building to put the blocks on top of the bolt.

1/16 RC M4A3E8 Korean war - Restoring Tamiya M4 with Takom kit - build
5.JPG (1.48 MiB) Viewed 3340 times

I did not care about operable rear grills on a RC tank so i glued them in place for more solidity.

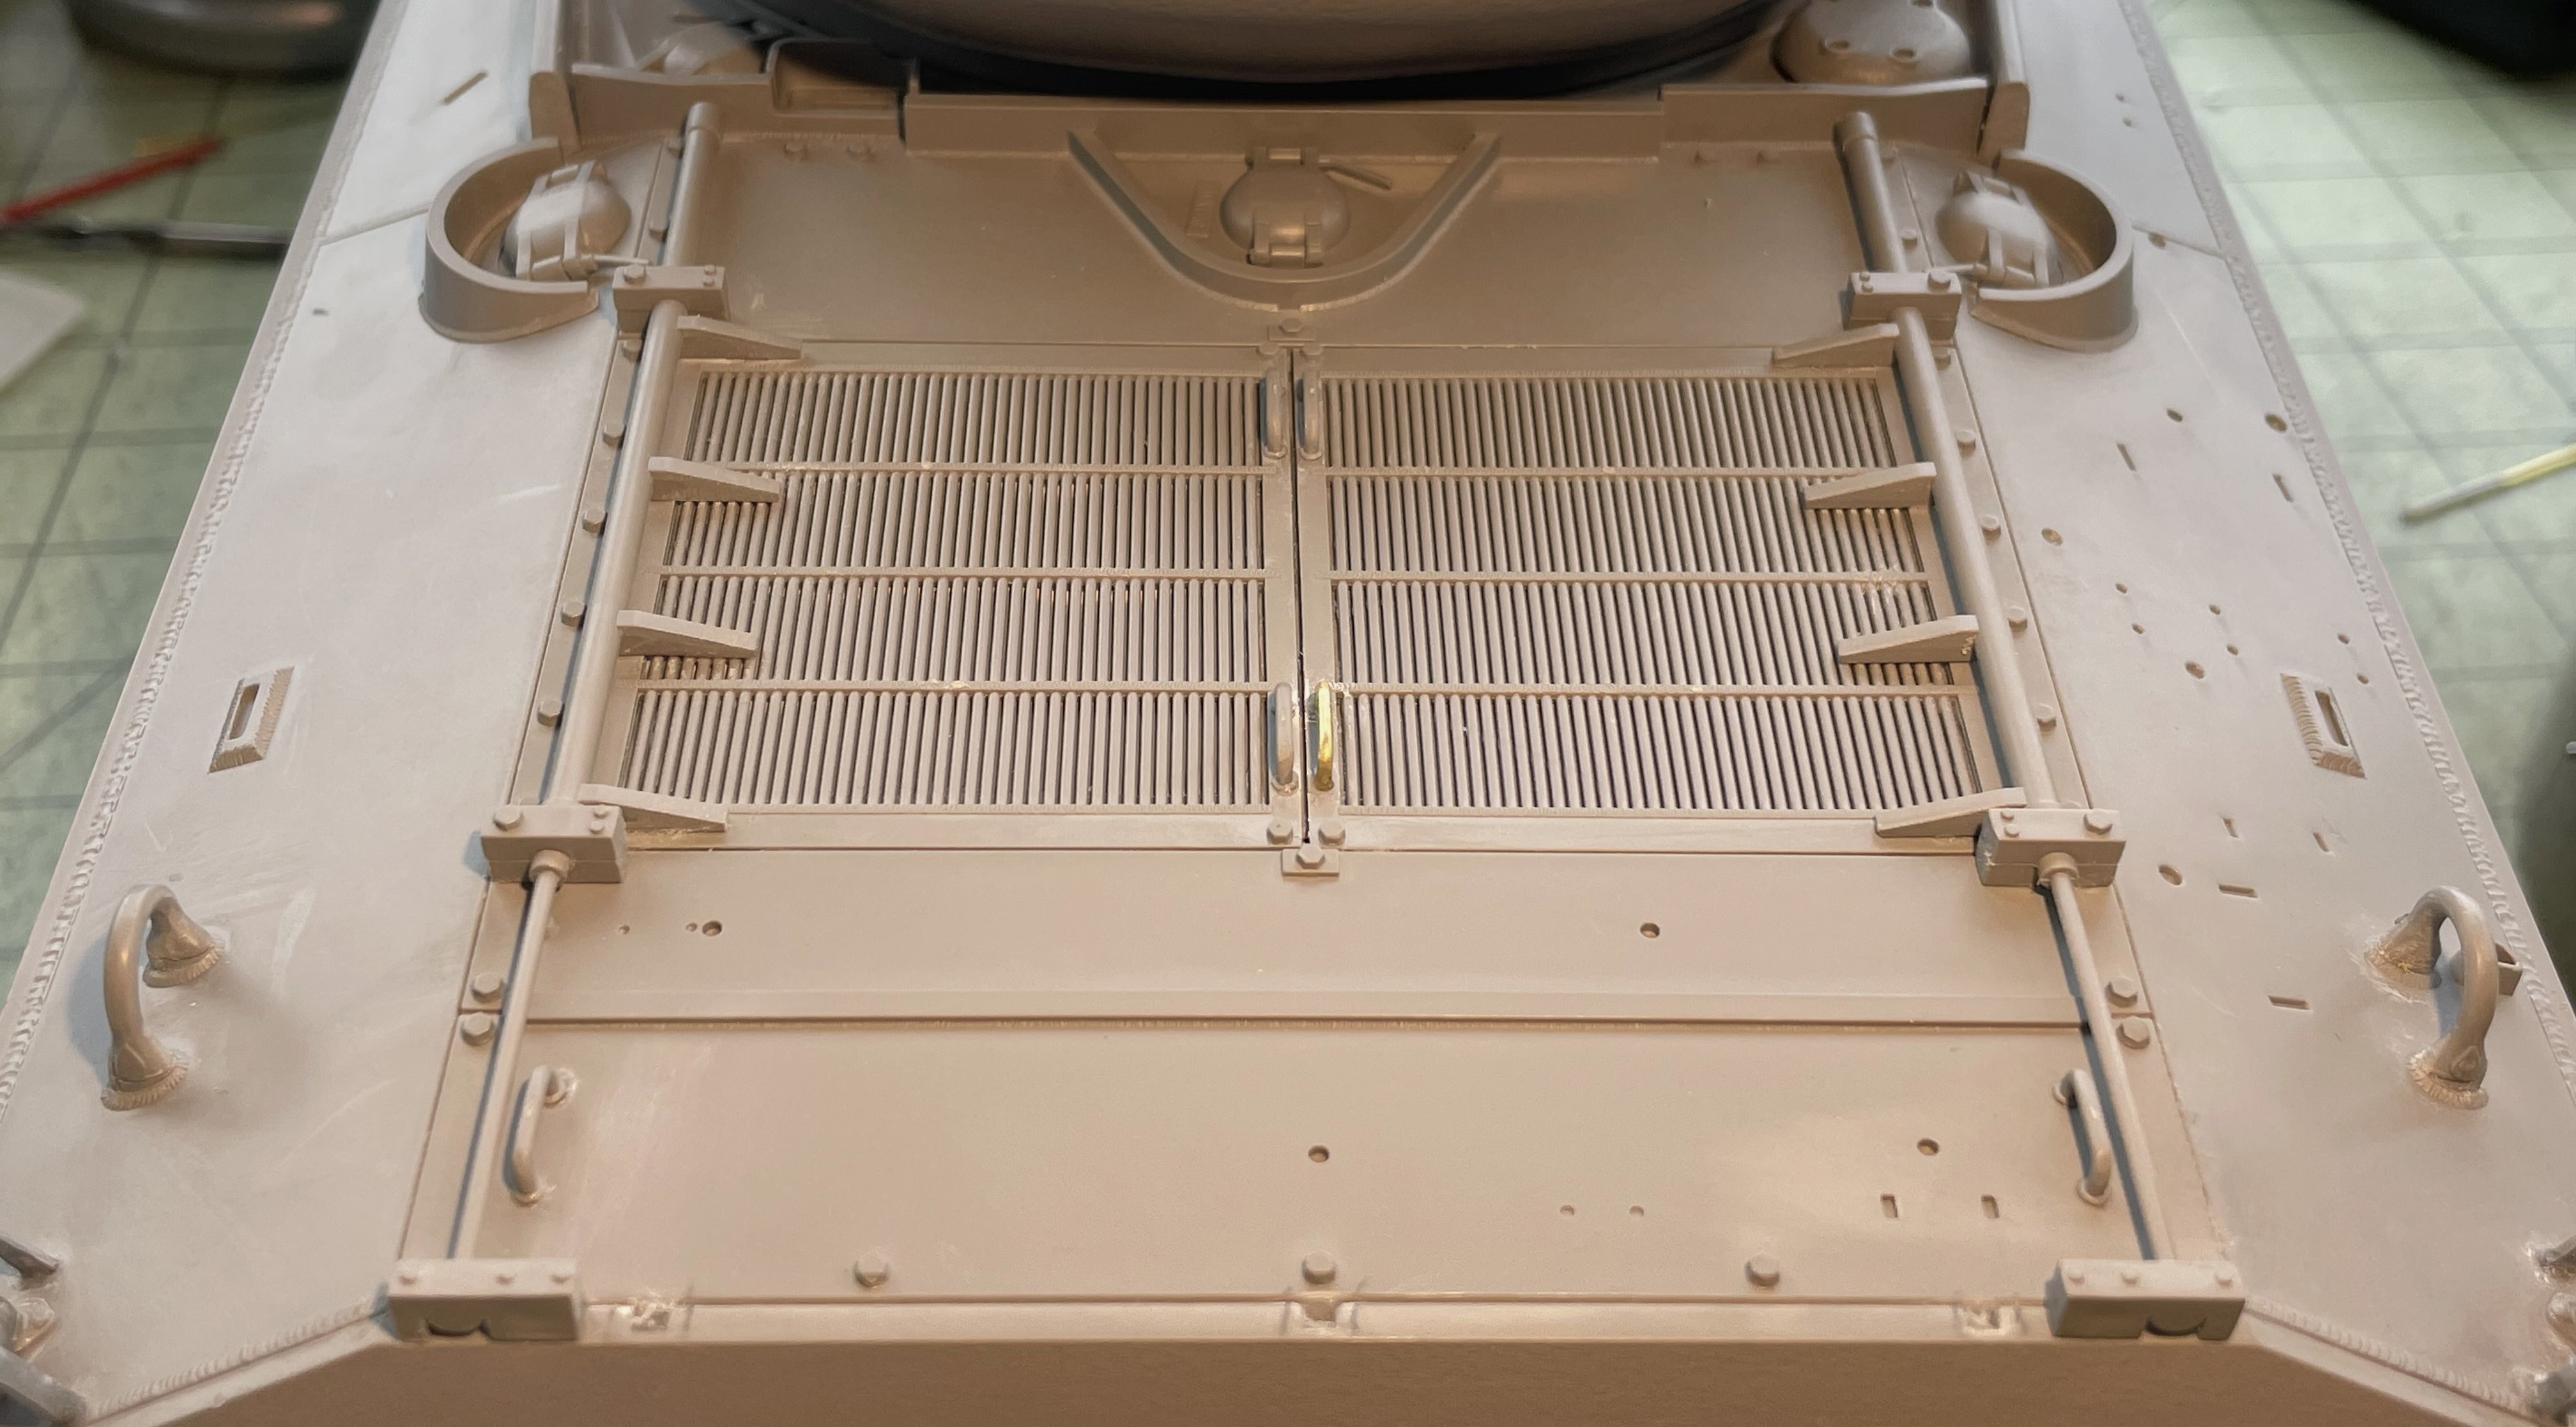
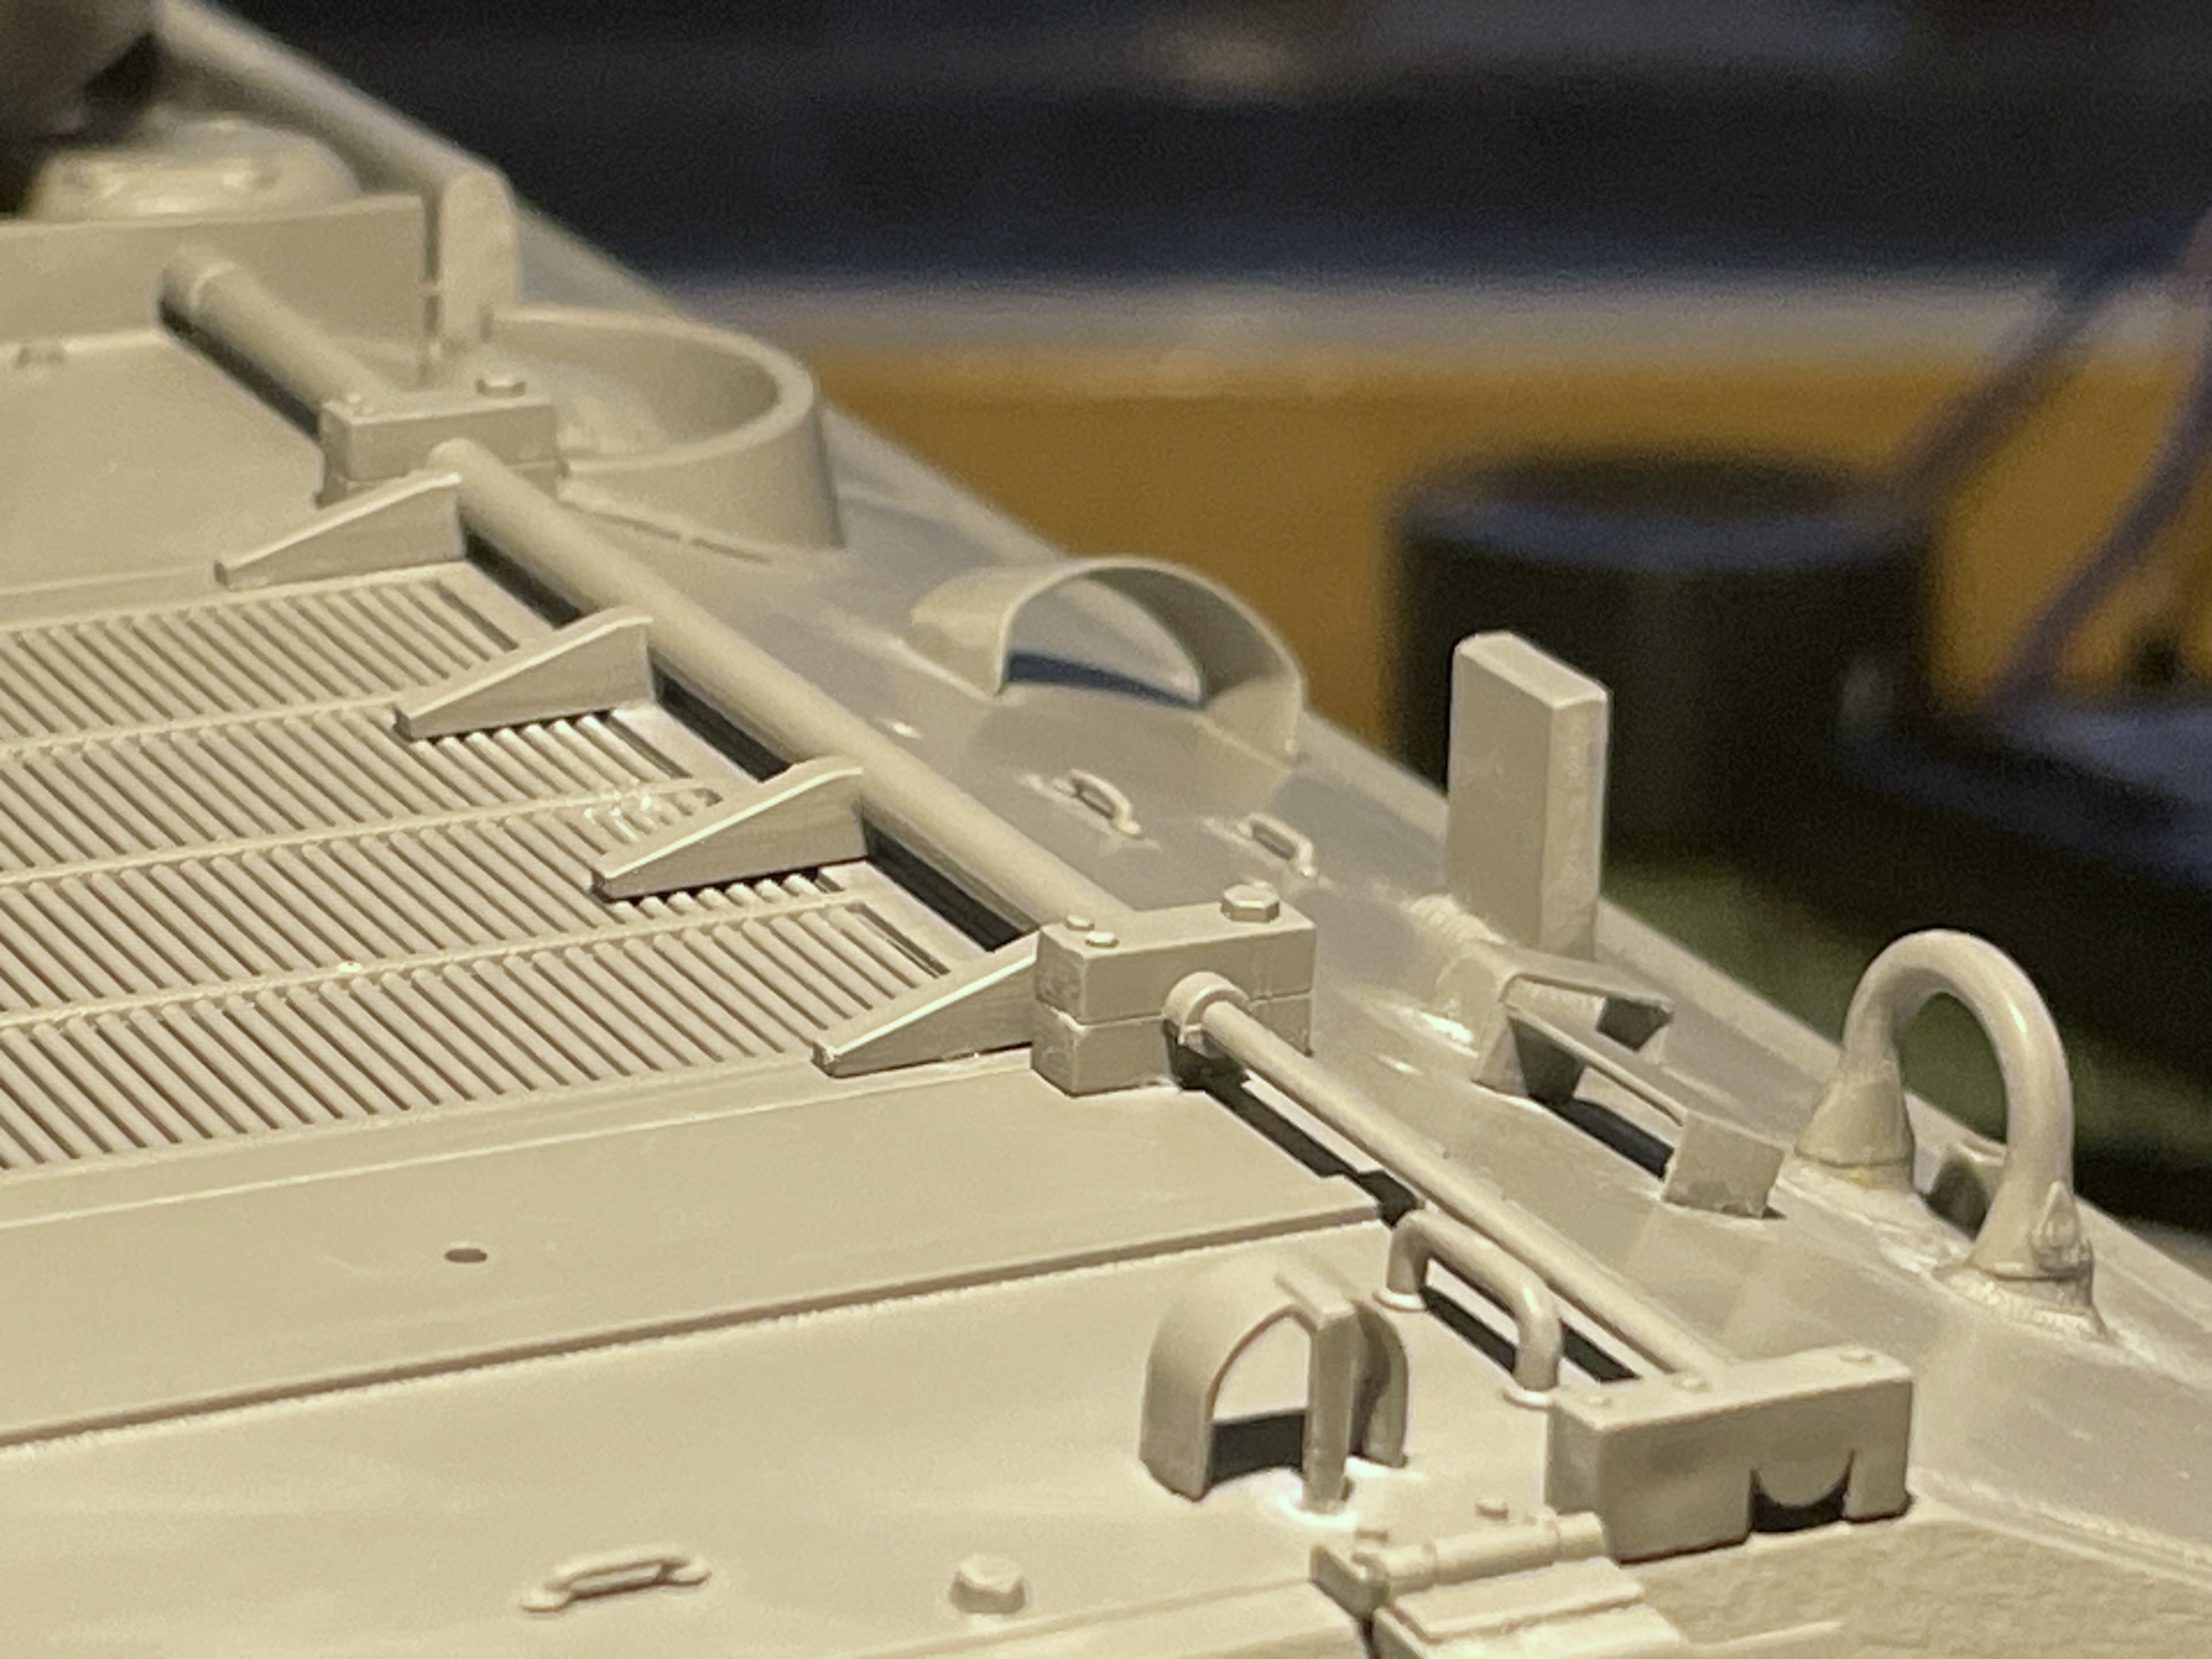
The diorama and static builders have a lot of great potential and opportunities with this engine deck. All the plates are molded separately and the vehicle is begging for an interior kit with engine.

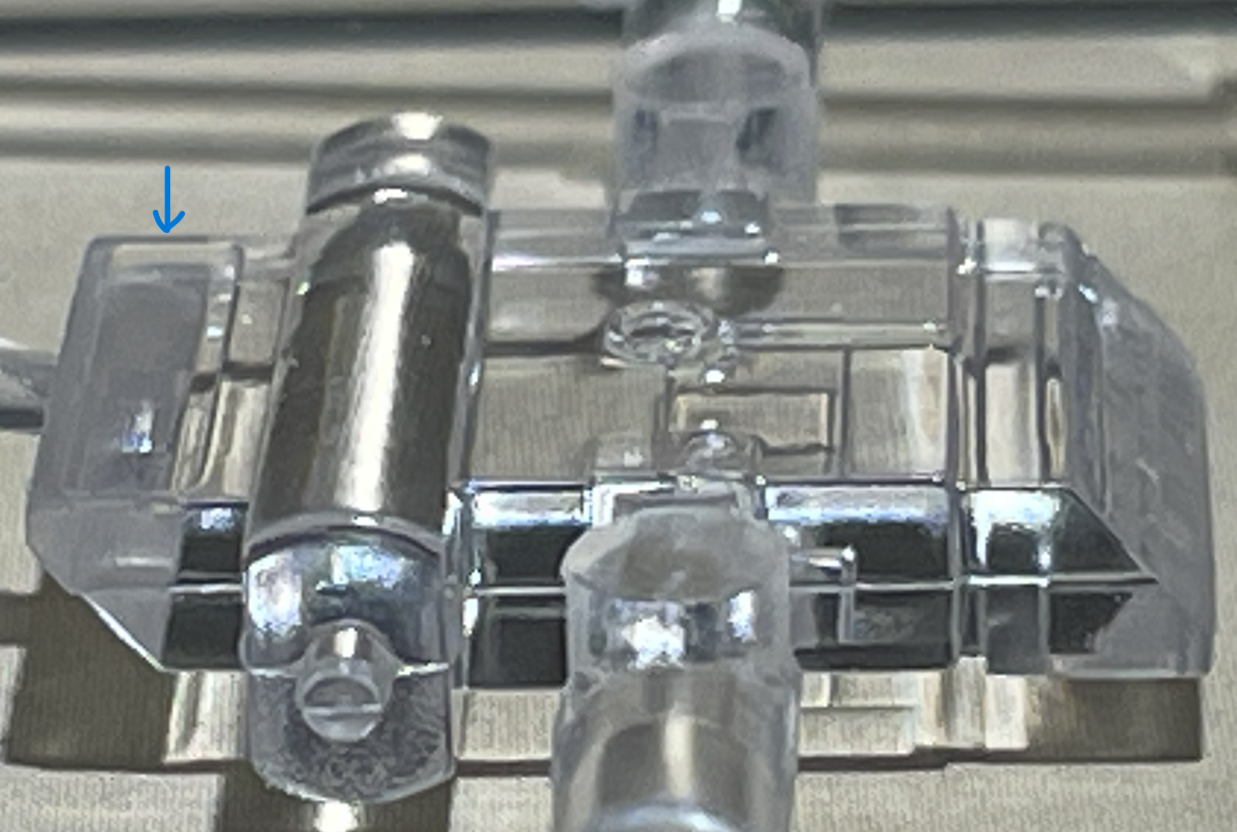
I lost a grill handle somewhere... never to be found. I had to replace it with one made of brass rod. It will require some finetuning to make the base similar to the other ones.

1/16 RC M4A3E8 Korean war - Restoring Tamiya M4 with Takom kit - build
6.JPG (1.24 MiB) Viewed 3340 times

Then the rest is just adding the details following the instructions.

1/16 RC M4A3E8 Korean war - Restoring Tamiya M4 with Takom kit - build
8.JPG (1.16 MiB) Viewed 3340 times
1/16 RC M4A3E8 Korean war - Restoring Tamiya M4 with Takom kit - build
9.JPG (1.33 MiB) Viewed 3340 times
Last edited by lmcq11 on Wed Nov 29, 2023 11:19 pm, edited 4 times in total.
User avatar
lmcq11
2nd Lieutenant
Posts: 2657
Joined: Mon Dec 19, 2016 7:42 pm
Location: Quebec, Canada

Re: 1/16 RC M4A3E8 Korean war - Restoring Tamiya M4 with Takom kit - build

Post by lmcq11 »

The tools will be added later.

Take note of the tiny detailed plastic tie downs, a rare sight in 1/16 scale.

1/16 RC M4A3E8 Korean war - Restoring Tamiya M4 with Takom kit - build
10.JPG (1014.58 KiB) Viewed 3340 times
1/16 RC M4A3E8 Korean war - Restoring Tamiya M4 with Takom kit - build
11.JPG (1.52 MiB) Viewed 3340 times

Regards, Louis
Last edited by lmcq11 on Wed Nov 29, 2023 11:12 pm, edited 3 times in total.
User avatar
Ecam
Warrant Officer 1st Class
Posts: 1757
Joined: Sun Jul 13, 2014 6:30 pm
Location: Lake of the Ozarks, USA

Re: 1/16 RC M4A3E8 Korean war - Restoring Tamiya M4 with Takom kit - build

Post by Ecam »

As I understand it those larger hinges included a torsion bar system to aid in opening the hatches. 15 M4 based AFVs? And I thought I had it bad! Great work so far.
"Don't believe everything you see on the internet" - George S. Patton

Eric
User avatar
Herr Dr. Professor
Captain
Posts: 4110
Joined: Mon Apr 22, 2019 10:48 pm
Location: Southern Wisconsin USA

Re: 1/16 RC M4A3E8 Korean war - Restoring Tamiya M4 with Takom kit - build

Post by Herr Dr. Professor »

Louis, 15 M4 based AFVs---aw, you're only getting started. Thanks for the tip on the instruction sheet's idiosyncracy regarding decals. I do hope to get to the kit someday, likely as a static build because I like those, too.
User avatar
lmcq11
2nd Lieutenant
Posts: 2657
Joined: Mon Dec 19, 2016 7:42 pm
Location: Quebec, Canada

Re: 1/16 RC M4A3E8 Korean war - Restoring Tamiya M4 with Takom kit - build

Post by lmcq11 »

Herr Dr. Professor wrote: Thu Nov 30, 2023 2:46 pm Louis, 15 M4 based AFVs---aw, you're only getting started
I've been doing three to four 1/16 tank builds per year for past 20 years, it adds up...


Continuning with the rear of the tank


The tow hook comes in 3 parts and is operable, a nice touch.


1/16 RC M4A3E8 Korean war - Restoring Tamiya M4 with Takom kit - build
1.jpg (508.45 KiB) Viewed 3264 times

Well detailed too.


1/16 RC M4A3E8 Korean war - Restoring Tamiya M4 with Takom kit - build
2.jpg (684.89 KiB) Viewed 3264 times


Tow hook open. The back plate has been completed, missing are the exhaust diffusers and the mud guards.

1/16 RC M4A3E8 Korean war - Restoring Tamiya M4 with Takom kit - build
3.JPG (1.23 MiB) Viewed 3264 times

View of the late model diffusers, taken from Prime Portal website, it has an excellent M4A3E8 walk around, a must for such build. Very grateful.

1/16 RC M4A3E8 Korean war - Restoring Tamiya M4 with Takom kit - build
3a.png (1.06 MiB) Viewed 3264 times

The two Takom diffusers are not hollow, the grills have a 1.5mm very thick back plate. Because there will have a smoker attached to the exhaust pipes, i have no choice but to create working diffusers to allow the smoke to go through, no way around it. The heavy lifting is done with the Dremel to get rid of the thick back plate. I wish Takom had made them hollow like they should have.

1/16 RC M4A3E8 Korean war - Restoring Tamiya M4 with Takom kit - build
4.JPG (1.4 MiB) Viewed 3264 times

They are then cleaned up and finetuned with a sharp blade, taking at least one hour each.

Here checking things out toward the end of the first grill, not perfect yet but slowly getting there. Close up pictures are a great tool to see imperfections.

1/16 RC M4A3E8 Korean war - Restoring Tamiya M4 with Takom kit - build
5.JPG (314.37 KiB) Viewed 3264 times

Good thing the inside face will not show. Here next to the second one about to get the same process.

1/16 RC M4A3E8 Korean war - Restoring Tamiya M4 with Takom kit - build
5a.JPG (1.55 MiB) Viewed 3264 times

Exhaust diffusers are assembled.

1/16 RC M4A3E8 Korean war - Restoring Tamiya M4 with Takom kit - build
6.JPG (2.39 MiB) Viewed 3264 times

For those who builds a WW2 version, the parts are included and no hard work is required for a working diffuser.

1/16 RC M4A3E8 Korean war - Restoring Tamiya M4 with Takom kit - build
7.JPG (2.08 MiB) Viewed 3264 times

This is an RC vehicle and the upper hull needs to remain removable. The attachments for the diffusers are quite weak, and cannot be attached to the lower and upper hull at the same time. After a brief analysis, i have opted to attach the diffusers to the lower hull.

1/16 RC M4A3E8 Korean war - Restoring Tamiya M4 with Takom kit - build
8.JPG (1.95 MiB) Viewed 3264 times

Continuing on following post
Last edited by lmcq11 on Sat Dec 02, 2023 4:08 am, edited 1 time in total.
User avatar
lmcq11
2nd Lieutenant
Posts: 2657
Joined: Mon Dec 19, 2016 7:42 pm
Location: Quebec, Canada

Re: 1/16 RC M4A3E8 Korean war - Restoring Tamiya M4 with Takom kit - build

Post by lmcq11 »

With the upper hull in place, the diffusers were glued to the lower hull on the sides only and are kind of floating at this point. You can see that i did not clean the front grills as i am interested in seeing the smoke coming out at the rear. But the diffusers have an open top, so at the same time that i am building a better anchor for the diffusers, i have to close the top because the smoke will reenter the chassis and come out of hatches, etc.

1/16 RC M4A3E8 Korean war - Restoring Tamiya M4 with Takom kit - build
9.JPG (882.36 KiB) Viewed 3263 times

The diffusers are now solidly in place, and the lower hull exhaust area is sealed, preventing smoke from going back into the hull.

1/16 RC M4A3E8 Korean war - Restoring Tamiya M4 with Takom kit - build
10.JPG (1.69 MiB) Viewed 3263 times

The upper hull slides into place, and the two parts hinges of the diffuser join correctly.

1/16 RC M4A3E8 Korean war - Restoring Tamiya M4 with Takom kit - build
11.JPG (1.9 MiB) Viewed 3263 times

The two attachment rods are added underneath.

1/16 RC M4A3E8 Korean war - Restoring Tamiya M4 with Takom kit - build
12.JPG (1.68 MiB) Viewed 3263 times

The Takom rear section has now been fully transposed to the Tamiya chassis.

1/16 RC M4A3E8 Korean war - Restoring Tamiya M4 with Takom kit - build
13.JPG (1.22 MiB) Viewed 3263 times


Views of the mud guards and mounts.

1/16 RC M4A3E8 Korean war - Restoring Tamiya M4 with Takom kit - build
14a.png (1.51 MiB) Viewed 3263 times
1/16 RC M4A3E8 Korean war - Restoring Tamiya M4 with Takom kit - build
14b.png (1.16 MiB) Viewed 3263 times

The detailed mug guard mounts are well represented by Takom. Take note of the detailed tank infantry phone. The storage rack at the back has not been installed yet, waiting to get further towards the end of the build to install this fragile part.

1/16 RC M4A3E8 Korean war - Restoring Tamiya M4 with Takom kit - build
16.JPG (1.98 MiB) Viewed 3263 times

However, the mud guards are totally warped, a molding defect. It's quite rare to see such defect on a model these days. With the warping issue with the upper hull and now this, Takom has a quality assurance problem in the production department.

1/16 RC M4A3E8 Korean war - Restoring Tamiya M4 with Takom kit - build
17.jpg (1.14 MiB) Viewed 3263 times

There is nothing that can be done with the mud guards, i tried microwaving them, hot water... nothing can flatten them. Replacements have to be scratch build. Oh, i could make a complaint and probably wait weeks for replacements but luckily, the part is easy to redo and i don't want to wait. However, i suggest to everyone that owns a AHHQ model to check their parts. I assume not everyone has the same issues with their kits, but they might not be interested in scratch building replacements either.

1/16 RC M4A3E8 Korean war - Restoring Tamiya M4 with Takom kit - build
18.JPG (1.51 MiB) Viewed 3263 times

continuing on following post
Last edited by lmcq11 on Sat Dec 02, 2023 4:11 am, edited 4 times in total.
User avatar
lmcq11
2nd Lieutenant
Posts: 2657
Joined: Mon Dec 19, 2016 7:42 pm
Location: Quebec, Canada

Re: 1/16 RC M4A3E8 Korean war - Restoring Tamiya M4 with Takom kit - build

Post by lmcq11 »

Replacements were made in stronger 1mm plasticard in 30 minutes using the Takom part as guide. I have reused a small attachment point from the original.

1/16 RC M4A3E8 Korean war - Restoring Tamiya M4 with Takom kit - build
19.JPG (768.39 KiB) Viewed 3262 times

The mud guards are held in place with M0.8 brass bolt, nuts and washers, and are replaceable.

1/16 RC M4A3E8 Korean war - Restoring Tamiya M4 with Takom kit - build
20.JPG (1.82 MiB) Viewed 3262 times

Replacement mud guards are in position. I have tried to reproduce the placement seen in reference pictures, but needed to adapt a bit. Need some finetuning as i can see some small issues while looking at the pictures.

1/16 RC M4A3E8 Korean war - Restoring Tamiya M4 with Takom kit - build
21.JPG (1.45 MiB) Viewed 3262 times
1/16 RC M4A3E8 Korean war - Restoring Tamiya M4 with Takom kit - build
22.JPG (2.34 MiB) Viewed 3262 times
1/16 RC M4A3E8 Korean war - Restoring Tamiya M4 with Takom kit - build
23.JPG (2.7 MiB) Viewed 3262 times

The tip of the little exhaust pipe had to be moved from the lower hull to the upper hull in order to open the hull.

1/16 RC M4A3E8 Korean war - Restoring Tamiya M4 with Takom kit - build
24.JPG (2.82 MiB) Viewed 3262 times
1/16 RC M4A3E8 Korean war - Restoring Tamiya M4 with Takom kit - build
25.JPG (2.12 MiB) Viewed 3262 times

The model as it stands today. Next step, the completion of the frontal area.

1/16 RC M4A3E8 Korean war - Restoring Tamiya M4 with Takom kit - build
26.JPG (2.87 MiB) Viewed 3262 times

Regards, Louis
Post Reply

Return to “Sherman”