After a few complicated builds and while i wait for the paint to dry on the Sho;t, its time to plan for something more easy. I mean something where i do not have to rebuild everything from scratch myself so this build will be using a mainstream kit.
It will be a M4A3E8 (76) W-HVSS Sherman of the Korean war, probably my 14th Sherman based model.
- 1/16 RC M4A3E8 Korean war - Restoring Tamiya M4 with Takom kit - build
- 1.JPG (1.7 MiB) Viewed 15753 times
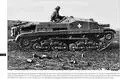
I have this used Tamiya M4 that i purchased on eBay maybe 3 years ago. The seller listed it with a picture of a model inside an opened bag where only the top of the chassis was showing. The auction was titled something like "Sherman restoration project" and he was asking for $100. I could see it was a Tamiya M4 but had no clue of the release version, condition or what was included in the bag. I offered $80 and he accepted. At that price, there was no real risks for me.
Upon opening the box, i was happily surprised. It's was a complete 1/16 Tamiya M4, missing a few small items on the chassis and turret. I did not really care, its the chassis that i wanted as i was planning for a Nick Aguilar conversion at the time, my third.
- 1/16 RC M4A3E8 Korean war - Restoring Tamiya M4 with Takom kit - build
- 2.JPG (1.85 MiB) Viewed 15753 times
There are only two easily repairable broken suspension units.
- 1/16 RC M4A3E8 Korean war - Restoring Tamiya M4 with Takom kit - build
- 3.JPG (1.6 MiB) Viewed 15753 times
- 1/16 RC M4A3E8 Korean war - Restoring Tamiya M4 with Takom kit - build
- 3a.JPG (1.77 MiB) Viewed 15753 times
Under the hood, big surprise, it's not the expected empty hull with an old broken clutch gearbox, it is the latest 56014 full option release, with twin motor gearbox, MF-02 and T-05 boards, spreaker, rotation and elevation units. I do not really care about the electronics because i plan to convert to TK-7.1 but this is a high value model. For $80, i hit the jackpot.
- 1/16 RC M4A3E8 Korean war - Restoring Tamiya M4 with Takom kit - build
- 4.JPG (2.73 MiB) Viewed 15753 times
And there is that bag full of spare parts. I can see that the previous owner collected parts for a restoration project, but somehow decided to get rid of it.
- 1/16 RC M4A3E8 Korean war - Restoring Tamiya M4 with Takom kit - build
- 5.JPG (2.96 MiB) Viewed 15753 times
Now, for the restoration, i plan to use a maintream kit. I have these two M4A3E8 models on inventory to choose from. Its incredible how the price of these two kits can vary from one seller to another. I got really good price on both of them. I got the I Love kit (Trumpeter) version with upgrade set for only US $102 from German Ebay sellet MS-Plueth and the Takom-AHHQ Korean war version for only US $94 from Sunward Hobbies with free shipping... That's almost the price of a new 1/35 kit with shipping these days.
Let's investigate which one is the best option for the restoration, well, actually it's more like an upgrade.
- 1/16 RC M4A3E8 Korean war - Restoring Tamiya M4 with Takom kit - build
- 6.JPG (2.03 MiB) Viewed 15753 times
Starting with the upper hull, the Takom part is a perfect fit. Need to adjust the height and to create an all around base for it to sit on, but the dimensions are perfect. Mud guards molded separately and need to be glued and could become weak points if not done correctly.
- 1/16 RC M4A3E8 Korean war - Restoring Tamiya M4 with Takom kit - build
- 7.JPG (1.44 MiB) Viewed 15753 times
Same with the Trumpeter upper hull, perfect fit. This one comes with molded on front and side mud guards. As such, this one has a small advantage as its probably a bit stronger for RC purposes. It mimics the original Tamiya part but a lot more detailed.
- 1/16 RC M4A3E8 Korean war - Restoring Tamiya M4 with Takom kit - build
- 8.JPG (2.34 MiB) Viewed 15753 times
Takom on the left (darker gray parts) and Trumpeter on the right (light grey parts). They are obviously both Large Hatch upper hull. There is lIttle differences in the contruction and layout. Strangely, the hatches on the Takom kit are about 0.5mm to 1mm smaller than on the Trumpeter. Its noticeable. I do not know yet which is more accurate, but it does not impact the quality of the model. There are both superb.
- 1/16 RC M4A3E8 Korean war - Restoring Tamiya M4 with Takom kit - build
- 9.JPG (1.71 MiB) Viewed 15753 times
Continuing on following post