Page 10 of 12
Re: TAMIYA M1A2 Displaymodel
Posted: Fri Jun 26, 2020 3:39 pm
by kintaroukinji
I made a tow bar to be installed in front of the M1 Abrams. Tow ropes are a staple in WWII tanks, but tow bar seems to be common in modern tanks.
This was made from WAVE's 8mm? plastic pipe and plastic plate laminate.
The adapter is attached to the tow bar.
Some real tanks have tow bar and some do not, but I added it because I thought it would look better as a model with the tow bar.
Re: TAMIYA M1A2 Displaymodel
Posted: Fri Jun 26, 2020 5:19 pm
by BarryC
I agree the Tow Bar looks great hanging from the front and adds a level of interest to the forward hull.


Barry
Re: TAMIYA M1A2 Displaymodel
Posted: Sat Jun 27, 2020 4:37 am
by kintaroukinji
Barry, thanks for your comment. As you say, I also felt that adding the Tow Bar would make the tank forward hull look much better.
Band for fixing
Posted: Tue Jul 07, 2020 7:05 am
by kintaroukinji
I made a belt to fasten and fix jerry cans. You can see model works of tanks in which ammo boxes, luggage, jerry cans, etc. are randomly placed in the bustle rack or on the turret, but in the case of real tanks, it is obvious that these will jump out when tank starts to run. I've heard that real tank crews take great care in arranging or securing their luggage so that it doesn't fall off, hinder sensors or their field of view. It seems natural because these can affect their lives during actual combat.
I bent the brass wire into a rectangle and soldered one brass wire across the center of the rectangle to make a buckle for the band. The band material can be anything that is strip-shaped and flexible, but I used a brass band plate this time.
With this method, you can easily make the binding band and buckle in a shape that looks good, although it does not have a length adjustment function like the real one. If the belt material is more flexible, such as cloth or paper, this buckle can allow for length adjustment.
A fixed band for jerry cans. I also put a band on the blanket and small arms.
TAMIYA M1A2 Displaymodel
Posted: Tue Aug 04, 2020 9:58 am
by kintaroukinji
The searchlight attached to the anti-sniper/objective MG can be turned on with an LED. I used a thin enameled wire to wire the LED and routed it through the cable duct between the MG and the turret. The headlights and blackout headlights can also be switched.
https://www.youtube.com/watch?v=VX-UbVC_DLE
Re: TAMIYA M1A2 Displaymodel
Posted: Tue Aug 04, 2020 10:07 am
by HERMAN BIX
Such sweet details Sir.
Thanks for keeping us in on your progress.
I will certainly use your technique to make straps for stowage on any vehicle I do.
Re: TAMIYA M1A2 Displaymodel
Posted: Wed Aug 05, 2020 6:52 am
by kintaroukinji
HERMAN BIX,
thank you for your comment. My method of detailing up M1A2 is not very planning, and the method is also trial and error, so it is not efficient either. However, that is also a hobby, so I consider it one of my pleasures.
Re: TAMIYA M1A2 Displaymodel
Posted: Wed Aug 05, 2020 12:10 pm
by BarryC
Keep up the great work!
I have a pile of scrap from "the planned" that turned out to be "trial & error" before it was right!
I agree, I also enjoy the pleasure that the inefficiency brings to my hobby.

Barry
Re: TAMIYA M1A2 Displaymodel
Posted: Thu Aug 06, 2020 4:35 am
by kintaroukinji
Barry,
Thanks for your comment. If this is work or business, such inefficiency would not be tolerated. As a hobby, there is no delivery date, and the modification method and final quality level are my preference. It's a world of self-satisfaction! On the other hand, it is a fact that everyone has the feeling that they want someone to see, appreciate their work, praise them, and state their opinions even if they are hobbies. This would be one of the most important points of this site.
Main switch position change
Posted: Wed Sep 02, 2020 4:59 am
by kintaroukinji
I installed the main switch of this M1A2 model under the blow-off panel of the turret like TAMIYA's full operation RC model.

- Main switch in turret
However, in order to install the slip ring for turning the 360° turret, it is advantageous to install the battery and main switch in the under hull. The main switch should be installed in a location that is inconspicuous from the outside. When the main switch is installed at the bottom of the tank like the HengLong tank, I have to lift the tank every time I switch it on and off.
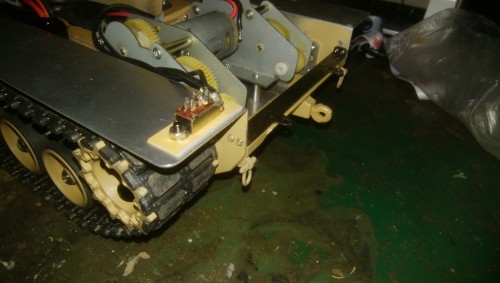
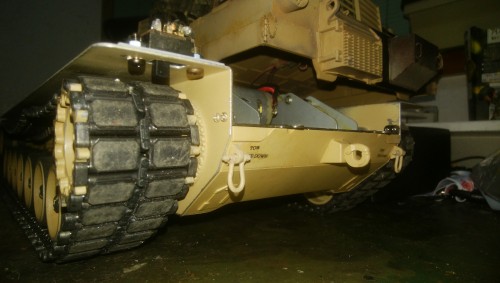
When I installed the main switch on the rear upper part of the rear drive sprocket wheel, it was hidden behind the side skirt and the switch was invisible, but within easy reach of my fingers.? I made a rectangular hole for the switch in the relevant part of the under hull and fixed it with a screw.

- Under hull Main switch

- Under hull Main switch

- Under hull Main switch
The switch is completely invisible when the upper hull is installed. But my fingers can easily reach the switch.