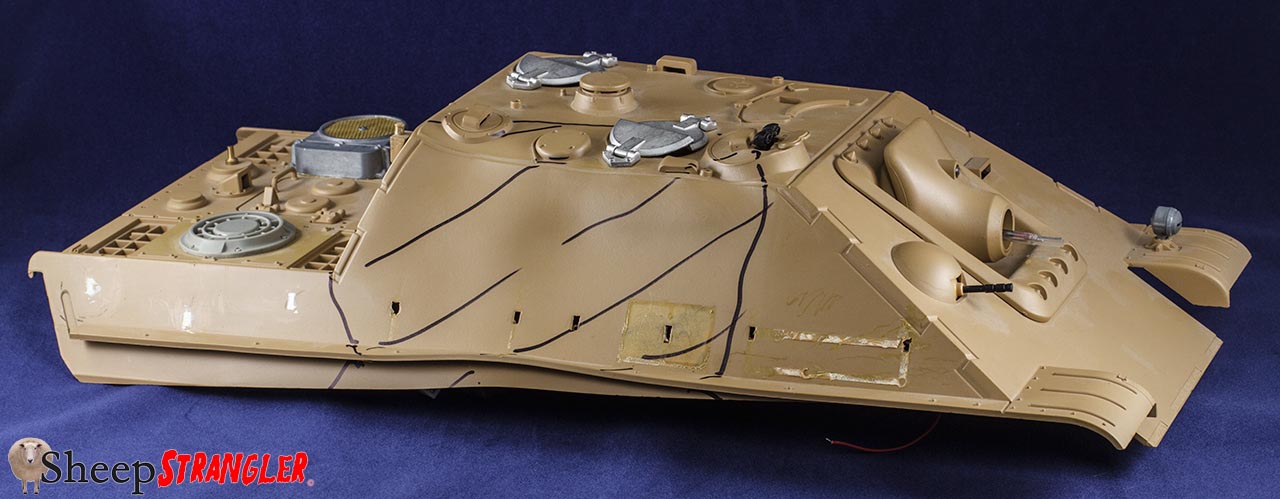
While I'm waiting for my new upper hull, I thought I'd press on with some of the upgrades I've got planned. I'd already textured the exhaust covers, but I noticed whilst mooching about on the internet that the curved deflecting covers on the late JP were different & you can see the bolts and a panel line where the two parts mate. I scribed a line round where I figured it should be, and used a round burr on my Dremel to add depressions to the four points where the bolts hold the cover in place, then smoothed it out with various sanding sticks. A couple of LionRoar hex-bolt heads were glued in the centres of the depressions and primed to check my work.
I've been wanting to test out my rolled-steel texturing technique that I picked up from one of the FAQ style books on modelling, so using a round burr, I attacked it randomly all over with various sizes, shapes and depth of ding, followed by a coat of liquid glue stippled into the plastic and paint to give it a roughish surface and break up the monotony. In between sessions I cut some of it back with a sanding stick, and then repeated the process where it looked a bit bare. Overall I'm happy with the look, and under a coat of grey primer it works well enough for me.
I also added the Tank-Modellbau sourced accurate braces to the hull after a bit of adjustment to thin down the attachment blocks (which still need weld-beads adding), although I still had to add a shim to the underside of the armoured exhaust surrounds so they fit flush to the hull. I'd added weld-beads from Milliput and textured them some time ago too, which adds a bit more detail.
This avo I've been assembling the ABER aft stowage boxes, which were time-consuming to do, but as I have all the PE tools I could want, it wasn't too difficult once I'd settled into the rhythm. I used solder paste dispensed from a hypodermic needle to get the stuff where I wanted it, and a flux pen to ease the connections too. The small parts were a bit of a trial, but I hit on a way of getting them in place and keeping any overflow to a minimum. After a dab with the solder pen, a tiny blob of solder was added, and the part pressed into it. Using tweezers to hold the piece in place, I then held it down with my soldering iron, and also gave it a blast with my gas soldering iron, with the hot-air adapter in place. This was great at melting the solder under the parts without letting too much heat escape and melt nearby joints. I suspect it took me 3+ hours to do one box including the clasps and hinges, but as I've used only solder to hold it all together, I'm quite pleased with the result. It should take a bit more hammering than if I'd used CA on everything, hopefully


There's still plenty of work to do on it, and I'm currently weighing my options with the pioneer tools, whether to improve on what is provided in the box, or to spend some cash on metal/PE upgrades. There are also lots of small parts, weld beads & so forth to look into while I wait for the hull from Dave @ Forgebear

Heng Long King Tiger, Jagdpanther... so far.