Time for part 2!
Well after sealing the lower hull I began to experience problems with the track overriding the drive sprocket I thought this maybe dude to the loss of hull stiffness from the removal of the battery box and screw posts etc, so I decided to brace the hull and this would also give me a place to mount a serve for the servo traverse I planned to install.
I was going to use some plastic angle I had but was not sure if this would give me the required stiffness, so I chose too use aluminium angle instead ( 20mmx20mm and 3mm thick) perhaps overkill but I thought ' it cant be too stiff!

). So after measuring and cutting I decided to rivet it all together and to the hull, it also gave me a nice semi enclosed section to install the electronics.

- 030038c9.jpg (49.04 KiB) Viewed 6416 times
Also I wanted to be able to switch the tank on/off with out turning it over or opening it so I removed 2 of the upper hatches in the hull ( I believe there air inlets)
- 030038c7.jpg (49.4 KiB) Viewed 6416 times
Then I fabricated 2 new covers from plasticard

- 030038c5.jpg (75.85 KiB) Viewed 6416 times
Hopefully you can't tell they have been removed and redone! Also I wanted semi hinged mud flaps (I was worried if I did a double hinge they would be too flexible and liable to damage, so I cut and hinged ( hinged using some strong adhesive Velcro I had) along the lower section only

- 030038cc.jpg (39.22 KiB) Viewed 6416 times

- 030038cb.jpg (41.87 KiB) Viewed 6416 times
My finger for demonstration!
Now after all this the tracks were still overriding the sprocket so I suspected that the rear parts of the side skirts maybe causing this as they collect alot of junk behind there against the sprocket ( you see alot of Leo's with this part hinged up,I imagine for the same reason) I also decided to fit track inducers at the same time to help

- WP_20151119_001 (2).jpg (42.08 KiB) Viewed 6416 times
I may at some point fabricate the skirt and model it hinged up, but as is for now!
Anyway after all this work- still the track overrode the sprocket! Time for some head scratching!
And the solution proved to be simple! Although the nice soft suspension was great it was to soft with the weight of the additional modifications I had added, meaning that the suspension compressed far to easily when turning causing excessive slack in the track combined with the horizontal torsion in a turn causing the track to override!
The solution was easy! I just moved all the suspension springs round to the next hole! It runs great now! Admittedly the tank does not bounce and roll like it used too dude to sharp turning/ acceleration/ breaking but its still there to some extent

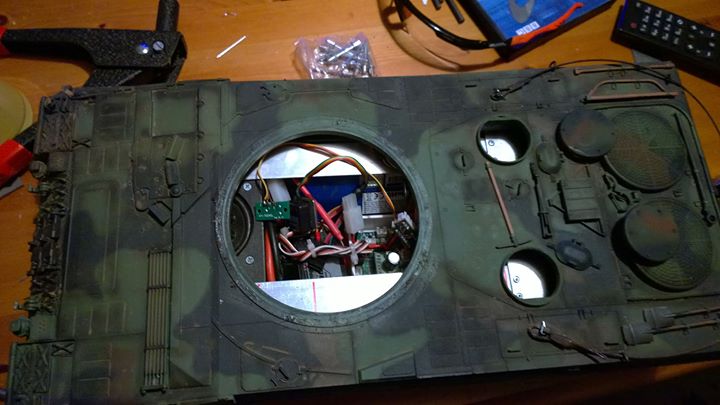
Finally here is a picture of the internals crammed in, we have in there an IBU2 with TPA, visaton large speaker in the hull playing gun and other sound effects and another visaton speaker between the gear boxes ( where the smoker used be, there to much trouble with to be fair) playing the engine sounds also a turnigy 5000MAh battery, I had planned to drill out the engine grills on the upper hull to let abit more sound out but did about 10% of one and have not bothered with the rest yet! Also plan to fit some viper volume remotes at some point!

- 030039e6.jpg (53.47 KiB) Viewed 6416 times
Now a word of warning! If you plan to fit servo rotation to the hull and have removed the battery box, DO NOT seal the battery cover in as it makes aligning the servo with the turret ring much more difficult! And led to alot of adjusting and trial and error,I will know for when my challenger 2 arrives! (hopefully soon!)

- 030038c4.jpg (66.11 KiB) Viewed 6416 times
Also another interesting not is that if you have the basic IBU2 you don't need the pro version to have servo traverse ( although the pro does come with many other good features over the basic version) you simply need an RX/TX with more than for channels and map the traverse servo to one of the extra channels then program your TX to actuate the servo with the same stick moment as the normal traverse, the turret rotation sound is still played and you will retain the same stick layout.
Anyway once aligned I can't recommend this mod enough for modern tanks, I had tried several different motors in the heng long rotation unit and nothing was satisfactory.
Sponghoobtank82-panzerIII, panther V, tiger VI early and late and another early tiger,leopard 2a6, panzer IV F2,challenger 2