There are some important things I discovered while doing this and that I only found out through trial and error as I went along. So I suggest to read this whole post through before cutting anything.
I am glad I bought the Taigen hinges- instead of somebody else's if they even make them- for several reasons I will describe in a minute. These metal hatches do not have precise movement at all-the hatches have plenty of wobble from the hinges. As it happens this is actually a good thing, because you need a lot of play to open and close the hatches, as you will see once you have installed them.
I thought for a while about how to do this, and asked around on the forum in a post or two. And the help I received from the kind members of this forum was invaluable-as many minds are often better then one! I think this method might be one of the best ways to install these hatches, because your hole will be perfectly round- matching the hatches which are also, almost exactly perfectly round. I believe with a little care during the drilling, you could be able to match the hole with the inner round ridge, sealing portion of the hatches almost within a fraction of a millimeter- and have hatches that close and fit perfectly. I was not able to quite do this as the skill required is beyond me, but they do fit very nicely. And doing it the way described below, anybody should be able to fit the hatches to the hull well enough to achieve pleasing results, the first time round!
The alternative methods such as cutting with a dremel cutting wheel, using the sanding drum, using the grinding wheel, or the grinding stone, filing, buying one huge drill and just straight drilling, and so on, might not result in such neat results. And I was pretty surprised just how well these holes turned out to be-which is, near perfect.
So here's how i installed them.
1. I bought the hatches from artistic hobbies for $10 shipped. The reason I added these is I wanted to relocate the on off switch under a hatch that opens - and not have to reach underneath all the time to turn on the power, and quit risking that my tank would get dropped and crash to the ground. Which would really ruin my day.
Here's the hatches. They're certainly a casting, not sure if they're aluminum or some other alloy.

Photo credit: ARTISTIC HOBBIES
Notice the tiny holes, on the hatch mounting plate. They are there for a reason, and that is this: YOUR HULL IS PROBABLY ALREADY SET UP TO MOUNT THESE HATCHES PERFECTLY, ONCE YOU CUT THE HOLE. More on this later-
2. Now how to make the holes for the hatches? Anyone can see you get one chance only on this! The hole you make is forever so I put some thought into this first. I asked the question in another post and some smart fellow suggested using the type of drill that allows you to make the hole progressively bigger-they are called a "Step drill". After considering the issue I decided this tool would be the best way to make the holes. For these holes you need a very big step drill. This one cost me $18 at harbor freight.
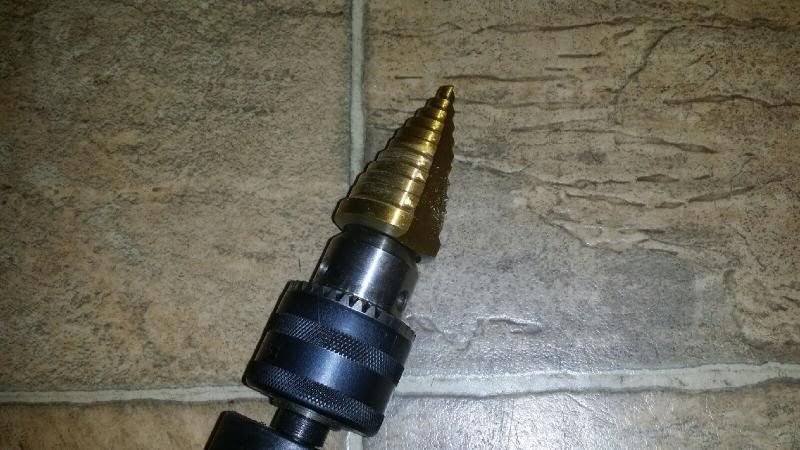
Just look how big it is. However this is the size of the drill that's required, nothing smaller will do. You will not get to the biggest step but pretty close to it. The package says the biggest "step", or last one, is 1 and 3/8" (or about 35 mm).
These step drills can be quite expensive. the first ones i looked at were $40-50, and didn't want to pay this much. Since we are just cutting plastic and not something like sheet steel, any step drill will do, after all! If you cannot borrow one of these drills from someone, I'd buy a cheap one from harbor freight or a similar cheap tool shop.
3. Now you need a pilot hole to start using the step drill. The size and even shape of the pilot hole is not important and neither is its placement. So long as you drill a pilot hole first and the hole is more or less centered, your hole should come out correctly. If you don't have a pilot hole the step drill will certainly wander- then what?!!
After thinking a bit about it, I decided to work from the top of the hull. There are several good reasons to drill from the top: There is much better access for the drill, the precision of the hole you want is not obstructed by the concave inside shape of the hatch, it is easier to trim the ridge afterwards, and you don't risk the drill chewing the headlight wires. (By the way you can see the headlight wires are in press in holders inside the hull, running near the hatches! Just pop the wires out of their holders-the top of the plastic holders are slotted- and move them out of the way before cutting.)
Now to make the pilot hole. I went to work with the dremel grinder wheel and quickly hacked a square hole where the hatch was. A more-or-less centered starter hole is all that is required.
With this step drill, don't forget - your hole will now be centered and sized completely by how you guide the drill- both vertically, and laterally, The plastic gets removed by the drill so fast the location of the pilot hole is almost irrelevant. The pilot hole is cut away instantly and becomes useless as a guide for the drill, its only real function is to prevent the drill from wandering .
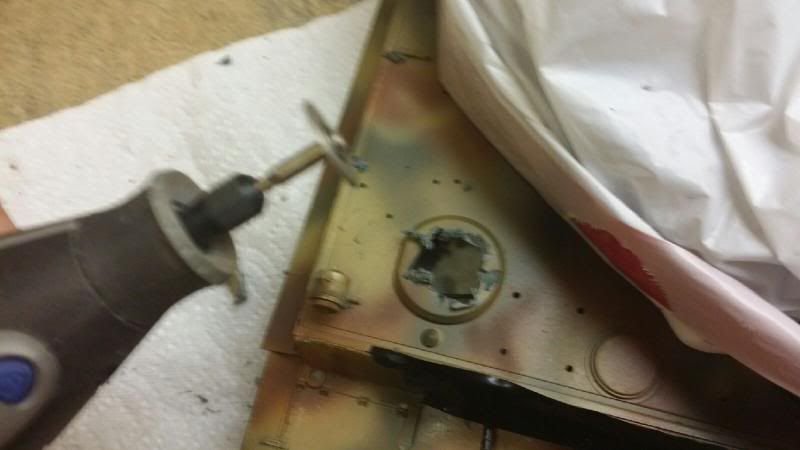
I covered the rest of the model with a big trash bag to try to keep dirt out of the works. Using the step drill though, there was not as much plastic mess as I expected. Afterwards i even blew it off with compressed air but little debris flew off.
4. Now the rest is surprisingly easy so long as one does not try to rush the job-that's the worst! Gently put the step drill in the hole, and start drilling. It is very important not to try to do it all in one step. Also please bear in mind the step drill makes very quick work of plastic and cuts extremely fast with the least pressure. If your drill has adjustable speed (mine didn't) you can guess what speed it should probably be set, at least at first.
Go slow and stop often- because it is YOU, not the tool, who determines where the hole is going to be as the step drill cuts. And how perfect your hole is (and you do want it to be perfect after all) all depends on where (laterally) you hold the drill and how much you apply slight sideways pressure as it cuts. I stopped drilling often, say every 5 seconds, for several important reasons: to check the hole to make sure it was centered, to compare and size the new hatches to where the hole is going to be when it is done, and because the plastic builds up heat very fast. The faster the heat builds up the bigger the ridge will be left behind, and the more ridge you have to cut off later.
I used the new metal hatches for sizing the hole and placing the hole. You can easily change the center of the hole by pressing one way or the other as you drill (again, laterally) but this is best done while the hole is still small. Otherwise there is a risk of making an oval instead of a circle.
5. The hole does not unfortunately come out smooth, it leaves a large ridge. You can though eliminate much work by tilting the drill to grind off much of the ridge. as you cut the hole. So after your hole is the right size, I used an x-acto (should have used the dremel!) to make the hole as smooth as you want it to be.
Now you have your hole made and I hope that now it is perfect or damn close..You will probably want to final finish the hole now unless you did a much better job with the step drill then i could do-personally I have all the skill of a trained monkey when it comes to power tools and I'm amazed i was able to pull off this mod without having to buy a new hull. If you left the hole 1 or 2 mm too small, probably the best place to stop drilling anyway, you have plenty of material left for final finishing to make your hole perfect.
6. OK here's something you might like to know now, I discovered a very pleasant surprise on this tank and that is this: The hull on this Tiger tank already HAS MOLDINGS ADDED IN, AND IS SET UP FOR THE METAL TAIGEN HATCHES TO BE INSTALLED! By that i mean, there is a small slot, and two pins on the underside of the hull next to the hatch holes you just made-and the mounting plate of the new metal hatch fits into it perfectly!
This spot might be really the only location possible to attach the mount of the hatch, so the hatch will open and close correctly, and sit closed exactly where it is supposed to. I have no idea why the factory would design the mold for the upper hull, for these pins to be there precisely to fit the taigen hatches, but they did. So if you too have a HL or airsoft Tiger and want to mount these hatches, now you know too.
Here's a picture of what your hull should probably look like inside. It shows the hatch installed already because I forgot to take a picture beforehand. There should be two small plastic ridges, i call them guide ridges, and then there are two small pins and these are for the hatch mount. The two holes that are in the mount for the hatch, just pops onto those plastic pins.
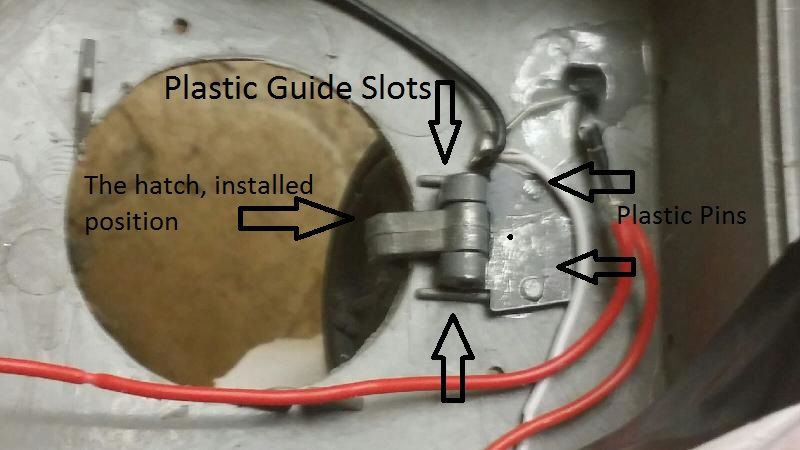
Obviously these pins were intended for the taigen hatches by the people who made the injection molds at the factory, and just included in every hull even for tanks that do not have them-as there would be no reason for them to make one mold for tank hulls with the hatches and one mold without.
So once a hole is made for the hatch, the mounting plate pops right into the pins. In fact I believe you could even use the pins to help in sizing and locating exactly how accurate your hatch hole size is-that is, before you've drilled it to final size of course-as once the hole were big enough to fit the hatch mount through, perhaps you'd have a better idea of how the hatch is going to sit.
I used Gorilla super glue to hold on the plate, after much trial fitting. I was of course, careful to keep the glue away from the hinge, pins. hatch i.e. any moving portions of the hatch! I checked and after a few minutes, the glue had swelled out a bit and was blocking the hinge from moving! Fortunately it was not quite dry, I just pried away that swelled glue and all was well again with the hatch. I submit that it would not be overkill at all, to apply some small amount of grease or other lubricant onto the moving parts, to prevent any runoff glue from getting a hold on them- and maybe seizing your hatches shut and messing up all your work!
Now once installed as described the hatch worked perfectly and opens and closes as it should. I hope your hatch comes out as good as mine!
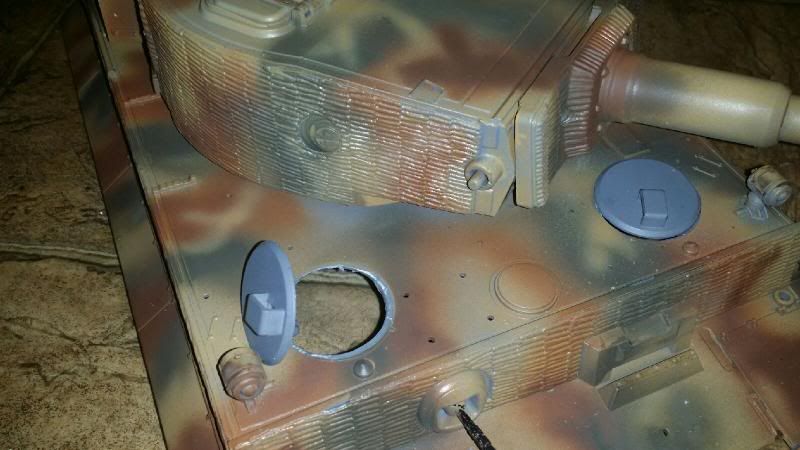
7. And here's the result of less then an hours work. It was much easier then i thought.
8. Now after a lot of thinking, here is how i mounted the switch. I would have preferred something more elegant but this is simple and about perfect in every way that counts i suppose. The mount clears the gears by about 5 or 10mm. If you lubricate the gears, I'd add some kind of splash guard, say a piece of hobby plastic, and simply glue it on under the mount.
I wrapped the connectors of the switch with some elec tape so they wouldn't touch any metal. The mount is nothing more then a computer slot blocker (or bracket, whatever they're called) that you remove when you add some kind of new card to your computer. The metal is very soft so easy to work by hand, only for tight bends did i clamp it in a vise. As you can see i wrapped it around the switch. I think you could even bend the metal 90 degrees longitudinally if that worked for what you wanted it for.
I glued the switch in place with small drops of glue in case replacement is ever needed, but if it does stick- a new mount isn't hard to come by after all.
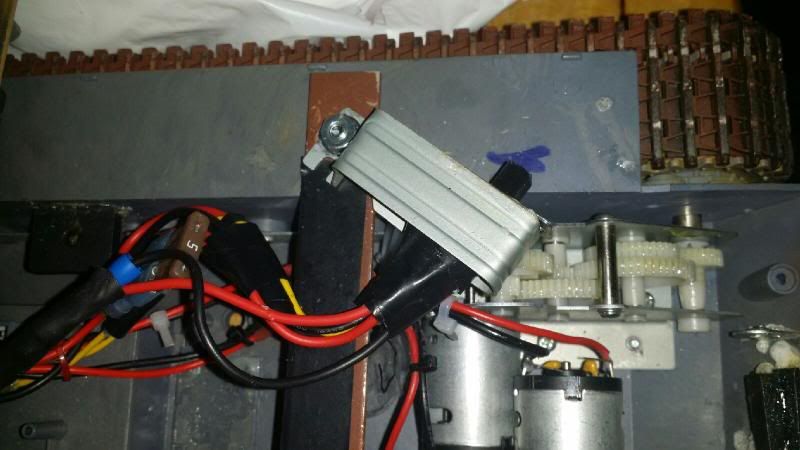
I ground out the hole on the end of the computer bracket, so it could be clamped by the same nut I use for the hull brace.
