Marc780 Tiger 1 Build

Post Reply
Marc780
Corporal
Posts: 496
Joined: Wed Mar 05, 2014 1:34 pm

Marc780 Tiger 1 Build

Post by Marc780 »

I took the tank hull apart the first time. Perhaps this will be of help to some other tank owner as some of them have a DIFFERENT disassembly method. The method I had to use is different then described elsewhere on this site. Your first clue will be, the screws above the tracks will be absent. You do NOT need to remove the tracks on this particular Tiger.

There are 4 deep seated screws in the rear of the bottom hull. You can't miss them, and these come out. Ok now HOW does the hull come off? You removed the treads like i did, and the hull screws are NOT THERE they are clearly located somewhere else then in the tutorial!

I gently pried open the hull and looked inside towards the front. It became clear there were screw holes, behind the spare tracks in their holder, on the lower front of the hull. So those had to come off. You can wiggle them off easily with a screwdriver, without breaking them. And behold, there are your last two screws, in the holes shown here.

Image

I didn't do much else to it today at all except drive it and mod the transmitter to make the battery contact improved.

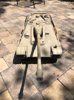
Added a brace of aluminum strip where i thought it wouldn't affect the turret rotation. Also painted the tracks with rustoleum red primer for that rusty track look, they are going to get touched up with silver at the contact points later, of course.

Image
User avatar
Markocaster
Staff Sergeant
Posts: 992
Joined: Mon Mar 31, 2014 11:16 pm
Location: Bay Area , California

Re: Marc780 Tiger 1 Build

Post by Markocaster »

Turret brace is a great idea. I will be adding to my tiger
HL /Mato tiger 1 early, Tamiya Tiger 1 early, Taigen tiger 1 mid
Taigen T34/85, HL SU-100
Jagdpanzer Lang
Taiga Jagdpanther
Heng Long Sherman DGS Firefly kit
Tamiya King Tiger (unbuilt)
Mato all metal Panzer III
1/10 Jagdpanther
Post Reply

Return to “Tiger I”