A small improvement on Famo

Up to the end of WWII
User avatar
Edwin
Corporal
Posts: 394
Joined: Tue Jun 11, 2013 8:34 pm
Location: Rheinland Pfalz Germany
Contact:

A small improvement on Famo

Post by Edwin »

Hello,

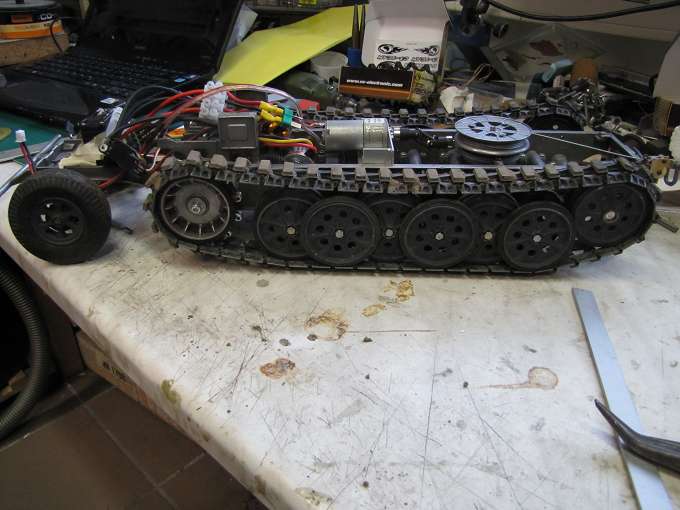
Today I have a slightly different conversion lie with me . A Famo .
His owner has given to me because the drive shafts are bent and I will occupy myself a little with the gearbox and the waves.

To find the current status of the parts.
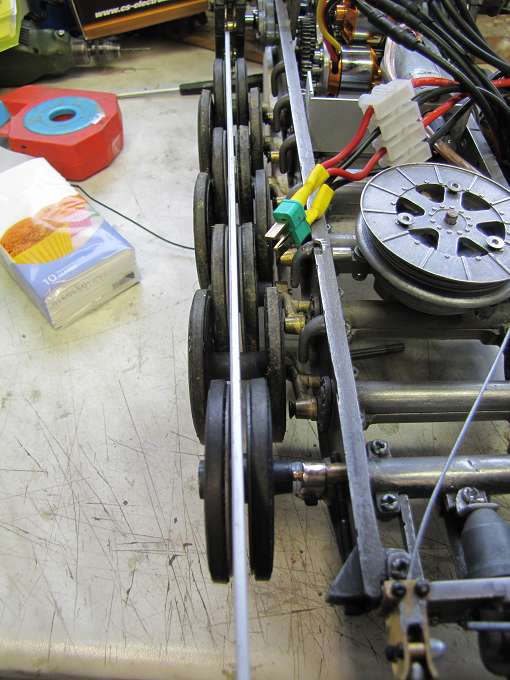
The axles themselves are by the complete counter made ??of 4mm iron and have a pinned stock after the last 8mm axle . The output gear is clamped with a 3mm set screw into a hole of 4mm shaft and here lies the main weakness of the axes. Aside from just 4mm thickness , which must bear the drive wheels , the axis is weakened by the drilling again and the axles bend even at low load.

Image

Image

So I'm going through replacing the axles 8mm silver steel and only leave a small 4mm pin in the innermost of the three camps that. Where the forces are lowest and a conversion is not necessary. The Laber in the countershaft I will replace it with larger bearings and solder the output gear with the hard axis.

But first I have time today cut the axes of silver steel and the inner bearing journal turned on .

Image

Here is the comparison of the axes. On top is an old , orginal and put down a new, stronger axle now in the inner bearing .

Image
APAMOTEC Model technology in detail
User avatar
Edwin
Corporal
Posts: 394
Joined: Tue Jun 11, 2013 8:34 pm
Location: Rheinland Pfalz Germany
Contact:

Re: A small improvement on Famo

Post by Edwin »

After Ralf yes me want to visit you tomorrow I'll do until then only the axes until done.
The profound changes to the frame and the back gears I do only when I have discussed this with him.

So I have made ??the first time for the M4 threaded hole in the axes and then carefully cut by hand crank and a lot of the threads in this lubricant .

Image

Image

If you do it on a lathe , but not necessarily the plug out . There is nothing better when the machine starts running with the crank at high numbers of revolutions , because they forgot this , apart from the risk of injury time .

Now all we need the flats on the axles. This I also milled with a lot of cooling lubricant to the axes so that the drive wheels will fit a little stiff and play it.

Image

Image
APAMOTEC Model technology in detail
User avatar
Edwin
Corporal
Posts: 394
Joined: Tue Jun 11, 2013 8:34 pm
Location: Rheinland Pfalz Germany
Contact:

Re: A small improvement on Famo

Post by Edwin »

After Ralf me (the owner of the Famo) visited on Friday and we talked a little about the car, so I know better what he wants to do with it, another question was in the room. Famo with the current engines is too slow and does not create the original scale speed, which he should go 3.125 km / h. In addition, more power would be desirable.
After Ralf has made a short test drive with one of my brushless drives in a tank, I'm His Famo a brushless engines installed which is much stronger and the vehicle will bring attention to the original mobility model speed.
In addition I have now first calculates what engines I need and I'm going to order this on Monday.

Image
APAMOTEC Model technology in detail
User avatar
Edwin
Corporal
Posts: 394
Joined: Tue Jun 11, 2013 8:34 pm
Location: Rheinland Pfalz Germany
Contact:

Re: A small improvement on Famo

Post by Edwin »

Yesterday, the motors are ordered finally arrived for Famo .

The however, I must first converted before they can be mounted in the gearbox , since the axes are on the rotor.

So the rotors are removed , dissolved the holding screw axes and down the shaft with an arbor press duch the rotor , as they still sit still extremely strong in their storage. The by striking it with a hammer is not recommended because it can destroy the rotor with a single failure or the magnets are moved by the hard blow .

Image

Image

Next, I 'll take care of the Famogetriebe .

Image

In these first had the motors are dismantled with me noticed eggs as the pinion .
What also surprised me a little are the 3mm mounting holes , although the motors M2, 5 screws were fastened so also the engagement was wrong.
After I then had the bare gear in my hands, I had to clean it first .

Image

Before installing the motors, the boring of the pinions was necessary to 3.17 mm , while I remembered the eccentric bore of one of the two pinions on what led to the rock .
It is the left of the two.

Image

After turning out with a mini lathe tool but now run both pinions clean round .

Image

Image

And so I could now mount the motors in the gearbox and the backlash right now .

Image

Image

Image

Image

My next work was to repair the PTO . When disassembling me a disintegrated it, since the gears are pressed onto the shafts and secured with two externally driven into splints .

Image

So I knocked out and the gear in the second wave, which simply went the pins removed and the waves from two sides sanded a bit flat .

Image

Image

So I now have the gap I need for brazing a good connection between the shaft and gear to create the . But first I had to press in and re-align .

Image

So I could then clean hard soldering and align the axles yet .

Image

Image

Image

Nor was the construction of the new bearing into the countershaft to the series to end for today.

In addition I 'm from 13mm brass two bearing tubes .

Image

Image

Image

Image

Image

Image

To fit the bearing tubes in the countershaft I have to unscrew them. I do this with a small four-jaw chuck that I just chucking in three-jaw chuck . With so low loads like this is the easiest way with the least effort. The centering and alignment of the component is still very expensive.

Image

Image

And I will then install the new bearing tubes in the housing .

Image

Image
APAMOTEC Model technology in detail
User avatar
Edwin
Corporal
Posts: 394
Joined: Tue Jun 11, 2013 8:34 pm
Location: Rheinland Pfalz Germany
Contact:

Re: A small improvement on Famo

Post by Edwin »

And on it goes with the reconstruction of the Famo .

First, today the cover of the countershaft to the series . The built-in storage there are also only for a 4mm shaft and much too small.

Image

So I have the first deed for the day turned up to 12mm and used the new bearings .

Image

Image

Since the new bearing sleeves are slightly larger than the old connections , it was necessary to drill out the terminals within 13mm . Not so easy with the giant part .

Image

So then I could even make a first Paßprobe .

Image

Since I change the design of the countershaft something and shut the housing to the frame , it is necessary well to rid the splices of oxide.

Image

And so I can clog the countershaft to the frame and clean and straighten with the help of axles and transmissions , so that later it can turn easily .

Image

Image

The whole thing must now first cure for at least two days , but tomorrow I 'm gonna be at a meeting of the Famo us can stand .
APAMOTEC Model technology in detail
User avatar
Edwin
Corporal
Posts: 394
Joined: Tue Jun 11, 2013 8:34 pm
Location: Rheinland Pfalz Germany
Contact:

Re: A small improvement on Famo

Post by Edwin »

Today it will be exciting ...

I want to fix the gears on the drive axles .

But first I have to turn down the pressed-in hub , but this is quite simple.

Image

Image

Fortunately, the hole is slightly smaller than the 8mm, I need for the axes , and so I can turn down to fit .

But in order to tighten the gears without damage and with perfect concentricity I 'm a little Hilsmittel , ... a so-called lost collet.

For this I use a matching scrap piece of brass whose outer Diameter I turn larger than approximately 1.5 mm as it is the gears and then prick it with a short edge .

Image

img]http://up.picr.de/16697703qp.jpg[/img]

At this sleeve I turn off the still standing edge to a small and only slightly larger in diameter remnant and use this as a stop of the sleeve lining. Until now, the sleeve must be moved in the feed , after turning down no more, I 'm somewhat deeper than the gears are wide.

Image

Image

The gears I push gently until it stops in the sleeve and eighth always that this is not moved. Only in this way it retains its precision. Then I pull the jaws too tight and the gear is solid and free of damage clamped by the sleeve. So I can unscrew the hole clean and without shock.

Image

Image

Then I check the fit of the gears under the cover and safety also again the chain track.

Image

Image

On the axles I makiere the position of the gears and loop at this point .

Image

Since the gears sucking sitting on the axles, I file a couple of corners in the bore of the braze can penetrate.

Image

How do I solder then the gear hard on the drive shaft.

Image

Image

Image

Now I just have to try and clean the shaft with the gear .

Image

Image

Image

The axes are now no longer held on the axes in position by screws in the gears , the Duch rigidly connected to the axle gear in the gear reducer .
APAMOTEC Model technology in detail
User avatar
Edwin
Corporal
Posts: 394
Joined: Tue Jun 11, 2013 8:34 pm
Location: Rheinland Pfalz Germany
Contact:

Re: A small improvement on Famo

Post by Edwin »

Slowly, the transmission is finished now .

Since the drive wheels of the exit waves would have only a grub screw to fix because of the higher power of two is necessary. So just a second attached .

Image

Image

And so can you then remove the bottom plate into the transmission install .

Image

Once again everything is screwed together I can devote myself to the final installation of the countershaft .

This I fill completely with graphite grease .

Image

The rim of the lid is made clean and gets a thick Pattexraupe as a seal in which the lid is pressed wet. This keeps the lid firmly addition , seals and can be relatively easily removed when needed. That there is always some fat suppressed by the camp is quite as provided by me. The orginale also were not very clean and so the penetration of water and dirt will prevent the countershaft .

Image

And so it now looks ready mounted gearbox . Unfortunately, it does not sit perfectly straight in the frame, but that this can not be , since I can not so readily put the countershaft and it is so defined by the frame and all the other fixings , but it should work anyway. The now -lubricated gearbox running in this position dachtel even better than I , and will shrink even further.

Image

Now I just have to store the new idlers as the 3mm shafts have proven to be too weak.

To this end, I remove the old axles and ball bearings , and thrust the idlers with a 7mm drill out .

Image

For the stock I make a brass rod down to about 7mm , with a rough surface is desired in this case.

Image

This it I glue into the idlers and let it harden until tomorrow .

Image

Meanwhile, I started to program the controller to test the transmission that runs better and quieter than I thought and am now the programming options . This Famo will not receive separate drive control but can only be controlled via the transmitter .

Image
APAMOTEC Model technology in detail
User avatar
Edwin
Corporal
Posts: 394
Joined: Tue Jun 11, 2013 8:34 pm
Location: Rheinland Pfalz Germany
Contact:

Re: A small improvement on Famo

Post by Edwin »

And further you go with the Famo .

The new bearing of idler wheels are now glued and I can drill out now . But this I had to somehow find a meaningful focus as this is a very life of their own in each direction have . So I have it clamped such that the outer disk running at its calmest , mounted the bearing bore H7 and rubbed.

Image

Image

The next work was then the production of the axes. This I cut from 4mm silver steel, which I solder a shim hard as a stop. To this end, I put the washer with a little flux centered on the axis and a small piece of silver brazing alloy in the middle. So I now can with a gas burner axis from bottom to heat the braze runs clean.

Image

Image

Image

After cooling, the axes clamped in the lathe and dressed with rubber polishing pad . But do not forget the cover of machine guides , since the rubber dust is very agrssiv and this damage can .

Image

So now I was able to install the idler wheels . Unfortunately, the drive and the idler wheels is still sleeping a little . The Idlers I could do at least as far .

Image

So I then pulled the chain , the chain tension set provisionally and will also fit a battery holder for the tests.

Image

Image

The first variant of the programming then has the basic features and functions the same, but unfortunately after a meter tiled floor the steering linkage given up the ghost .

Image

The times I have to fix tomorrow and then it continues with driving tests and the setting. I would incidentally also strongly recommend a servo saver for the steering servo . If the chain Gripp has not even fall on what the front wheels. The Famo drives still there where I control .
APAMOTEC Model technology in detail
ALPHA
Major-General
Posts: 10960
Joined: Thu Oct 03, 2013 1:06 am

Re: A small improvement on Famo

Post by ALPHA »

You know Edwin... everytime I view one of your builds .. I have to sit back in awe...I can't even imagine the workshop you must have... 8O

I enjoy meeting you.. and viewing your projects .. they are more than works of art... they are surely the creations of a master craftsman

HAPPY HOLIDAYS EDWIN :thumbup:

ALPHA
User avatar
NickDonitz
Corporal
Posts: 386
Joined: Sun Jul 31, 2011 8:52 am

Re: A small improvement on Famo

Post by NickDonitz »

Hi Edwin you do some fantastic work on those boxes, I had to make minor changes to mine when I got it, your right about the servo saver it certainly is needed to avoid to much damage to the servo I kept with speed 400 motors as I have a Clarkboard under the bonnet and as you know none of the boards support brushless motors,, I run the track and the steering on a Y lead to the board that way I get proportional steering and track movement combined, I also run it on a 8.4v Nmih pack to give a better turn of speed ...because of the excellent tracks it grips really well but you will find you have the tracks on backwards this makes them dig in even more , looking forward to the rest of the build when my boxes wear out I will know where to find a master
Attachments
Famo resize.jpg
I'm manning the gun's ! Who's driving ?
Post Reply

Return to “Wheeled and Half-Tracked Vehicles”