birgers HL-Tiger I 313 from rookie to___?

User avatar
birger
Lance Corporal
Posts: 138
Joined: Fri Aug 16, 2013 12:08 pm

birgers HL-Tiger I 313 from rookie to___?

Post by birger »

Hi guys,

today I want to show you how I started this hobby in 2006 and what followed since.

And I want to show you that everybody should be and is able to convert his HL-Tiger I in a nice working all terrain tank.

Let´s begin:

Who doesn´t know the original HL-Tiger I coming out off the box.

In this case a S&S version with RX-13 electronics and ordinary metal gears.

Image

Image

Image

Image

Image

After driving the first 30 minutes, the plastic tracks cracked. I had no spares, so I had to carry it home. And then the reconstruction started.

After I visited a now friend of mine to get tips and tricks, I came home with a bag full of accessories.

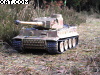
My first reconstruction result looked like this

The Tigers front:

Image

1. New bracket for sparetracks (nonprofessional screwed alu bar)

2. Replaced spare tracks with new ones made from single a plastic tracks.

3. Tow shackles (nonprofessional bent wire)

Image

4. Replaced machinegun.

Image

5. Cut front mudguard.

Image

6. Opened drivers vision port (opened, not replaced)

Image

7. Fixed the shovel with copper wire.

Image

8. Turned gun mantlet int right position.

Image

9. Added headlight cover and simulated the headlight wiring.

Image

10. Added transmission reinforcement plates.

Image

11. Suspension reinforcement plates. (Made them myself)

- Alu bar, thickness 2mm
- Drilled after measurement holes for M5 screws
- Drilled after measurement holes for the springs
- Drilled after measurements holes to fix the bar to the chassis
- Cut M5-threads
- Mounted bar inside
- Filled gaps with silicone from the inside.

Image

- Removed everthing inside except the mount for the gears
- Took M5-screws and mounted the suspension arms

Image

Image

Image

Image

12. Cut the side mudguards.

Image

Image

Report continues

Greetings
Birger
Fahrzeuge einsatzbereit: Tiger I HL 313, Tiger I Tamiya S33, Star Wars Tiger, Bergetiger
In der Inst: HL-PIII Lackierung, Vollkettenschlepper, Tiefladeanhänger
In Planung: MLRS,Crusader, KöTi, Jagdtiger, PIII, PIV,
User avatar
birger
Lance Corporal
Posts: 138
Joined: Fri Aug 16, 2013 12:08 pm

Re: birgers HL-Tiger I 313 from rookie to___?

Post by birger »

13. Inside:

I had three batteries and wanted to integrate the minto the hull.

The electronic was put into a small box with a cover to prevent it from oil and dirt.

The plugs for charging the batteries were placed in the exhausts.

The volume control was placed behind / under the right Feivel.

The on / off switch was placed under the plate at the back of the hull.

Three switches, one for each batterie, were placed behind the tool box at the back of the hull.

Image

Image

Image

Image

Image

Image

Image

Image

Image

Image

Image

Image

The Tiger´s back:

14.

- New mounts for the rear mudguards (nonprfessional bent from copper wire)
- Added crank handle to the jack (also nonprofessional done)
- Created my own track tensioner (not pretty but it worked)

Image

Image

Image

Image

Image

Image

Image

The Tiger´s top:

Image

15. Added headlight wiring and anti personal mortars.

Image

16. Added intake grids.

Image

17. Replaced intake tubes. Took old cable sheathing.

Image

18. Relocated antenna to the right area.

19. Created my own tow cable. I also invented my own brackets for it so that I could dismount the cable for tractor duty.

Image

Report continues.

Greetings
Birger
Fahrzeuge einsatzbereit: Tiger I HL 313, Tiger I Tamiya S33, Star Wars Tiger, Bergetiger
In der Inst: HL-PIII Lackierung, Vollkettenschlepper, Tiefladeanhänger
In Planung: MLRS,Crusader, KöTi, Jagdtiger, PIII, PIV,
User avatar
Wildboar44
Corporal
Posts: 392
Joined: Sun Jan 13, 2013 10:28 pm
Location: Kent England UK.

Re: birgers HL-Tiger I 313 from rookie to___?

Post by Wildboar44 »

Are those pictures from 2007 ? ..... I really like the effort you put into making your own track adjusters .
Yesterday is our history, Tomorrow is an eternal mistery, Today is a gift, its why its called "The Present".
User avatar
PainlessWolf
Lieutenant-Colonel
Posts: 7410
Joined: Sun Feb 26, 2012 9:09 pm
Location: Southern Colorado Rocky Mountains

Re: birgers HL-Tiger I 313 from rookie to___?

Post by PainlessWolf »

Good Afternoon,
I've got one of these gray Tiger 1's with the RX13 board in it. Mine is even older tho' with the red headlights and no smoke and sound. It still works perfectly (or as designed) after all these years. I was so enamored with it when I received it that it became a Shelf Queen after extensive outdoor use. It is still stock and even tho' I have been bitten by the upgrade bug on other tanks, this one I was happy to leave alone as it was. (Having written that. I remember that I added a metal fire extinguisher and scale, steel antenna, apologies.) I look forward to seeing even more of your fantastic work, Herr Birger, on this tank. I am really impressed by the way that you compacted all of the RX 13 circuitry into one small box.
regards,
Painless Wolf
...Here for the Dawn...
doc larsson
Staff Sergeant
Posts: 829
Joined: Sat Sep 29, 2012 5:05 pm

Re: birgers HL-Tiger I 313 from rookie to___?

Post by doc larsson »

you will repaint it ?
User avatar
birger
Lance Corporal
Posts: 138
Joined: Fri Aug 16, 2013 12:08 pm

Re: birgers HL-Tiger I 313 from rookie to___?

Post by birger »

Yeah, those pictures are from 2007 made during my first reconstruction. Just stay tuned. There will be much more to see until you see what this baby looks like today.

Greetings
Birger
Fahrzeuge einsatzbereit: Tiger I HL 313, Tiger I Tamiya S33, Star Wars Tiger, Bergetiger
In der Inst: HL-PIII Lackierung, Vollkettenschlepper, Tiefladeanhänger
In Planung: MLRS,Crusader, KöTi, Jagdtiger, PIII, PIV,
User avatar
birger
Lance Corporal
Posts: 138
Joined: Fri Aug 16, 2013 12:08 pm

Re: birgers HL-Tiger I 313 from rookie to___?

Post by birger »

The Tiger´s turret:

20. Changed the mantlet to the right face an position.

Image

21. Lengthened the gun barrel to the right length.

Image

22. Created the turret observation slits.

Image

23. Corrected the position of the pistol port.

Image

24. Corrected position of the commanders cupola.

Image

25. Painted the Tiger with a brush by hand. No Airbrush.

26. Mounted metal tracks.

After all this work my Tiger looked like this:

Image

Image

Image

Image

Image

Not bad for a beginner.

Next steps were to spend my Tiger new and good electronics.

I bought Elmod and put it in a removable box. I did that to be able to use this box in different vehicles without buying one for each. In all my vehicles I installed the same connectors.

The electronic on top is the so called EGS for battling.

Image

Image

Image

I was so happy and satisfied, I wanted to show everybody. So I started a thread on a German forum.

And then day X came.
After I posted my Tiger, some oft he members just slamed me on this.

Well, I can live with negative feedback, so I took it.

Then I asked the members to help me changing my “ugly” duck into a swan.

Well, what shall I say, they took the invitation and we did it.

The next steps shall show you, what we changed and what the result looks like.

First I had to take an original.

I choose this one. An early Tiger I with spare tracks at the turret and no Feivels.

Image

Image

Image

Image

Image

Image

Image

Image

Image

The first thing we changed was the turret´s center point.

I hope, pictures tell enough.

And while changing the center, I also corrected the height of the turret. The lower part is about 1mm too high. And, of course, the shape of the “Rommel”-box.

Watch:

Image

Image

Image

Image

Image

Image

Image

Image

Image

Image

Image

Image

Image

Image

Image

Then I removed all details from the upper hull.

Image

Now we change the center point on the hull.

The new center is 14mm more to the back

Image

Image

Image

Image

Image

Now the turret again:

Image

Image

Image

Image

Image

Image

Image

Image

Image

Image

Report continues

Greetings
Birger
Fahrzeuge einsatzbereit: Tiger I HL 313, Tiger I Tamiya S33, Star Wars Tiger, Bergetiger
In der Inst: HL-PIII Lackierung, Vollkettenschlepper, Tiefladeanhänger
In Planung: MLRS,Crusader, KöTi, Jagdtiger, PIII, PIV,
User avatar
birger
Lance Corporal
Posts: 138
Joined: Fri Aug 16, 2013 12:08 pm

Re: birgers HL-Tiger I 313 from rookie to___?

Post by birger »

Image

Image

Image

Image

Image

Image

Image

Image

Image

Image

Image

Image

Image

Image

Image

Image

Image

Image

Image

Image

Image

Image

Image

Image

Image

Image


Report continues.

Greetings
Birger
Fahrzeuge einsatzbereit: Tiger I HL 313, Tiger I Tamiya S33, Star Wars Tiger, Bergetiger
In der Inst: HL-PIII Lackierung, Vollkettenschlepper, Tiefladeanhänger
In Planung: MLRS,Crusader, KöTi, Jagdtiger, PIII, PIV,
User avatar
birger
Lance Corporal
Posts: 138
Joined: Fri Aug 16, 2013 12:08 pm

Re: birgers HL-Tiger I 313 from rookie to___?

Post by birger »

Before we start remounting the mechanics, let´s create a new box with the missint 3rd lifting point.

Take an old axle and shorten it.

Image

Build a box that fits below the hole. Drill a hole into it for the shortened pin.

Image

Image

Image

To make it easier with the mechanics, I used the known recoil system.

I also changed the center point of the gun mantlet at the turret, so the whole mechanics hast o be moved a little more to the front.

Image

To mount the recoil system, I had to create new brackets.

Image

Now let´s fix the turret´s roof.

Image

Image

Image

Image

Well, there is still one problem. How can we make the roof static without falling off?

We use the smoke dischargers as clips. Watch.

Image

Image

Image

Image

Image

Image

While the glue is drying, let´s modify the turret´s observation slits.

Image

Image

Image

Image

Meanwhile the glue dried. So let´s finish the dischargers.

Image

Image

Image

Image

Next part I need to change is the pistol port.

Image

Image

Image

Image

Got a new metal commanders cupola. I added the missing sighting mechanism.

Image

Image

Image

Because this Tiger is for use in RC-battles, I have to add the receiver device.

Image

Image

Image

Image

Image

Image

Image

Image

Image

Image

If the Tiger is not battling, this plate can be removed to use the original cupola.

Image

Image

Image

Habe in meiner Kiste noch einen Winkelspiegel gefunden.

Image

Then I added the gunner´s optical square.

Image

Image

Image

Image

Added details to the gunner´s hatch.

Image

Image

The main work on the turret is done. Let´s do some tuning here.

Take glazing body filler and a bristle brush. Put some of the filler using the brush to the turret and speckle and turn it at the same time. Do it for the areas that shall have shaping structure.

Then speckle the filler without turning to the gun mantlet to get cast structure.

After the filler has dried, grind the filler almost off for the shaping structure and grind a little bit for the cast structure.

I hope, you can understand what I mean.

The result should look like this:

Image

Image

Image

Image

Image

Image

Now remove the filler from the following areas.

Image

Image

Report continues

Greetings
Birger
Fahrzeuge einsatzbereit: Tiger I HL 313, Tiger I Tamiya S33, Star Wars Tiger, Bergetiger
In der Inst: HL-PIII Lackierung, Vollkettenschlepper, Tiefladeanhänger
In Planung: MLRS,Crusader, KöTi, Jagdtiger, PIII, PIV,
User avatar
birger
Lance Corporal
Posts: 138
Joined: Fri Aug 16, 2013 12:08 pm

Re: birgers HL-Tiger I 313 from rookie to___?

Post by birger »

And now let´s create some welding lines.

Take some 2 component putty and form small lines. Then follow the pictures.

Image

Image

Take a small putty knife and add a little wave structure.

Image

Image

Image

Image

The ones I did could be much better. But for the first time….

Image

Image

Now the turret is completed.

Let´s do some changes to the upper hull. First the drivers vision port. Let´s open it.

Image

Image

Image

This one is a new one from a supplier. We just need to glue it to its position.

Image

Image

Take the filler and the brush and repeat the turret procedure to the hull.

Side walls and front speckling and turning, engine grids, machine gun ball mount and drivers port just speckling. Then grinding.

Image

Image

Image

Image

Again, adding some welding lines.

Image

Image

Cut the mudguards.

Image

How to create the intake protection grids.

Image

Image

The grid you can see is ordinary fly-screen.

Image

Image

Image

Then I recreated the engines air intake. I didn´t want to use the Feivels. But I also didn´t like the mid / late cover. So I decided to use the early one as a leftover.

Image

Image

Image

Image

http://i158.photobucket.com/albums/t118 ... CT4803.jpg

Changed the position of the aerial mount.

Image

Got a new hull air ventilation cover.

Image

Image

Image

Cut out a small slice of poly as a distance peace and mounted both.

Image

Scratched the mudguards to simulate the edge to the hull.

Image

Added the extinguisher.

Image
Fahrzeuge einsatzbereit: Tiger I HL 313, Tiger I Tamiya S33, Star Wars Tiger, Bergetiger
In der Inst: HL-PIII Lackierung, Vollkettenschlepper, Tiefladeanhänger
In Planung: MLRS,Crusader, KöTi, Jagdtiger, PIII, PIV,
Post Reply

Return to “Tiger I”