First, just as a test if I succeed

Post all your larger scale RC Tanks, Half Tracks and Military Vehicles, build threads here. From 1/12 all the way up to 1/4! all here! Your Larger Scale figures are also welcome here.
User avatar
Edwin
Corporal
Posts: 394
Joined: Tue Jun 11, 2013 8:34 pm
Location: Rheinland Pfalz Germany
Contact:

Re: First, just as a test if I succeed

Post by Edwin »

And it is again a little further.

The silicone, which I wanted to use for the Schleudergußformen so well and stand hard it is, I have gotten off of this form . It's too tough and takes too long to create the such a complicated shape. If it can not finish in a certain time, the silicone pulls back away from the part and you have to edit it again. For simpler forms but I will still use it again and here I can also use it for other and is not lost.

So I ordered plasticine and 2K Sillikon and I thought from my experience a new form despite the limbs form should be in two parts possible.

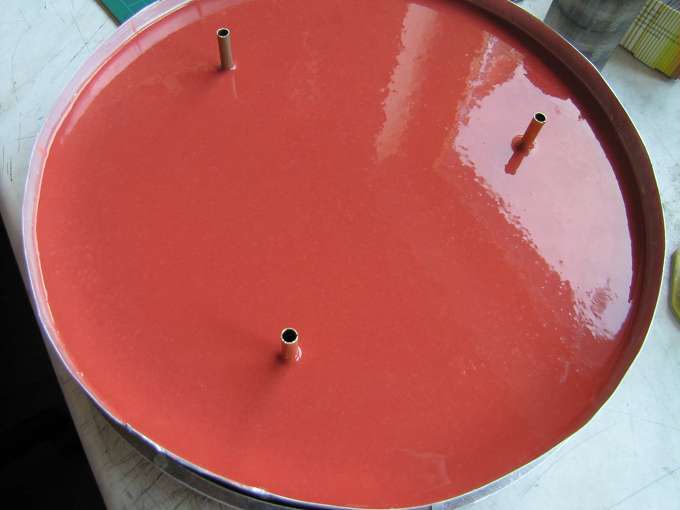
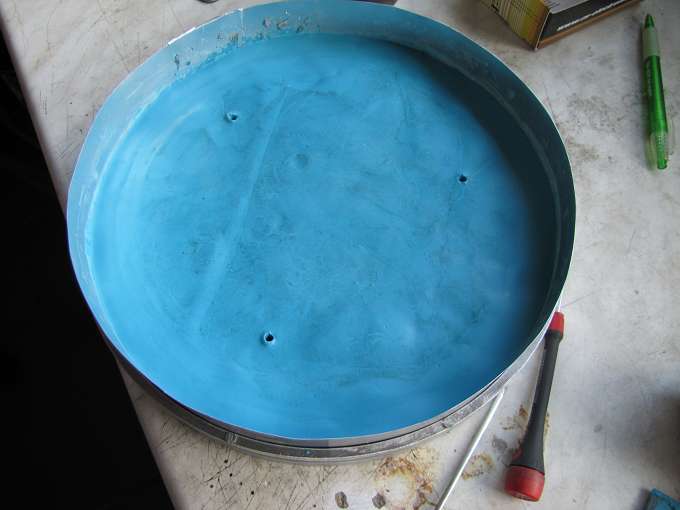
So today I lift first the pot evenly filled with modeling clay and smoothed.

Image

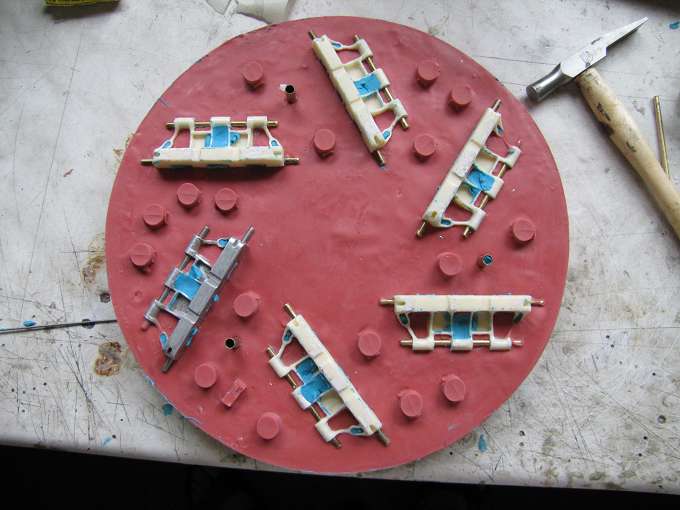
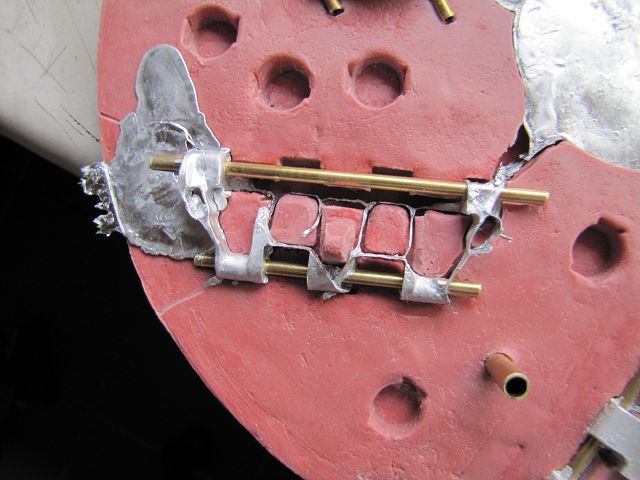
The master I then distributed evenly in the second step .

Image

And so I am now doing the links individually embedded in the clay , which is quite complicated in this case, but maybe I can pour tomorrow .
APAMOTEC Model technology in detail
User avatar
Edwin
Corporal
Posts: 394
Joined: Tue Jun 11, 2013 8:34 pm
Location: Rheinland Pfalz Germany
Contact:

Re: First, just as a test if I succeed

Post by Edwin »

Today I finished the chain links embedded in the clay and smoothed the surface of this.

Image

So I could shape also teeming with 750g HT Sillocon and bleed.

Image

Now I have to wait until tomorrow and hope soon to be able to pour the second mold part.
APAMOTEC Model technology in detail
User avatar
Edwin
Corporal
Posts: 394
Joined: Tue Jun 11, 2013 8:34 pm
Location: Rheinland Pfalz Germany
Contact:

Re: First, just as a test if I succeed

Post by Edwin »

Today, I now could separate the mold from the clay.

Image

After I had the mold half cleaned from the remnants of clay, I could complete for the casting of the upper mold half.

Image

And then again pour with HT silicone. It is not so easy to remove the trapped air in the silicone, but it geling me then.

Image

After the mold was able to cure a few hours in one of my temper Chambers sees the shape after separation from so now.

Image

It is not yet quite perfect succeeded, but one learns and now I have to deal with it again the vents drilling and higher temperature, but then I can try the first pour.
APAMOTEC Model technology in detail
User avatar
Edwin
Corporal
Posts: 394
Joined: Tue Jun 11, 2013 8:34 pm
Location: Rheinland Pfalz Germany
Contact:

Re: First, just as a test if I succeed

Post by Edwin »

After I am not satisfied with the first spin cast . I have since made ??a small mistake and removed the master to clean from the first mold half. It indeed does not believe as creep is the silicone and now I 'm just here to build a new one.

This time I let the master links in the form and make me remove the Knetmassereste so really quite complex work.

Image

For this I use different screwdrivers , homemade spatula , a scalpel and a pipette.

Image

It works best with the homemade spatulas , I had that in 1.2 mm spring steel remnants made ??that I have burned out at the end , knocked flat with a hammer and fed ground .

Image

And that amn gets like this the masters out yet .

Image

For this I have discovered another well usable effect. The plasticine can be fine air bubbles in the resin , the master lock .
APAMOTEC Model technology in detail
ALPHA
Major-General
Posts: 10960
Joined: Thu Oct 03, 2013 1:06 am

Re: First, just as a test if I succeed

Post by ALPHA »

WOW ... JUST WOW Edwin... your dedication to the craft is surreal ...a modeller with unsurpassed patience

Awesome work :thumbup:

ALPHA
User avatar
Edwin
Corporal
Posts: 394
Joined: Tue Jun 11, 2013 8:34 pm
Location: Rheinland Pfalz Germany
Contact:

Re: First, just as a test if I succeed

Post by Edwin »

After I finished the casting of the upper part of the lower part of the form num.

Image

Could I also this casting. The cap in the middle of the filling opening for the zinc.

Image

After everything was nicely cured saw the moldings after separating from better.

Image

But before I finished making the mold and still build with the vents , I'm still the master casts made ??from resin . So I have the hassle with the shape is no longer relevant and the silicone can without much preliminary work direckt giesen on the master plates . The silicone mold will not even live forever.

Image

Image

The only drawback to this method is the rather large consumption of Resin, but it is still worthwhile if you need a new form .
Here you can see how pretty much the resin must be plate .

Image

The same course I did that with the second mold half , only that I 've placed a displacement in the middle to save Resin .

Image
APAMOTEC Model technology in detail
User avatar
Edwin
Corporal
Posts: 394
Joined: Tue Jun 11, 2013 8:34 pm
Location: Rheinland Pfalz Germany
Contact:

Re: First, just as a test if I succeed

Post by Edwin »

Today I had again the time something to do here.

If I need now form a new centrifugal casting I can drain quickly with the Resin negative now.

Image

In the right form now still missing, the vent holes. The I install with a 1mm drill at all relevant points.

Image

Allow the air to escape during the casting and also the holes are not sealed by the pressure plate I milled with a cutting disc just still air channels through the holes.

Image

Image

Now I can soon try out the new form.
APAMOTEC Model technology in detail
User avatar
Edwin
Corporal
Posts: 394
Joined: Tue Jun 11, 2013 8:34 pm
Location: Rheinland Pfalz Germany
Contact:

Re: First, just as a test if I succeed

Post by Edwin »

Today I finally tried my hand in rotational molding again .

First powdered forms .

Image

Here you can see the difference as beautiful as the powder adhered to the silicone.

Image

Place the brass tubes for the pin bearing into the mold.

Image

And close the mold and screw it into the skid pan .

Image

After I had melted enough zinc , I could pour it into the opening.

Image

The first pour but has become anything yet. The speed was too high and not pressed the mold enough to each other. As a part of the zinc is ejected from the From and only two of the six members are useful . I think the temperature of the zinc was too hot .

Image

Image

Image

So the same again and this . Sometimes with less temperature and lower speed This was but now back to low. The casting looks good, but the form is not completed and the parts so flawed .

Image

That will probably still be some work until it works to my satisfaction.
APAMOTEC Model technology in detail
User avatar
The Tank Man
Staff Sergeant
Posts: 971
Joined: Sat Jul 16, 2011 9:06 am
Location: England UK Bolton Manchester

Re: First, just as a test if I succeed

Post by The Tank Man »

Wow amazing work! And a great read! Keep it comming!! :thumbup:
I love the smell of napalm in the morning!
User avatar
Edwin
Corporal
Posts: 394
Joined: Tue Jun 11, 2013 8:34 pm
Location: Rheinland Pfalz Germany
Contact:

Re: First, just as a test if I succeed

Post by Edwin »

After a few small changes it went today. I do but only piece by piece and so I first have installed a few vents .

Image

Image

Image

It has gotten better , but I see the need again to make a new form and I also do not know if I need a slightly harder silicone for this, as some slightly bent chain links come from the mold. On the second cast I had way too little material which is why two of the forms were not filled sufficiently . What I do not like is the surface of the chain. That was much better from the single form.

So now I have at least some members whose quality is just sufficient for use according to my understanding . Therefore, I have now started with the assembly of which is still a lot of work .

First, disconnect the small brass tubes with a band saw , as far as you can reach it .

Image

The pipe pieces that you can not cut so I have to cut out with a small blade.

Image

Then I can edit the links with a small belt sander .

Image

When connecting bolts I use 2mm spring steel. It is so stable that 150kg train at enem piece of chain had led to no deformation or tearing .

Image

And here , the combined length of chain . The slightly shorter is still the tensile test , but it can recognize the much better surface. The temperature of the mold makes the way, since no difference.
In the foreground is a small piece of 1/16 chain as a comparison.

Image
APAMOTEC Model technology in detail
Post Reply

Return to “Larger Scale Military”