Page 4 of 19
Re: Panther G on the Eastern Front 1945
Posted: Fri Dec 21, 2012 11:41 pm
by hotte8487
Panzerman wrote:Have looked this thread trough a couple of times, great detail, great pic's and
a great build looking forward to seeing the paint go on........
Hi Panzerman,
I find that is again and again really nice, you live so far away from me, but we can so easy share our experiences and pics. Before I can begin with painting on my tank, I have nor a lots of things to do; you will see it here soon.
Here is now winter, in Berlin we have - 3 degrees Celsius or round about 30 degrees Fahrenheit. Thanks for your comment; I wish you a merry christmas in the summer and a good slip in the new year.
Re: Panther G on the Eastern Front 1945
Posted: Fri Dec 21, 2012 11:44 pm
by hotte8487
streetfighterjeff wrote:just looked again at your travel lock. can you get the locking chain seperate? need to one one the tiger and i think the chain part will be the killer, unless i can get the full barell lock for a tiger 1
jeff
Hi Jeff,
how I wrote, this is a Kit from WeCoHe. I don't know, whether WeCoHe sell individual parts from their Kits. Asking costs nothing, write a e-mail to WeCoHe and you will get a answer of your question.
Thanks for your comment; I wish you also a merry christmas and a good slip in the new year.
Panther G on the Eastern Front 1945
Posted: Sun Dec 30, 2012 9:37 pm
by hotte8487
As announced it continues today with the holder for the hammer and crowbar in proven mixed construction and the completion of the wooden block for the jack.
For that I used also parts from the tool holder kit from WeCoHe, original parts from Tamiya and some DIY additions. First I had to adapt the tools.

Then it continued with adapting the tool holder, here is a first fitting of the tool holder at the Panther.
I let the pictures speak…


And here the final appearance on the Panther…


With the completion of the wooden block for the jack it goes on. And I let again the pictures speak…


It looks like an old suitcase of wood…

For the presentation of my Panther I definitely need the side skirts, unfortunately has Tamiya the holder only indicated and the skirts are completely missing.
That's why I took measures and made then a couple CAD drawings of the necessary parts. With the implementation of this project it goes then on; the production of side fenders, holders for the fenders and side skirts and the side skirts themselves.
Re: Panther G on the Eastern Front 1945
Posted: Mon Dec 31, 2012 5:04 pm
by sparks
Fantastic work

Re: Panther G on the Eastern Front 1945
Posted: Mon Dec 31, 2012 5:30 pm
by doc larsson
may i ask in stupidity, why you would put a handle on a wooden block in real life ? Did they put them on wooden blocks / I have never seen any pics of this.
answers welcome.
again nice tank
Re: Panther G on the Eastern Front 1945
Posted: Tue Jan 01, 2013 5:39 pm
by hotte8487
sparks wrote:Fantastic work
Thanks guy and a happy new year!
Re: Panther G on the Eastern Front 1945
Posted: Tue Jan 01, 2013 5:48 pm
by hotte8487
doc larsson wrote:may i ask in stupidity, why you would put a handle on a wooden block in real life ? Did they put them on wooden blocks / I have never seen any pics of this.
answers welcome.
again nice tank
Hi doc,
there are no stupid questions, but only stupid answers. And I will gladly answer your question.
I think that such a handle on a wooden block makes sense. When you want to take him out of the holder and he would have no handle, it would be much more difficult. But it is also difficult to give you a proof.
In my view had many german tanks have a wooden block with a handle, like for example the Tigers.
The Panther was produced indeed in three different factories with different suppliers, but under constantly observation from the Heereswaffenamt (HWA).
I will show you two images; one from a Panther type D and a drawing from a Panther type G. And also Schumo Kits has a wooden block for a Panther type G with a handle, in my opinion it is so right.
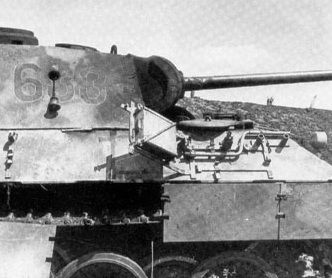
- PantherD_WoodenBlock1.jpg (37.83 KiB) Viewed 3889 times
Re: Panther G on the Eastern Front 1945
Posted: Wed Jan 02, 2013 9:37 am
by doc larsson
well bless my cotton socks,we live and learn.
thanks for the info need to do it to my tiger.
cheers
Panther G on the Eastern Front 1945
Posted: Wed Jan 02, 2013 11:32 pm
by hotte8487
Today's topic are the side skirts of the Panther, which are not included in the original Tamiya Kit. Also the indicated holders are no help, so I decide for me to build not only the holders and skirts, but also equal the side fenders. For this reason, I have once searched in my books for useful drawings and I have taken measure on my Panther. Result of this research are a few CAD-drawings of all necessary parts.
With the production of the holders for side fenders and side skirts I started, as starting material I used a 0.4 mm thick copper plate.
Since pictures are better than words...


After I had prepared the parts like in the picture, followed the shortening of the lower leg, the bending and then the soldering of the holder. Overall, you need twelve pieces of these holders, six for the right side and six for the left side. All parts must then still be slightly reworked with a file, in particular to adapt the actual retention hook for the side skirts. The hook is finally two and a half millimeters high and has only a slight angle to the top.
For attachment: The long part of the holder (reduced to upper hull thickness) sits on top in a small sawed slot. Additionally, I have drilled through the bracket and bolted with one M1-screw. If that's not enough, you can use while mounting a drop of glue.


Here two of the sawed slots for upper guide; at the most forward holder is very little space available for mounting.

And here is a complete side view from the mounted holders.

As next follows the production of the side fenders and side skirts.
Panther G on the Eastern Front 1945
Posted: Thu Jan 03, 2013 9:58 pm
by hotte8487
Today is all about the production of side fenders and side skirts. All these parts are made of 0.3 mm thick copper plate. At first I've marked all side plates and skirts according to my CAD drawings, partly I've already center punched for the drill-holes. Thereafter I’ve cut out all parts with a tin snips; the side fenders looked at first a bit funny.

These were then rolled out, folded and directed. Then followed fine sanding and sample lie on the holders...

I had to continue with building the support pieces for the butt seam and the end of the two side fenders, this again from a 0.4 mm copper plate. In this photo to see is the end part.

For better understanding of the entire fastening are here some details...


The two front holders, screwed with M1 rivet head bolts...
...a mad fumble...

The rear support and the last two holders...

The support for the butt seam and a holder...

And in finished state from top...


With the side skirts it goes on in the next report…