Another Cat, My Panther G
-
greengiant
- Warrant Officer 2nd Class
- Posts: 1138
- Joined: Tue Jun 26, 2012 12:15 am
Re: Another Cat, My Panther G
Very nicely done. I have done a similar conversion long ago but without the battle damage. After seeing yours I think I'll revisite it and add battle damage as it does add a lot to the look. Great Job

Re: Another Cat, My Panther G
fetch me the kitty's lets go to war

-
panzerschreck
- Lance Corporal
- Posts: 171
- Joined: Tue Jun 09, 2009 7:58 pm
- Location: Cornwall (Marazion)
Re: Another Cat, My Panther G
Cracking piece of work sir 

-
panzerschreck
- Lance Corporal
- Posts: 171
- Joined: Tue Jun 09, 2009 7:58 pm
- Location: Cornwall (Marazion)
Re: Another Cat, My Panther G
"To a New Yorker like you, a hero is some weird kind of sandwhich!" , Oddball.panzerschreck wrote:Cracking piece of work sir
Re: Another Cat, My Panther G
Great build, wish I had your skill.
Re: Another Cat, My Panther G
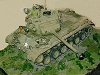
Well I have been a bit busy as you will see. I have painted the wheels, first sprayed and then hand painted then.
I was going to use the plastic track but I got hold of some metal track off "Forgebear" on ebay so I had a change of mind. I already had motors with metal gears and also rear Idler wheels fitted with bearings, so I decided to try fitting a track tensioner kit as well.
First was the track tensioner. As I say before the idler wheels had bearings fitted and as sod law prevails the stub axles were a bit too thin and long for the tensioner kit. I decided to use a bit of brass tubing cut just proud of the wheel axle housing assembly. As luck would have it the brass tubing was perfect for the wheel axle housing assembly, but the inner diameter of the tubing was too small for the stub axle. My solution was to attach a round needle file to my hard working dremel to enlarge the inner diameter and it worked. All I did then was to cut down the stub axle.
That done I removed the plastic idler wheel holder from the lower hull and sanded smooth. You need a 13mm drill bit to enlarge one of the holes required to fit the main tensioner assembly. Once the hole is drilled I temporary fitted the kit to mark the holes for the two small nut and bolts. I also filed down part of outer washer for better access to the allen grub screw.
Now I fitted it all together. I filed down the brass tubing connecting the two idler wheels where they touched the two plastic hull supports for a better fit.
First was the track tensioner. As I say before the idler wheels had bearings fitted and as sod law prevails the stub axles were a bit too thin and long for the tensioner kit. I decided to use a bit of brass tubing cut just proud of the wheel axle housing assembly. As luck would have it the brass tubing was perfect for the wheel axle housing assembly, but the inner diameter of the tubing was too small for the stub axle. My solution was to attach a round needle file to my hard working dremel to enlarge the inner diameter and it worked. All I did then was to cut down the stub axle.
Re: Another Cat, My Panther G
The motors I have required a bit of help to fit into the lower hull as they didn't line up with the mounting pins or screws. This was easily overcome with the use of so plastic rod, cut and glued together and attached to the lower hull. The motors were used to mark out the holed to be drilled and a few self tapping screws were used to attach the motors quiet firmly.
Re: Another Cat, My Panther G
Now for the weathering. I first gave the tank another coat of Pledge multi-purpose floor Wax (the replacement for Johnsons Klear) which is just sprayed on neat with an airbrush. Once dry I use Vallejo acrylic wash "Sepia Shade" which is lightly brushed over the whole tank. You can use water to thin it out if you want but I don't bother. I let it dry then I use Vallejo Airbrush Cleaner with a bit poured into a paint palette and a clean brush, then I work in and push around the wash. I use the airbrush cleaner as its not strong enough to go through the "Pledge" coat but allows you to modify the wash how you want it.
Re: Another Cat, My Panther G
At the minute I am adding a few chips and battle damage.
