Page 2 of 5
Re: Changing from Taigen V2 to HL 7.1
Posted: Tue Aug 06, 2024 7:03 pm
by MrChef
Shoulda quoted me HDP. I didn't notice this till I was bored and went looking around.
If I do the TK7.0 swap, Nope no plans or need for the V3. You spoke first so I'll hold it for you.
Now I just gotta get everything in order and some help from one of our members to make the swap. I can do everything except I'm not sure how to mod the Asiatam recoil/elevation unit.
Which tank are you planning resuscitate?
Re: Changing from Taigen V2 to HL 7.1
Posted: Tue Aug 06, 2024 7:37 pm
by Herr Dr. Professor
Thank you! I have more of the little sound modules than Taigen V3 RXs and TXs. And since I once favored Taigen/Torro over HengLong, I still have some Taigen oldies to change from V2 to V3, Tigers, PzKw. III, IV, Panther, Stug and more.
Re: Changing from Taigen V2 to HL 7.1
Posted: Tue Aug 06, 2024 8:03 pm
by Jofaur86

Good evening Mr.Chef, what modifications would you like to make on the Asiatam setback ??
Re: Changing from Taigen V2 to HL 7.1
Posted: Tue Aug 06, 2024 11:15 pm
by MrChef
Jofaur86 wrote: ↑Tue Aug 06, 2024 8:03 pm
Good evening Mr.Chef, what modifications would you like to make on the Asiatam setback ??
I'd like to get the asiatam recoil/elevation unit mated and working with the TK 7.0 if possible.
I'm the furthest thing from an electronics wizard but I'm completely competent disassembling and reassembling a Heng Long tank down to the last screw.
I understand which plugs do what and where to plug them. It's the modifying from plug and play that eludes me.
Re: Changing from Taigen V2 to HL 7.1
Posted: Tue Aug 06, 2024 11:19 pm
by MrChef
Herr Dr. Professor wrote: ↑Tue Aug 06, 2024 7:37 pm
Thank you! I have more sound of the little sound modules than Taigen V3 RXs and TXs. And since I once favored Taigen/Torro over HengLong, I still have some Taigen oldies to change from V2 to V3, Tigers, PzKw. III, IV, Panther, Stug and more.
Ok then when it all goes down I'll give you a heads up. I'll probably be awhile though as the new job has me averaging about 65 hours a week

Re: Changing from Taigen V2 to HL 7.1
Posted: Wed Aug 07, 2024 3:13 am
by john1970
this was for a TK6.0 think the connections are the same on the TK7.0 but check to be sure
john1970 wrote: ↑Fri Sep 25, 2020 10:14 pm

remove the white and the blue wire that goes to the switch on the taigen turret take the wires from the 3 pin plug pop the pins out and put the 2 wire from the elevation motor (on the right) into a 2 pin plug this plugs into cn4 black on the left red on the right.
For the recoil motor (on the left) you will need to add another red wire and put those 2 wire into anther 2 pin plug and plugs into cn10 the black wire will be at the bottom towards the middle of the board and the red wire will be at the top. the yellow wire with the black wire is another earth so make sure you get the connections the right way round when plugging into the board.
The large red or black wire that connects to the microswitch with the yellow wire will need to connect to the battery negative/black wire not the on/off switch as the on/off switch is 2 live wires.
I need to do better soldering
Re: Changing from Taigen V2 to HL 7.1
Posted: Wed Aug 07, 2024 4:46 am
by MrChef
john1970 wrote: ↑Wed Aug 07, 2024 3:13 am
this was for a TK6.0 think the connections are the same on the TK7.0 but check to be sure
john1970 wrote: ↑Fri Sep 25, 2020 10:14 pm
remove the white and the blue wire that goes to the switch on the taigen turret take the wires from the 3 pin plug pop the pins out and put the 2 wire from the elevation motor (on the right) into a 2 pin plug this plugs into cn4 black on the left red on the right.
For the recoil motor (on the left) you will need to add another red wire and put those 2 wire into anther 2 pin plug and plugs into cn10 the black wire will be at the bottom towards the middle of the board and the red wire will be at the top. the yellow wire with the black wire is another earth so make sure you get the connections the right way round when plugging into the board.
The large red or black wire that connects to the microswitch with the yellow wire will need to connect to the battery negative/black wire not the on/off switch as the on/off switch is 2 live wires.
I need to do better soldering
Thank you very much John. Now I gotta figure how the barrel flash will get hooked up. But looks like the meat of my concerns is not much to actually be concerned about.

Re: Changing from Taigen V2 to HL 7.1
Posted: Wed Aug 07, 2024 12:37 pm
by Jofaur86

Hello Mr.Chef, John 1970 ,gave the explanations...otherwise I attach link and photos,? If can you provide a little help?

- IMG_3956.jpeg (209.64 KiB) Viewed 2159 times
Re: Changing from Taigen V2 to HL 7.1
Posted: Wed Aug 07, 2024 9:48 pm
by Meter rat
Mr C.
I don’t know if this helps? John1970, and Jofaur86, assisted me with doing the same with a Tamiya recoil unit. It also works for a Taigen unit.
viewtopic.php?p=341431#p341431
I did do a photo by photo discription on FB on how to do this. But that caused a lot of issues with one member. If you remember?
Re: Changing from Taigen V2 to HL 7.1
Posted: Wed Aug 07, 2024 10:02 pm
by Meter rat
Ian HendersonForgeBearTanks - forgebeartanks.com
·
For those who wish to know how to connect a Taigen recoil unit which does not use servos unit to a Heng long board, that does not support servos.
This is how I did mine.
One thing we have to remember is that these units, like Tamiya units are neutral switching.
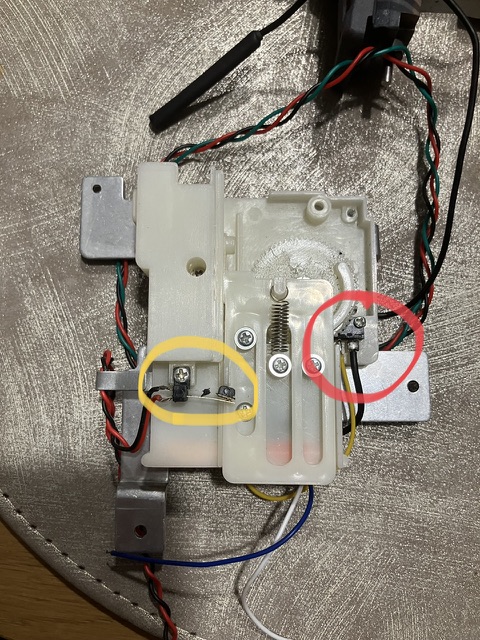
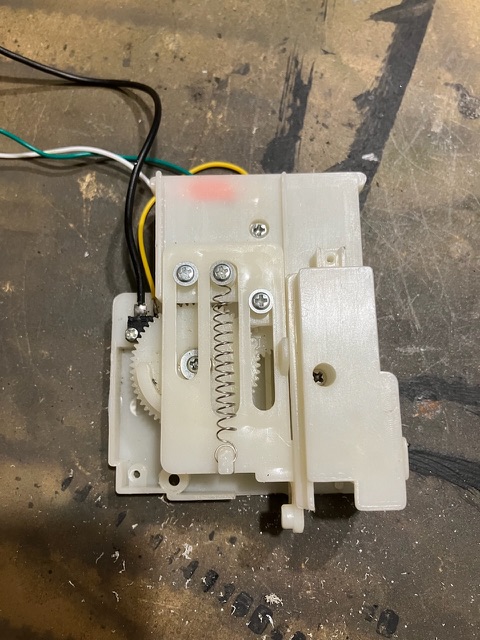
Firstly you do not need to disassemble the whole unit, like I did, as I did not need the elevation unit. This would be connect to CN3 On the board if required. The wiring that is not required can just be tidied way. There is a small micro switch on the top. Circled in yellow. This is the trigger for the sound. This can be removed, and tidied away. By doing this it means we can reverse the process. The wires we are interested in, are the green wire, white wire, and the thick black wire which come from the microswitch. Circled in red. First remove the three pin plug. Circled in red. This has a red, green and black wire going to it. The black and red wire can be tidied away. We should now have a lone black wire, green wire, and a white wire. These will need extending and a two pin plug fitting on the end. The green wire needs to end upon the side marked in red, and the white wire needs to end up on the side marked in yellow. This is important for it to work.This plug is connected to CN10. We should now end up with one thick black wire coming from the micro switch previously highlighted. This is connected to the neutral side of the battery. Last thing to do is make a jumper wire from a two pin plug by connecting two wires together and inserting into CN6. This will activate the sound at the correct time. It is also required if you install cannon smoke and flash.

- 9935F117-8A21-4F83-A184-0399E974A8E9.jpeg (166.25 KiB) Viewed 2134 times
- B2A2A961-36A0-4F36-8FF0-8CAFA8BF98A5.jpeg (163.98 KiB) Viewed 2134 times
- 0AE1B0FB-0000-477A-9363-816376DDA68C.jpeg (109.92 KiB) Viewed 2134 times

- FD49634A-71CB-4D58-8BA3-86929FE061DA.jpeg (109.87 KiB) Viewed 2134 times