I'm considering painting some up and flogging them on e-bay, but im willing to talk commision, pm me and we'll chat about it if you likefleshpedler wrote: Hey Mad Fox.
What a cracking good job, keep it up and we will all send our little
chaps for you to paint, no really a super job,.
Pete....................
A basic figure painting guide
Forum rules
This section is for posting helpful Tips and Tricks only. Questions need to be posted within general questions section viewforum.php?f=14
This section is for posting helpful Tips and Tricks only. Questions need to be posted within general questions section viewforum.php?f=14
Re: A basic figure painting guide
1 H/L Tiger in lots of bits being sorted
"A Tiger gives you a VERY nice Edge"
"A Tiger gives you a VERY nice Edge"
Re: A basic figure painting guide
Basic Painting guide Part two: The Fleshy Bits & The Hairy Bits......... OOOer Missus! 
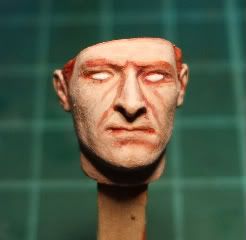
Ok as before the parts were de flashed, cleaned and then dried, then given a coat of grey primer don't overdo it as it fills the recesses that you need for the shades.
First coat was a medium flesh....
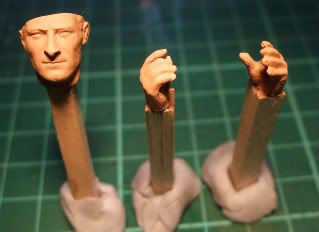
When this was dry I then gave it a wash of brown, this will be the lowlight, don't over do it or it will take forever to bring it up to the highlight.
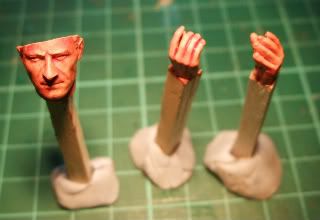
once this was dry the next stage is the application of the medium flesh again, blending into the lowlight areas carefully to add depth and shade.
next was the highlight, I use a light peach tone rather than the usual light flesh as I feel it gives a more realistic skintone for the highlight, again this was blended carefully to get a nice transition.
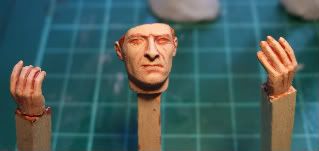
The Eyes.
this is I feel one of the hardest things to get right and I suggest practicing first before attempting it on your figures, I practiced by drawing eyes at the scale I was painting to scale and to the right distance apart, I then filled them in by painting them as I will explain in the next part of the tutorial. as a point of note, have a look at how a persons eyes fix in different positions when looking to the front, slightly to the side and fully to the side, these can be replicated with care and practice.
ok first off I used white for the eyeball and painted it in carefully, make sure you can see exactly where the lids end and the eyeball begins and paint into it.
next was the iris I did this one in blue, but you can use green or brown if you wish, here is where the difficulty comes in, you need to get this bang right or it will mess the look of the entire figure, not only do the iris's need to be central, (if looking forwards is what you want it to look like), but they also need to be the same size, and with size the size needs to be just right, too big the figure will look terrified, too small, well there will be just too much white showing and the "Grasshopper" look will be very evident, (yup I remember the series Kung Fu with David Carradine lol), so again the practice on the paper is where it all comes in.
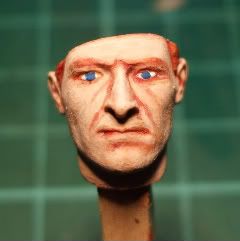
last stage for the eyes is the pupil, again, too big makes the figure look scared, too small doesnt look right, again the centre of the iris is what your aiming at.
ok so thats the eye nightmare done, now for something hairy....

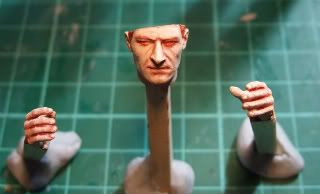
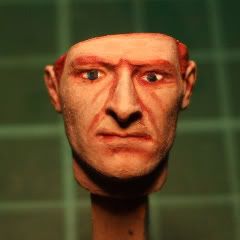
first thing I did was paint the parts to have hair black....

Next was a brush over with brown, leaving only the deepest recesses black...
I then brushed on a lighter brown for highlights...

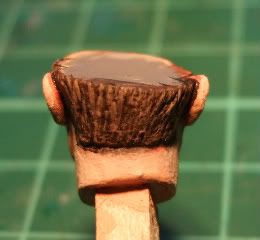
and then finally an even lighter brown for the top most highlights...
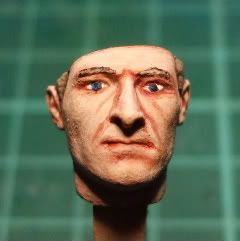
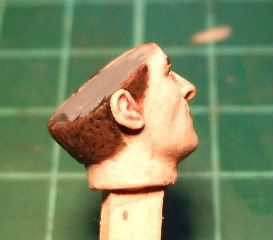
so their it is the fleshy and hairy bits sorted.
Ok as before the parts were de flashed, cleaned and then dried, then given a coat of grey primer don't overdo it as it fills the recesses that you need for the shades.
First coat was a medium flesh....
When this was dry I then gave it a wash of brown, this will be the lowlight, don't over do it or it will take forever to bring it up to the highlight.
once this was dry the next stage is the application of the medium flesh again, blending into the lowlight areas carefully to add depth and shade.
next was the highlight, I use a light peach tone rather than the usual light flesh as I feel it gives a more realistic skintone for the highlight, again this was blended carefully to get a nice transition.
The Eyes.
this is I feel one of the hardest things to get right and I suggest practicing first before attempting it on your figures, I practiced by drawing eyes at the scale I was painting to scale and to the right distance apart, I then filled them in by painting them as I will explain in the next part of the tutorial. as a point of note, have a look at how a persons eyes fix in different positions when looking to the front, slightly to the side and fully to the side, these can be replicated with care and practice.
ok first off I used white for the eyeball and painted it in carefully, make sure you can see exactly where the lids end and the eyeball begins and paint into it.
next was the iris I did this one in blue, but you can use green or brown if you wish, here is where the difficulty comes in, you need to get this bang right or it will mess the look of the entire figure, not only do the iris's need to be central, (if looking forwards is what you want it to look like), but they also need to be the same size, and with size the size needs to be just right, too big the figure will look terrified, too small, well there will be just too much white showing and the "Grasshopper" look will be very evident, (yup I remember the series Kung Fu with David Carradine lol), so again the practice on the paper is where it all comes in.
last stage for the eyes is the pupil, again, too big makes the figure look scared, too small doesnt look right, again the centre of the iris is what your aiming at.
ok so thats the eye nightmare done, now for something hairy....
first thing I did was paint the parts to have hair black....
Next was a brush over with brown, leaving only the deepest recesses black...
I then brushed on a lighter brown for highlights...
and then finally an even lighter brown for the top most highlights...
so their it is the fleshy and hairy bits sorted.
1 H/L Tiger in lots of bits being sorted
"A Tiger gives you a VERY nice Edge"
"A Tiger gives you a VERY nice Edge"
Re: A basic figure painting guide
Next up will be what I call the insundries, shoes/boots and finishing bits. which will come soon, (working on the cupola at the minute, but will sort this bit out soon ).
Last edited by Mad Fox on Wed Apr 22, 2009 9:42 pm, edited 1 time in total.
1 H/L Tiger in lots of bits being sorted
"A Tiger gives you a VERY nice Edge"
"A Tiger gives you a VERY nice Edge"
-
[ICE]monkey

- 2nd Lieutenant
- Posts: 2669
- Joined: Wed Sep 10, 2008 5:58 pm
- Location: pluckley ,ashford ,kent
Re: A basic figure painting guide
nice post ,
all the best, ice
all the best, ice
on second thoughts lets not go to Camelot ,it is a silly place
Re: A basic figure painting guide
nice work

Re: A basic figure painting guide
Brilliant post madfox thanks a lot for the time and trouble to share it
Makes my effort on a tamiya figure well ::) ::) ::)
Makes my effort on a tamiya figure well ::) ::) ::)
Re: A basic figure painting guide
Its a good effort bud, keep in their  I've been painting figures many years and Im still not totally happy with my results, I just keep plugging away and trying different things to improve.
1 H/L Tiger in lots of bits being sorted
"A Tiger gives you a VERY nice Edge"
"A Tiger gives you a VERY nice Edge"
-
wibblywobbly

- Major
- Posts: 6396
- Joined: Fri Oct 17, 2008 9:30 am
- Location: South Wales Valley
- Contact:
Re: A basic figure painting guide
Brilliant 'How To' . Cheers!
Tiger 1 Late
Panther G
King Tiger
M36 B1
Panther G
King Tiger
M36 B1
Re: A basic figure painting guide
no probs m8, happy to help
1 H/L Tiger in lots of bits being sorted
"A Tiger gives you a VERY nice Edge"
"A Tiger gives you a VERY nice Edge"
Re: A basic figure painting guide
How can you comment on this level of skill when the guy is colour blind....absolutely amazing. This realy is absorbing.
Even though I have not tried a figure yet, I am going to buy the paints this weekend and have a go.
I have a roller and a paint pad....so if it turns out rather poo, I will post it and tell you I have one arm and hand, which I use to hold the figure and so I have therfore done the painting with my foot. This foot has several verrucas and a ingrowing toenail hence the strange expression on Herr Hans's face...cross eyed etc.
Bet you can't wait eh????
Great stuff eagerly await the next installment....Mike
I should have collected beer mats
