Now she's looking sharp Birger, great details!!!
Derek
birgers HL-Tiger I 313 from rookie to___?
-
Red Devils

- Staff Sergeant
- Posts: 872
- Joined: Sun May 06, 2012 2:38 pm
- Location: Edmonton, Alberta, Canada
- Contact:
Re: birgers HL-Tiger I 313 from rookie to___?
The Princess Patricia's Canadian Light Infantry
First in the Field - Since 1914.
First in the Field - Since 1914.
Re: birgers HL-Tiger I 313 from rookie to___?
Next step. Tow cables.

Cut off the thimbles.

Drill a hole for the new cable.

Glue the cable to the thimbles. The new one should be, of course, as long as the old one, including the thimbles.

Replaced the cable clamps. Gott hem from a supplier.

Also made new mounts for the gun cleaning sticks.


Let´s create the sticks. I took wooden sticks with diameter 2,5mm.
Tooth sticks were not long enough. Watch next pictures.


Completed the mounts.


Because my „original“ had now headlights, I removed the one fromm y Tiger and just added the base plate.

Then I prepared and added the S-mine-launchers.
Two of them were installed at the rear of the hull. They had special mounts. Those are easy to loose on the model, because I need to lift the whole upper hull for changing batteries. So I didn´t used the ones in the back.

After grinding the hull, the original mounts disappeared. So I had to create new ones.

In between there was something else to do like replacing the machine gun and the track tow cable.

The cable to remount the tracks is made off copper wire and shrink hose It is very easy and looks ok.


Of course, to mount the cable I had to create new cable mount. This is my first try.


Completed the base plates with welding lines.

When I tried to complete the cable mounts the got destroyed. So I did new and different ones. This is the second try.


It is different to the originals but useful and easier to make.
Now let´s go back to the s-mine-launchers


Next component is the lower hull. First the back plate. I removed everything and filled the holes.

Removed the second rear light because the Tiger only had one on the left side.

Filling the holes need some time for the glue to dry. So let´s do some modification to the chassis.
I got a set of plastic wheels from a Torro-Tiger. I modified them and adapted them to the HL-suspension arms. Watch the pictures.


Of course I did a test drive and it worked very good. Meanwhile you can get those early wheels in metal form from different suppliers. Those are much easier to change.
Ok, glue dried, grind the back plate.

Remount the exhausts and create a new mount for old jack.


Got a new starter crank from a supplier, modified it and mounted it.


The crank handle follows later.
Next is the tow-bar.


Nach Trocknung des Klebers Teile verschliffen, angepasst und angeklebt.


Well, one of my biggest problems were the rear mudguards, especially the mounts. I found an easy solution. It worked for a while but the plastic dries out and breaks. So I changed those mounts after a while. Now they are made of small brass stripes. Just for your information.


Back to the crank handle.


I know this one was never to be opened, but I thought it would be the right place fort he main switch. So what the heck…


After I got the swiveled parts, I added the turret lifting points. They are also the new gun elevation axle.


Those points are removable to disassemble the gun.

I also added a locking to the gunners hatch. I saw that one on a picture. But I could not see any more details. So it looks like it looks.

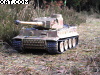
After brushing the hull and the turret to see how the structure looked, the tank looked like this.


After checking everything again, I declared the second rebuilt as finaly finished.
Because I don´t know how to do the painting, a good friend of mine did that for me. And he did a hell of a job. Here are the results.
Before you ask, “DIXI” is the short form of my uncles name Dietmar. I thought it would be a nice name for my cat.


And as the closing of this thread, a few pictures on the Dernbach battlefield.


Greetings
Birger
PS: I hope some of you Tiger owners find some practicable ideas to realize on their own models. I hope, with this thread I can help a little bit. And, by the way, when I am able to present such result, except the painting, then everybody else can do so, too.
Cut off the thimbles.
Drill a hole for the new cable.
Glue the cable to the thimbles. The new one should be, of course, as long as the old one, including the thimbles.
Replaced the cable clamps. Gott hem from a supplier.
Also made new mounts for the gun cleaning sticks.
Let´s create the sticks. I took wooden sticks with diameter 2,5mm.
Tooth sticks were not long enough. Watch next pictures.
Completed the mounts.
Because my „original“ had now headlights, I removed the one fromm y Tiger and just added the base plate.
Then I prepared and added the S-mine-launchers.
Two of them were installed at the rear of the hull. They had special mounts. Those are easy to loose on the model, because I need to lift the whole upper hull for changing batteries. So I didn´t used the ones in the back.
After grinding the hull, the original mounts disappeared. So I had to create new ones.
In between there was something else to do like replacing the machine gun and the track tow cable.
The cable to remount the tracks is made off copper wire and shrink hose It is very easy and looks ok.
Of course, to mount the cable I had to create new cable mount. This is my first try.
Completed the base plates with welding lines.
When I tried to complete the cable mounts the got destroyed. So I did new and different ones. This is the second try.
It is different to the originals but useful and easier to make.
Now let´s go back to the s-mine-launchers
Next component is the lower hull. First the back plate. I removed everything and filled the holes.
Removed the second rear light because the Tiger only had one on the left side.
Filling the holes need some time for the glue to dry. So let´s do some modification to the chassis.
I got a set of plastic wheels from a Torro-Tiger. I modified them and adapted them to the HL-suspension arms. Watch the pictures.
Of course I did a test drive and it worked very good. Meanwhile you can get those early wheels in metal form from different suppliers. Those are much easier to change.
Ok, glue dried, grind the back plate.
Remount the exhausts and create a new mount for old jack.
Got a new starter crank from a supplier, modified it and mounted it.
The crank handle follows later.
Next is the tow-bar.
Nach Trocknung des Klebers Teile verschliffen, angepasst und angeklebt.
Well, one of my biggest problems were the rear mudguards, especially the mounts. I found an easy solution. It worked for a while but the plastic dries out and breaks. So I changed those mounts after a while. Now they are made of small brass stripes. Just for your information.
Back to the crank handle.
I know this one was never to be opened, but I thought it would be the right place fort he main switch. So what the heck…
After I got the swiveled parts, I added the turret lifting points. They are also the new gun elevation axle.
Those points are removable to disassemble the gun.
I also added a locking to the gunners hatch. I saw that one on a picture. But I could not see any more details. So it looks like it looks.
After brushing the hull and the turret to see how the structure looked, the tank looked like this.
After checking everything again, I declared the second rebuilt as finaly finished.
Because I don´t know how to do the painting, a good friend of mine did that for me. And he did a hell of a job. Here are the results.
Before you ask, “DIXI” is the short form of my uncles name Dietmar. I thought it would be a nice name for my cat.
And as the closing of this thread, a few pictures on the Dernbach battlefield.
Greetings
Birger
PS: I hope some of you Tiger owners find some practicable ideas to realize on their own models. I hope, with this thread I can help a little bit. And, by the way, when I am able to present such result, except the painting, then everybody else can do so, too.
Fahrzeuge einsatzbereit: Tiger I HL 313, Tiger I Tamiya S33, Star Wars Tiger, Bergetiger
In der Inst: HL-PIII Lackierung, Vollkettenschlepper, Tiefladeanhänger
In Planung: MLRS,Crusader, KöTi, Jagdtiger, PIII, PIV,
In der Inst: HL-PIII Lackierung, Vollkettenschlepper, Tiefladeanhänger
In Planung: MLRS,Crusader, KöTi, Jagdtiger, PIII, PIV,
-
Death Head
- Lance Corporal
- Posts: 113
- Joined: Sun Nov 04, 2012 11:31 pm
- Location: Basingstoke Hants
-
PainlessWolf

- Colonel
- Posts: 7969
- Joined: Sun Feb 26, 2012 9:09 pm
- Location: Southern Colorado Rocky Mountains
Re: birgers HL-Tiger I 313 from rookie to___?
Good Morning,
Truly an amazing Tiger and a wealth of useful modeling tips as well. Thank you!
regards,
Painless Wolf
Truly an amazing Tiger and a wealth of useful modeling tips as well. Thank you!
regards,
Painless Wolf
...Money!? What's that!?...
-
tankman
Re: birgers HL-Tiger I 313 from rookie to___?
Great build thread, a lot of very usefull and informative information. Thanks for sharing.
Alan
Alan
