
Thought I would have a go at a video on painting and weathering tips
Not as easy as it looks, take 5 still sound like an uninteresting idiot who doesn't know what he is talking about! (which could be true)
I could stick with it, as their as so many youtube videos about how do do things which makes life some much simpler than written or picture descriptions
[youtube]http://www.youtube.com/watch?v=o5dA4kQ7 ... UhvVhBZHcQ[/youtube]
http://www.youtube.com/watch?v=o5dA4kQ7 ... UhvVhBZHcQ
First go at tips video
-
PainlessWolf

- Colonel
- Posts: 7892
- Joined: Sun Feb 26, 2012 9:09 pm
- Location: Southern Colorado Rocky Mountains
Re: First go at tips video
Good Morning,
Thank you for the video link. That was interesting on how you used the medium to produce the weathering effect by mixing it in with the paint.
regards,
Painless Wolf
Thank you for the video link. That was interesting on how you used the medium to produce the weathering effect by mixing it in with the paint.
regards,
Painless Wolf
...Money!? What's that!?...
Re: First go at tips video
Looks good to me Phil, I wanna see more 
I've used pastel dust to weather tanks but not tried the MIG range and not thought to use thinners as a carrier. When you mix it does it go a little muddy? I assume the thinners helps it to stick to the plastic once dry.
I've used pastel dust to weather tanks but not tried the MIG range and not thought to use thinners as a carrier. When you mix it does it go a little muddy? I assume the thinners helps it to stick to the plastic once dry.
You aint gettin me on no plane fool!
Re: First go at tips video
Nice, ….no film critic's here, thanks chaps.
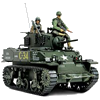
Mig pigments come in dry pounder form and you can just about ad them to anything. The Panzer below was weathered with mud made up by acrylic wet look resin with a few mig pigments thrown in, then left to dry. The picture below that was the same mig pigment powerd but added to the mig thinners, brush on to get the effect go the wet drying out. I really like effect, you don't see it instantly but when the mig thinners dry in about half and hour (depends on the temp) you end up with a live looking mud.
My friend who is a 35 scale kit basher wines on about how do you stop the mig powered coming off when you use it, simple I don't the tank just looks even better, the pigment powered is a very strong dye, spilt a bit on my dust/paint sheet cover and it stained it, that was about two years ago and still looks looks like the same brown as before.


I have some empty small pots so if you want to try some drop me your address and I'll send you a thinners and powder mud mix to try.
I can't send loads, so after maybe send it on to someone else.
Just a thought.
Mig pigments come in dry pounder form and you can just about ad them to anything. The Panzer below was weathered with mud made up by acrylic wet look resin with a few mig pigments thrown in, then left to dry. The picture below that was the same mig pigment powerd but added to the mig thinners, brush on to get the effect go the wet drying out. I really like effect, you don't see it instantly but when the mig thinners dry in about half and hour (depends on the temp) you end up with a live looking mud.
My friend who is a 35 scale kit basher wines on about how do you stop the mig powered coming off when you use it, simple I don't the tank just looks even better, the pigment powered is a very strong dye, spilt a bit on my dust/paint sheet cover and it stained it, that was about two years ago and still looks looks like the same brown as before.
I have some empty small pots so if you want to try some drop me your address and I'll send you a thinners and powder mud mix to try.
I can't send loads, so after maybe send it on to someone else.
Just a thought.
Re: First go at tips video
Good job Phil
keep em comming
keep em comming
If at first you can't fix it , hit it with a big hammer
TANKS
4 Tiger 1's
King Tiger
Panzer 3
Challenger 2
Bulldog
TANKS
4 Tiger 1's
King Tiger
Panzer 3
Challenger 2
Bulldog
-
tankmad

- Warrant Officer 2nd Class
- Posts: 1335
- Joined: Tue Jan 27, 2009 10:02 pm
- Location: glasgow
- Contact:
Re: First go at tips video
Good video Phil and I can vouch for how good Phil's tanks are I bought two of them. 
Stevie
Stevie
-
wibblywobbly

- Major
- Posts: 6396
- Joined: Fri Oct 17, 2008 9:30 am
- Location: South Wales Valley
- Contact:
Re: First go at tips video
I agree about the pigments. What they are is raw acrylic paint, eg no moisture content. You can add water and paint them, or airbrush them, or mix them with acrylic paint. Rust is easy to achieve, by placing a small mound on a sheet of tin foil, and putting a puddle of matt black next to it. Pull various amounts of pigment into the paint and daub it on. By varying the mix you will end up with a natural mottled textured rust finish. It works a treat.
The reverse is also true. Allow a puddle of acrylic paint to dry out, scrape it into powder, and you have a pigment/weathering powder.
The reverse is also true. Allow a puddle of acrylic paint to dry out, scrape it into powder, and you have a pigment/weathering powder.
Tiger 1 Late
Panther G
King Tiger
M36 B1
Panther G
King Tiger
M36 B1
-
Red Devils

- Staff Sergeant
- Posts: 872
- Joined: Sun May 06, 2012 2:38 pm
- Location: Edmonton, Alberta, Canada
- Contact:
Re: First go at tips video
Great video Phil and those are some bang on tips!! Have you experimented with applying a dullcote spray overtop of the dried pigments in order to retain them after driving through grass, puddles, etc. Just wondering as I head into the weather phase of my Tiger build. Thanks...
Derek
Derek
The Princess Patricia's Canadian Light Infantry
First in the Field - Since 1914.
First in the Field - Since 1914.
-
SteveDorics
- Recruit
- Posts: 24
- Joined: Sat Mar 24, 2012 10:16 am
Re: First go at tips video
I mixed pigments, paint and white glue to weather mud on my tanks
