Christian Ludwigs new Tiger-Chassis for HL-Tiger I

User avatar
birger
Lance Corporal
Posts: 138
Joined: Fri Aug 16, 2013 12:08 pm

Re: Christian Ludwigs new Tiger-Chassis for HL-Tiger I

Post by birger »

Now we will finish the bracket.

Last parts are these two mounting brackets.

Image


Image

After rip off, an angle has to be cut as it is shown in the picture.


Image

Then glue it.


Image

At last the end plates.


Image


Image


Image

Next parts are the fittings for the wrecking crane and the hitch.


Image


Image


Image

The hitch needs a 3mm hole and a curve. See picture.


Image


Image


Image

That´s it for the chassis. Let’s do the upper hull next.

First the engine compartment. This has to be separated from the HL hull.


Image

Than we have to separate the front plate.


Image

Everything else needs to be cut out and glued. See pictures.


Image


Image


Image


Image


Image


Image


Image


Image


Image

Report will be continued.

Greetings

Birger
Fahrzeuge einsatzbereit: Tiger I HL 313, Tiger I Tamiya S33, Star Wars Tiger, Bergetiger
In der Inst: HL-PIII Lackierung, Vollkettenschlepper, Tiefladeanhänger
In Planung: MLRS,Crusader, KöTi, Jagdtiger, PIII, PIV,
User avatar
birger
Lance Corporal
Posts: 138
Joined: Fri Aug 16, 2013 12:08 pm

Re: Christian Ludwigs new Tiger-Chassis for HL-Tiger I

Post by birger »

Next step.

Separate the hull for easier handling.

Image

Rip off and mount the remaining brackets.

Image

Image

Now, again, you have the choice. You can use the roof for an early Tiger or the other one for a mid Tiger. I use the early one.

Image

Image

Next, we mount the back brace. You can glue it or not.

Image

Image

Image

Image

Now we need to cut off all parts from the HL-roof as shown in the next pictures. Adjust and glue them.

Image

Image

Image

Image

On top of the round part we glue the fan plate. The square one is for the log.

Image

Image

Now the kabel brackets. These ones need to be new constructed. Also the position needs to be changed. Will be corrected.

Image

Image

Image

Image

Now you have to adjust the engine compartment.

Image

Report will be continued.

Greetings

Birger
Fahrzeuge einsatzbereit: Tiger I HL 313, Tiger I Tamiya S33, Star Wars Tiger, Bergetiger
In der Inst: HL-PIII Lackierung, Vollkettenschlepper, Tiefladeanhänger
In Planung: MLRS,Crusader, KöTi, Jagdtiger, PIII, PIV,
User avatar
birger
Lance Corporal
Posts: 138
Joined: Fri Aug 16, 2013 12:08 pm

Re: Christian Ludwigs new Tiger-Chassis for HL-Tiger I

Post by birger »

Next step.

Adjusting the engine compartment. The rear must be shorted 2mm.

Image

Image

Image

The front brace is next. Don´t glue it. It should be removable.

Image

Image

Image

Antenna base and the two front hatches are next.

Image

Image

First I wanted to use the HL track cable. But it broke multiple times during rip off.
Also the side fenders are missing. First I tried to rip off the hl ones. Didn´t work. So I had to construct new ones.

Let´s prepare the turret next.

In this case pictures should be enough. The center point is in the correct position.

Image

Image

The new swivel is not as high as the old one.

Image

Image

Image

Image

Image

Image

Image

Image

Image

Image

Image

Image

Image

Image

Image

Image

Image

Image

Image

Image

Here you can see the turret gap before and after.

Image

Image

Report will be continued

Greetings

Birger
Fahrzeuge einsatzbereit: Tiger I HL 313, Tiger I Tamiya S33, Star Wars Tiger, Bergetiger
In der Inst: HL-PIII Lackierung, Vollkettenschlepper, Tiefladeanhänger
In Planung: MLRS,Crusader, KöTi, Jagdtiger, PIII, PIV,
User avatar
birger
Lance Corporal
Posts: 138
Joined: Fri Aug 16, 2013 12:08 pm

Re: Christian Ludwigs new Tiger-Chassis for HL-Tiger I

Post by birger »

Next step.

Because of adjusting the turret center point, the gun has to be cut off as shown in the picture.

Image

Now we assemble the turret base.

Image

Here you can see the center cable management.

Image

Image

Next we do the roof wiring.

As you can see, the turret drive is mounted temporary. With the kit, there will be a box for mounting.

Image

After finishing the electrical work, my prototype looks like this. There is much space left. The batteries, as long as they are racing packs can be fitted as shown in the picture. If you use different ones which don´t fit there, you can cut off the brackets.

Image

I mounted the main switch temporary with a piece of poly in a position underneath the drivers hatch.

At last a few pictures to show the new constructed track fenders, the transmission and different front brackets as 2mm patterns to create different versions. The fenders and the transmissions can be mounted with m1 screws. Drill holes are prepared from the inside of the hull. You just need to finish the holes.

Image

Image

Image

Now the last update.

Well, it is done. Everything is mounted and tested. Everything works as expected.

That is the actual result.

Image

Image

Image

Image

After correcting all construction mistakes and news, Christian worked on it. He produced one pre-production Tiger. That one I assembled to check, if everything now is perfect. Simultaneously I wrote the assembly instructions in German and, of course, English.

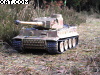
After finishing the pre-production Tiger, I looks like this.

Image

Image

Image

Image

Well, here does my report end. I hope, you enjoyed it. Please take my apology for my English, especially in form of special words. I tried my very best.

If you have any further questions or ideas, don´t hesitate to post them here. Maybe we can include one or more into this project.

There will be different types of suspension systems in the future, like the one the new metal chassis uses. So step by step, it will come, but I don´t know when, yet.

This Kit is available in Christians shop, now.

http://www.ludwigs-hobby-seite.de/Tiger%20H.html

End of Report.

Greetings

Birger
Fahrzeuge einsatzbereit: Tiger I HL 313, Tiger I Tamiya S33, Star Wars Tiger, Bergetiger
In der Inst: HL-PIII Lackierung, Vollkettenschlepper, Tiefladeanhänger
In Planung: MLRS,Crusader, KöTi, Jagdtiger, PIII, PIV,
User avatar
jarndice
Colonel
Posts: 8372
Joined: Mon Sep 03, 2012 11:27 am
Location: the mountains of hertfordshire

Re: Christian Ludwigs new Tiger-Chassis for HL-Tiger I

Post by jarndice »

After viewing this brilliant build I hope what I say is me missing something but when I fitted a jack on the back of my Tiger1 I also fitted the jack handle and a retaining clamp to the rear section, tell me it is my mistake please. still whatever a great job. shaun
I think I am about to upset someone :haha:
User avatar
birger
Lance Corporal
Posts: 138
Joined: Fri Aug 16, 2013 12:08 pm

Re: Christian Ludwigs new Tiger-Chassis for HL-Tiger I

Post by birger »

Well, Shaun,

you are right. According to the HL-Tiger, its jack doesn´t have a handle. On the original there is a clamp for the handle. In this case, you have to add a handle and therefore also a clamp.

If you take a close look to the very last picture, you can see, that I added a handle. I just glued it to the rear plate without a handle.

Greetings
Birger
Fahrzeuge einsatzbereit: Tiger I HL 313, Tiger I Tamiya S33, Star Wars Tiger, Bergetiger
In der Inst: HL-PIII Lackierung, Vollkettenschlepper, Tiefladeanhänger
In Planung: MLRS,Crusader, KöTi, Jagdtiger, PIII, PIV,
Post Reply

Return to “Tiger I”