
Hi all,
Just looking to finish off my HL KV-1 based SU-152, and want to get some idea on what people did with the driving light cover. It is the usual HL fare, with the LED bulb sticking out of a round plate. I have upgraded all my German tanks to the slit cover, but don't think there is any after market replacement for the KV-1 unless I can source a Tamiya part . I was thinking of finding a 1/18 diecast car and get the headlight cover off to use it over the LED (Will have to either take the plate off or file down the LED).
Any thoughts ?
HL KV-1 Driving light cover
Forum rules
If your question is electronics related please post it in one of the relevant boards here: viewforum.php?f=31
If your question is electronics related please post it in one of the relevant boards here: viewforum.php?f=31
-
jonger
- Lance Corporal
- Posts: 215
- Joined: Tue Jan 04, 2011 8:39 pm
- Location: Charnwood Leicestershire
Re: HL KV-1 Driving light cover
I have taken the 5 mm led's out of my lights on my Tigers etc and replaced them with 3 mm ones, they don't stick out so far so covers can be easily fitted to the standard lights.
Don't know if this helps in your situation.
Don't know if this helps in your situation.
Jonger
-
B.A.D.A.S.S.Force

- Private
- Posts: 55
- Joined: Tue May 29, 2012 7:03 am
- Contact:
Re: HL KV-1 Driving light cover
I took the route of modifying the original KV-1 headlight on my tank. I also replaced the larger 5mm original LED with a 3mm LED.
First thing was to get the headlight out of the tank, then apart to take the LED out.
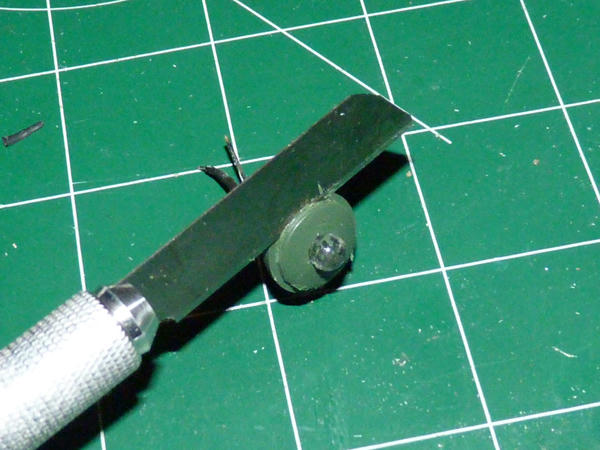

I then scrounged around in the recyclables a bit to find some nice clear plastic I could use for a lens.
I also found a round head bolt, where the round head just about perfectly fit when pushed into the headlight opening.
I filled the bolts Philip head groves with some solder & filed & sanded it pretty smooth.
Next I take the razor knife & lightly score the plastic with criss-crossed lines over an area that is much larger than the headlight opening.

I then used my heat station's hot air blower to heat up the plastic over the scored area until it's very soft, but not so much as to have it start melting or warping too much.

While the plastic was still hot, I held the headlight on the back side & the bolt on the scored side, then quickly stamped out the lens by pressing the bolt very firmly into the headlight opening.
I held it there for about 20 - 30 seconds while it formed the lens & the plastic cooled a little.


This was the first stamping that I was left with after I removed the bolt. Then slightly trimmed.


This is what it looked like after it was trimmed to size, then just popped into the empty stock headlight fixture.


Here are a few images of it temporarily installed in the tank.


Not too bad, a definite improvement over the "pimple" light, lol, but it still didn't quite look good enough for me at this stage, so I created another lens using the same technique, but having straighter & more even score lines than my first tested hand made lens.
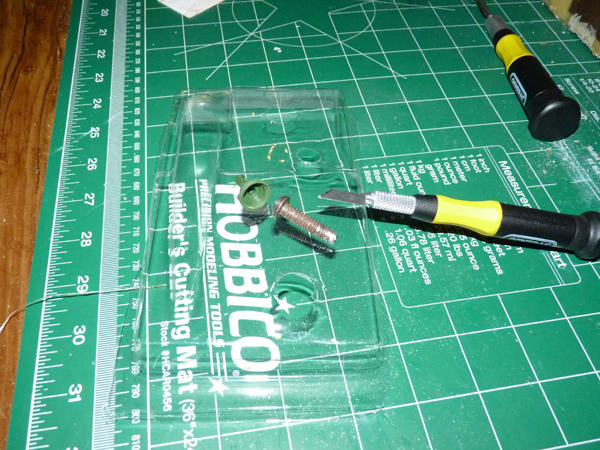
I also went out & purchased some #12 finishing washers to fabricate a better looking rim to give it a more over-all finished look.
You can see the full #12 finishing washer next to one of the same beginning size which I then had ground down with my Dremel, reamed out, & sanded thinner & smaller to create the rim I would use.
Also in the image is the newer lens I made up with more score lines than the previous lens I was using.

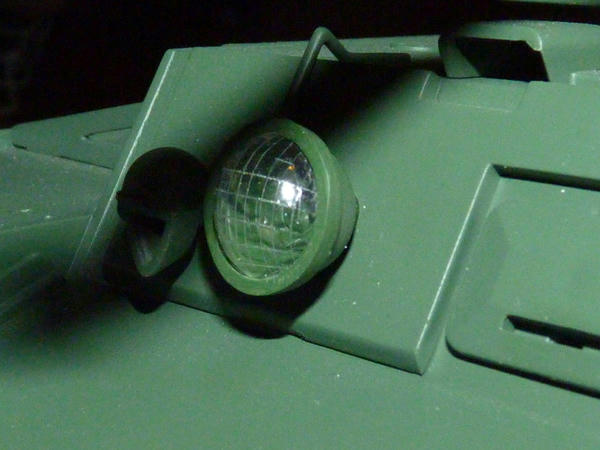
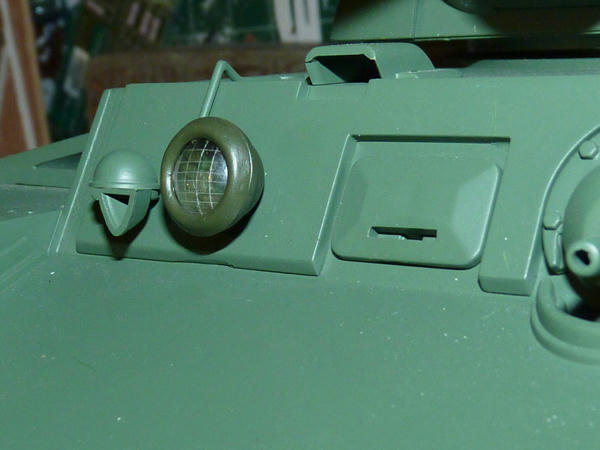
Here is a close-up after I had painted the new metal rim washer & assembled the headlight again. This new green on the light will eventually be used to paint the whole tank

Here are several pictures taken of the new headlight from different angles.


~ Craig ~
First thing was to get the headlight out of the tank, then apart to take the LED out.
I then scrounged around in the recyclables a bit to find some nice clear plastic I could use for a lens.
I also found a round head bolt, where the round head just about perfectly fit when pushed into the headlight opening.
I filled the bolts Philip head groves with some solder & filed & sanded it pretty smooth.
Next I take the razor knife & lightly score the plastic with criss-crossed lines over an area that is much larger than the headlight opening.
I then used my heat station's hot air blower to heat up the plastic over the scored area until it's very soft, but not so much as to have it start melting or warping too much.
While the plastic was still hot, I held the headlight on the back side & the bolt on the scored side, then quickly stamped out the lens by pressing the bolt very firmly into the headlight opening.
I held it there for about 20 - 30 seconds while it formed the lens & the plastic cooled a little.
This was the first stamping that I was left with after I removed the bolt. Then slightly trimmed.
This is what it looked like after it was trimmed to size, then just popped into the empty stock headlight fixture.
Here are a few images of it temporarily installed in the tank.
Not too bad, a definite improvement over the "pimple" light, lol, but it still didn't quite look good enough for me at this stage, so I created another lens using the same technique, but having straighter & more even score lines than my first tested hand made lens.
I also went out & purchased some #12 finishing washers to fabricate a better looking rim to give it a more over-all finished look.
You can see the full #12 finishing washer next to one of the same beginning size which I then had ground down with my Dremel, reamed out, & sanded thinner & smaller to create the rim I would use.
Also in the image is the newer lens I made up with more score lines than the previous lens I was using.
Here is a close-up after I had painted the new metal rim washer & assembled the headlight again. This new green on the light will eventually be used to paint the whole tank
Here are several pictures taken of the new headlight from different angles.
~ Craig ~
(¯`·._.·´¯`·._ ? B.A.D.A.S.S. F?rce Club F?under ? _.·´¯`·._.·´¯)
Re: HL KV-1 Driving light cover
Craig,
That is amazing and exactly what I wanted........ I think I can use a normal hair dryer for softening the plastic. Will give it a try !
That is amazing and exactly what I wanted........ I think I can use a normal hair dryer for softening the plastic. Will give it a try !
-
dgsselkirk

- Warrant Officer 1st Class
- Posts: 1510
- Joined: Tue Oct 16, 2012 1:57 am
- Location: Kitchener, Ontario, Canada
- Contact:
Re: HL KV-1 Driving light cover
I agree, neat and relatively simple way to do it. We will have to try it Michael and compare all ours!
"There are things in Russia which are not as they seem..."
Georgy Konstantinovich Zhukov
Georgy Konstantinovich Zhukov
Re: HL KV-1 Driving light cover
Thanks for this great idea! Simple enough to try by myself and looks very good! Will try on my KV-1, too! 
Edmunds
Edmunds
-
B.A.D.A.S.S.Force
- Private
- Posts: 55
- Joined: Tue May 29, 2012 7:03 am
- Contact:
Re: HL KV-1 Driving light cover
Thanks for the compliments everyone, I think it is a very worthwhile mod, not very difficult, & adds to the looks of the tank quite a bit for such a small change.
A couple things I can add about this mod which might help, if you are going the extra step to make a front bezel like I have, then try to stick with at least a #12 (or equivalent) sized finishing washer. I had tried a smaller #10 washer first & found I could not grind down enough of the outside, nor ream out enough of the interior hole to allow more of the lens to peek through while giving the rim a slimmer look & still maintaining that nice curved lip that the finishing washer provides. Maybe even the next larger finishing washer past #12 could work as well or even better, but I didn't even bother to test that theory since the #12 looked great!
For reference, the below images show my very first attempt using a #10 finishing washer, where the results were OK, & looked much better than the original HL lamp, but the rim was too "thick" looking for my taste, & there was a lot less of the lens itself being exposed through the rim.

Therefore I decided to move up to the #12 washer, with which its larger size allowed me to ream the inner hole bigger, as well as grind more off the outside diameter to make the rim fairly thin, but still allow it to fit the diameter of the original headlight housing.
I also sanded the the headlight fitting itself some, so that its raised edge was a lot thinner too, otherwise when you add the washer to the front of it, the rim may still look way too thick. Others may want to maybe even sand the original headlight down even more than I have, to get an even thinner look.
Make sure to sand the headlight housing first though, because it will lessen the overall diameter of the headlight a wee bit. Then go on to make the washer rim to fit the newly sanded headlight.
Also make sure as you are expanding the inner hole on the washer, that you aren't grinding out too much, & starting to grind into that nice rounded lip area on the washer. Gotta keep all of that rounded edge, it's what gives the headlight such a nice finished & realistic look when it's in place holding the lens!
Once I got the look I wanted with the rim fitted to the headlight housing, I then sanded down my fabricated plastic lens until it it fit the new rim & housing snuggly.
Good luck with the mods, & don't forget to post some pictures here of your work!
~ Craig ~
A couple things I can add about this mod which might help, if you are going the extra step to make a front bezel like I have, then try to stick with at least a #12 (or equivalent) sized finishing washer. I had tried a smaller #10 washer first & found I could not grind down enough of the outside, nor ream out enough of the interior hole to allow more of the lens to peek through while giving the rim a slimmer look & still maintaining that nice curved lip that the finishing washer provides. Maybe even the next larger finishing washer past #12 could work as well or even better, but I didn't even bother to test that theory since the #12 looked great!
For reference, the below images show my very first attempt using a #10 finishing washer, where the results were OK, & looked much better than the original HL lamp, but the rim was too "thick" looking for my taste, & there was a lot less of the lens itself being exposed through the rim.
Therefore I decided to move up to the #12 washer, with which its larger size allowed me to ream the inner hole bigger, as well as grind more off the outside diameter to make the rim fairly thin, but still allow it to fit the diameter of the original headlight housing.
I also sanded the the headlight fitting itself some, so that its raised edge was a lot thinner too, otherwise when you add the washer to the front of it, the rim may still look way too thick. Others may want to maybe even sand the original headlight down even more than I have, to get an even thinner look.
Make sure to sand the headlight housing first though, because it will lessen the overall diameter of the headlight a wee bit. Then go on to make the washer rim to fit the newly sanded headlight.
Also make sure as you are expanding the inner hole on the washer, that you aren't grinding out too much, & starting to grind into that nice rounded lip area on the washer. Gotta keep all of that rounded edge, it's what gives the headlight such a nice finished & realistic look when it's in place holding the lens!
Once I got the look I wanted with the rim fitted to the headlight housing, I then sanded down my fabricated plastic lens until it it fit the new rim & housing snuggly.
Good luck with the mods, & don't forget to post some pictures here of your work!
~ Craig ~
(¯`·._.·´¯`·._ ? B.A.D.A.S.S. F?rce Club F?under ? _.·´¯`·._.·´¯)
