Updated 08-11-2019.
The first part of this re-build has been to lift the electronic components off from the bottom of the hull and to add sound deadening covers around the gearboxes and stiffen up the front of the hull.The following pages will deal with the conversion from this early period Tiger 1 to the Mid-production version shown in the photograph of Tiger 131 in Morgny 1944.
The next few articles are dedicated to "correcting" the many details on a HL Tiger 1 (especially the early ones) that are incorrect on purpose for what I believe is to not have a copy right challange from that well known Japanese company beginning with T? There are many items that are incorrect, mine when purchased did not have all the "faults" as the evolution process had begun and changes had been made by HL as later units were produced. As a guage as to what needs correcting here are some of what I can remember popped up on many a build list within the community for the Early model Tiger1
1-Gun barrel mantlet was upside down (not on my purchase model)
2-Barrel is shown in the "recoil" position
3-Pistol port left turret side wrong orientation, shown horizontal not vertical (I think !) (Removed on mid Production)
4-Main commander cupola wrong orientation, hatch opening at wrong angle
5-Turret storage bin wrong shape and too narrow.
6-Undercut on lower rear turret inaccurate, there never was a cut out here in real life.
7-Hull turret opening is too far forward.
8-Turret ring opening is to far forward.
The above 7 & 8 look correct when the turret and barrel face forward, only when turned 90 degree to left or right the turret bin is shown overhaning the hull sides. When rearward facing the turret is shown too far forward, I guess this can only be a copy right thing as it can be correct as demonstrated later so that the turret has the correct alignment with the turret bin flush with the sides and in a central location pointed rearward.
9-Two convoy light mouldings on rear, one above each mudflap ( One on the left only is accurate )
10-The square loaders hatch on the top of the turret is too big.
11-Towing pintle missing from bottom cente of rear hull (towing hitch plates)
12-Turret lifting lugs either side of mantle wrong shape.
13-Turret lifting lug on rear of turret missing.
14-The antenna storage tube is shown along both side of hull , this only ran along the right side (looking from rear)
15- The Mantlet on the HL early version is shown with the gun barrel central. It should be in fact slightly off centre to the left as viewed from the front.
First job was to remove the "rubber zimmerit from the rear hull, then dremmel off the right hand side dummy convoy light I may fit a working left hand side convoy light in the furture, not sure if historically they were blue or green ? Anyone know the right answer ?
Next one was a bit of a head scratcher. As indicated on many of the Master Class Tiger 1 builds past and present , The Rear Panel on a HL Tiger should not stop under the engine rear decking. It should in fact extend all the way to the top and its the engine decking panel that should butt up against this. The solution following the inspiration of these Master builders is to scratch build an extention on top of the rear panel or cut the back edge from the engine deck and glue this onto the top of the rear panel and in so doing will restore the original detail.
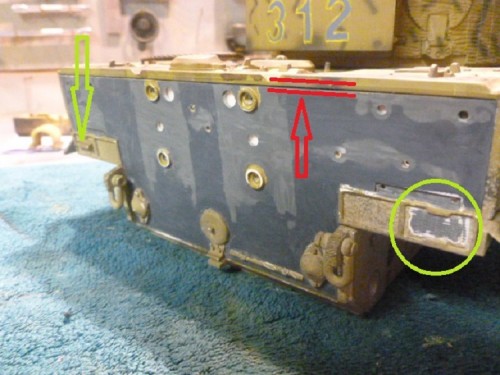
- Green arrow is correct location convoy light, circled light has been removed . Red lines show incorrect gap on hull/engine deck
My dilema was this, the rear engine panel on the original HL top hull is around 4.5mm thick. I plan to mount a travel lock onto the rear of my Mid Production Tiger. In order to do this I will need this width as my plan is to make the travel lock from 3 layers of 1.5mm brass strip. Cutting off the back of the Hull and gluing it to the rear hull panel top edge will mean I only have 2-3mm to balance any travel lock onto.
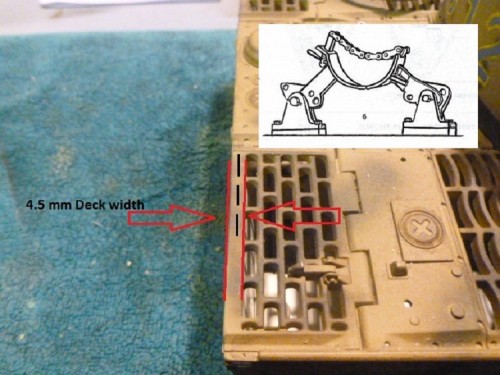
- Location for travel lock placement.
I prefer brass as it will be more durable and if I try to follow the Master example of a travel lock built by Red Devilsbuilt by Red Devils (His travel lock by its own right should be in a display case?) out of styrene I am concerned that it will be destroyed in a short space of time.The trouble is I also wanted to correct the rear panel height issue, as now its been pointed out
So after a lot of head scratching and staring at the rear panel for hours at a time, the answer to fix both issues came to me. My solution was this. I selected a sheet of 0.75mm styrene and cut a covering template to cover most of the rear panel.The top was left 2-3mm over the height of the rear panel, the rear engine decking was then filed back 0.5mm so the styrene panel sat flush against the back of the hull, after the two part epoxy resin glue had dried, I filed down the styrene sheet to the exact width and height contours of the corrected rear panel using the height of the engine decking as a guide. Historically the Mid-production Tiger's had the Feifel air filter cannisters and tool box removed from the rear hull, the styrene saved me the job of filling in the holes with milliput.The two holes on the right lower side are to mount the jack.
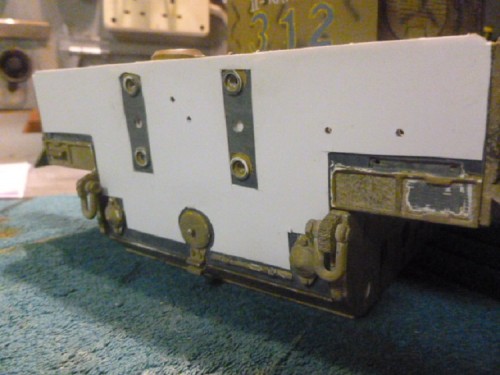
- Corrected height of rear panel
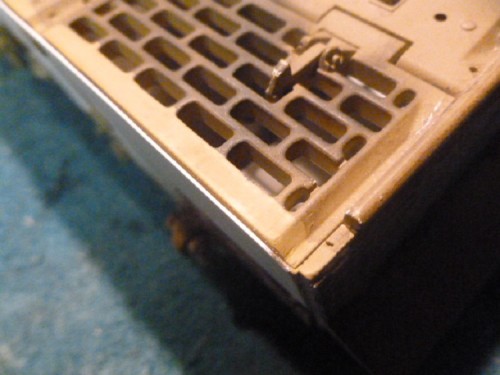
- Engine deck now butts up to rear panel
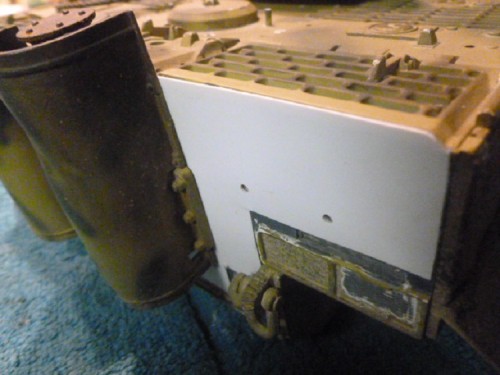
- Styrene sheet profiled to contours of engine deck
Until next time............
Yesterday is our history, Tomorrow is an eternal mistery, Today is a gift, its why its called "The Present".
