HL Panther G customization diary
-
greengiant
- Warrant Officer 2nd Class
- Posts: 1138
- Joined: Tue Jun 26, 2012 12:15 am
Re: HL Panther G customization diary
I had the same problem when I opened up the molded in hatches and hinged them. I just ground away enoufh of the mantle at the points it interfered and then sanded like mad to make the curve of the mantle that was changed unnoticable. as far as the real tank goes considering how easy my fix was, I would think that the they could be opened with the turret in the position you show.
-
DRAGONWAGON

- Lance Corporal
- Posts: 169
- Joined: Tue May 29, 2012 8:24 am
- Location: Gemert, The Netherlands.
Re: HL Panther G customization diary
Maxmekker said: "This is just ridiculously great stuff man.that PE stuff looks so tiny "
Wait if you have to make ' em in 1:48 scale!! I use the 1:48 ones for my 1:35 models, 'cos the 1:35 ones are slightly too big and look out of scale. After fiddling several hours with these babies, I'm ready to return to my straight-jacket.....
John.
Wait if you have to make ' em in 1:48 scale!! I use the 1:48 ones for my 1:35 models, 'cos the 1:35 ones are slightly too big and look out of scale. After fiddling several hours with these babies, I'm ready to return to my straight-jacket.....
John.
Tamiya M4 (105) HVSS Sherman
Tamiya Tiger I early version
Tamiya Pz.Kpfw.182 Tiger II "Königs Tiger"
Tamiya Tiger I early version
Tamiya Pz.Kpfw.182 Tiger II "Königs Tiger"
Re: HL Panther G customization diary
Update 8/11
I took a break from assembling the PE latches (for my sanity) and concentrated in detailing the front tool brackets again. I had some left over locking pins with chains from the track hangers and decided to add these to secure the C-hooks.

First I sanded the C-hooks to thin them a bit so I can do this...

With the extra space thus created I was able to drill a hole to the fastening uprights.

I have to enlarge the holes a bit until I can insert both locking pins. This is just a test fit. I removed the pins again so I can add the wire so that I can thread the wires into the tank's hull. (Like I did the track hangers).

After I added the wires to the chain. (see pic) I have to decide where to attach the chains to the tank. I drilled holes on the bracket above the C-hook like so. This is where I will insert the wires for the chains.


I didn't have problems threading the wires to the tank's hull on one side, but the opposite bracket, the holes where underneath the junction circuit board (on the underside) which have to be unscrewed and set aside so I can have access to the wire and be able to CA glue it in place. After I glued the wires, I was able to put back the circuit board.


And here are the pictures of the C-hooks (on opposite sides) secured to the brackets with the locking pins.
I took a break from assembling the PE latches (for my sanity) and concentrated in detailing the front tool brackets again. I had some left over locking pins with chains from the track hangers and decided to add these to secure the C-hooks.
First I sanded the C-hooks to thin them a bit so I can do this...
With the extra space thus created I was able to drill a hole to the fastening uprights.
I have to enlarge the holes a bit until I can insert both locking pins. This is just a test fit. I removed the pins again so I can add the wire so that I can thread the wires into the tank's hull. (Like I did the track hangers).
After I added the wires to the chain. (see pic) I have to decide where to attach the chains to the tank. I drilled holes on the bracket above the C-hook like so. This is where I will insert the wires for the chains.
I didn't have problems threading the wires to the tank's hull on one side, but the opposite bracket, the holes where underneath the junction circuit board (on the underside) which have to be unscrewed and set aside so I can have access to the wire and be able to CA glue it in place. After I glued the wires, I was able to put back the circuit board.
And here are the pictures of the C-hooks (on opposite sides) secured to the brackets with the locking pins.
Re: HL Panther G customization diary
Updates 10/10
I finally had some time from work to start tinkering with the tank again. Especially since the metal tracks arrived. I ordered them from the late Phil Pflueger from RCTankWars 2 months ago. I would like to take this time to send my condolences (however late) to his family and friends.
The transaction itself was remarkable for being unremarkable. I had some very friendly e-mail exchanges with Phil about my order which was promptly delivered to a friend who was visiting the States at the time. Her stay in the States got extended so she decided to just ship my package to me instead. Unfortunately something went terribly wrong with the forwarder, and the tracks I ordered somehow got lost in transit.
That was fixed when I got the package just a couple of days ago. It seems it was stuck in customs until someone there contacted me and I finally got it cleared. Anyways I'll just post how I installed the tracks and also do a mini-review on it.

Thanks to simonm I now know the rear idler is held by a philips screw and not allen keyed so using a regular screw driver I was able to remove the plastic idler.

The metal idler is also captive screwed and fits the same way. Attaching was straightforward.

The front drive sprocket comes in 2 parts and has to be locked in place before attaching it to the tank. Here's a pic comparing it with the plastic sprocket.

And 1 part of the sprocket attached.

The track link itself is open ended so you can easily wound it on the tank wheels. Here it is laid out as I tried to attach it to the tank.

Once the track is wrapped over the wheels, I then closed the link by attaching the locking pin.

The metal tracks add considerable weight to the tank. I think the tracks themselves weigh more than half of the tank's original weight. I sort of bought this track on a whim but now the weight of it definitely is a con since my transmission is still plastic geared. I tried running the tank to break in the tracks and the drive gears where definitely not up to the task. The tank is now unable to turn or reverse turn but can still travel forwards and back and rotate in place only under effort. (and a lot of audible jumping and slipping of the gears) Also the clackety clack of the tracks is such that it drowns out even the motor sounds on the tank's speakers.
Scale wise, I think the original HL plastic tracks got it right in terms of scale. The metal tracks are a bit thick in my opinion where pictures of the original tank (looking from the side) the tracks should be a bit thinner. However this is a minor thing and would only be noticed by an eagle eyed observer.
Anyway, one thing I liked about the metal tracks (over the pastic ones) are that the track's guide teeth have holes in them like the original tank. This little detail adds a touch of realism and is especially noticeable when the guide teeth are up against the rear idler wheels.

Also since the metal tracks are heavier the track slack looks more natural on the tank than in the plastic ones.
I finally had some time from work to start tinkering with the tank again. Especially since the metal tracks arrived. I ordered them from the late Phil Pflueger from RCTankWars 2 months ago. I would like to take this time to send my condolences (however late) to his family and friends.
The transaction itself was remarkable for being unremarkable. I had some very friendly e-mail exchanges with Phil about my order which was promptly delivered to a friend who was visiting the States at the time. Her stay in the States got extended so she decided to just ship my package to me instead. Unfortunately something went terribly wrong with the forwarder, and the tracks I ordered somehow got lost in transit.
That was fixed when I got the package just a couple of days ago. It seems it was stuck in customs until someone there contacted me and I finally got it cleared. Anyways I'll just post how I installed the tracks and also do a mini-review on it.
Thanks to simonm I now know the rear idler is held by a philips screw and not allen keyed so using a regular screw driver I was able to remove the plastic idler.
The metal idler is also captive screwed and fits the same way. Attaching was straightforward.
The front drive sprocket comes in 2 parts and has to be locked in place before attaching it to the tank. Here's a pic comparing it with the plastic sprocket.
And 1 part of the sprocket attached.
The track link itself is open ended so you can easily wound it on the tank wheels. Here it is laid out as I tried to attach it to the tank.
Once the track is wrapped over the wheels, I then closed the link by attaching the locking pin.
The metal tracks add considerable weight to the tank. I think the tracks themselves weigh more than half of the tank's original weight. I sort of bought this track on a whim but now the weight of it definitely is a con since my transmission is still plastic geared. I tried running the tank to break in the tracks and the drive gears where definitely not up to the task. The tank is now unable to turn or reverse turn but can still travel forwards and back and rotate in place only under effort. (and a lot of audible jumping and slipping of the gears) Also the clackety clack of the tracks is such that it drowns out even the motor sounds on the tank's speakers.
Scale wise, I think the original HL plastic tracks got it right in terms of scale. The metal tracks are a bit thick in my opinion where pictures of the original tank (looking from the side) the tracks should be a bit thinner. However this is a minor thing and would only be noticed by an eagle eyed observer.
Anyway, one thing I liked about the metal tracks (over the pastic ones) are that the track's guide teeth have holes in them like the original tank. This little detail adds a touch of realism and is especially noticeable when the guide teeth are up against the rear idler wheels.
Also since the metal tracks are heavier the track slack looks more natural on the tank than in the plastic ones.
-
streetfighterjeff
- Sergeant
- Posts: 516
- Joined: Sun Dec 04, 2011 10:05 am
- Location: near whitby, north yorkshire
Re: HL Panther G customization diary
looking good bud, love all the PE work you have done.
jeff
jeff
only here for a good time, not a long time
HL King Tiger
Torro Tiger I
HL King Tiger
Torro Tiger I
Re: HL Panther G customization diary
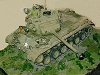
Updates 10/21
I already had the side skirts bought way back but waited for the metal tracks to get fitted before attempting to attach it since I wanted to know the final width of the tracks so I can make adjustments to the side skirts (if necessary) so it wouldn't snag during running.
The side skirts are from Tank Modellbau and I bought it from Welshdragon models. I could've made them myself but these are machine cut and are measured very precisely.

Fitting them was straightforward. First I measured where they attach. As you can see I started from the rear fender since this had a definite edge I can align with the edge of the side skirt piece.

I marked the fastening holes through with felt pen so it would mark the tank's fenders.


Then it was just a matter of freeing the hook fasteners from the sprue... (By the way, I wasn't cutting through my wife's precious table mantle as it is under the tabletop glass. A thing to remember for you husbands deciding to use the dinner table as a work table )
)

and gluing it to the side fenders. Here is a pic with the fastening hooks in place. My confidence in this thing holding while the tank is in motion has now gone as the hooks themselves are so small and narrow, I don't think there's enough surface area for the plastic glue to get a really good hold. Anyway I am thinking I'll just attach the skirts when the tanks is in static display (or running very slow) and remove it when I really want to tear the track.

Here are two side views of the tank with the side skirts on. I'm thinking whether to leave the last side skirt off as I think it looks better. However having the side skirts does change the look of the tank. I kinda miss the 'uncovered' look of the tracks.


I already had the side skirts bought way back but waited for the metal tracks to get fitted before attempting to attach it since I wanted to know the final width of the tracks so I can make adjustments to the side skirts (if necessary) so it wouldn't snag during running.
The side skirts are from Tank Modellbau and I bought it from Welshdragon models. I could've made them myself but these are machine cut and are measured very precisely.
Fitting them was straightforward. First I measured where they attach. As you can see I started from the rear fender since this had a definite edge I can align with the edge of the side skirt piece.
I marked the fastening holes through with felt pen so it would mark the tank's fenders.
Then it was just a matter of freeing the hook fasteners from the sprue... (By the way, I wasn't cutting through my wife's precious table mantle as it is under the tabletop glass. A thing to remember for you husbands deciding to use the dinner table as a work table
and gluing it to the side fenders. Here is a pic with the fastening hooks in place. My confidence in this thing holding while the tank is in motion has now gone as the hooks themselves are so small and narrow, I don't think there's enough surface area for the plastic glue to get a really good hold. Anyway I am thinking I'll just attach the skirts when the tanks is in static display (or running very slow) and remove it when I really want to tear the track.
Here are two side views of the tank with the side skirts on. I'm thinking whether to leave the last side skirt off as I think it looks better. However having the side skirts does change the look of the tank. I kinda miss the 'uncovered' look of the tracks.
-
templargfx
- Recruit
- Posts: 8
- Joined: Wed Oct 24, 2012 12:36 am
Re: HL Panther G customization diary
This has been inspiring!
Keep up the amazing work!
Keep up the amazing work!
Re: HL Panther G customization diary
Thanks for the info Eastern. I look at it as a large scale model more than anything else (more static display than battling). Although I am interested on the fastening hooks you mentioned. Are they carried by Welshdragon? Can you send me a link?  Thanks.

Re: HL Panther G customization diary
Thanks for sharing the settup on the side skirts. I'm building a JP and got both the TM ones, and then I bought some 'odd stock' with some minor cosmetic stuff on them from mitosal. 8 doallars ore so for 2 complete set's. Just need to build some hangers for them.
Odd stock
http://mitosal.com/oddstock.htm
The set with the hangers seems to be this one .
http://www.welshdragonmodels.co.uk/aber ... -165-p.asp
Seems you get fenders , hangers and side boards like here.
if you use this link you see a 'click here for PDF' to se the manual
http://www.bnamodelworld.com/armour/arm ... tamiya-kit
Odd stock
http://mitosal.com/oddstock.htm
The set with the hangers seems to be this one .
http://www.welshdragonmodels.co.uk/aber ... -165-p.asp
Seems you get fenders , hangers and side boards like here.
- bild-1358table50.jpg (9.68 KiB) Viewed 3860 times
if you use this link you see a 'click here for PDF' to se the manual
http://www.bnamodelworld.com/armour/arm ... tamiya-kit
- IMG_0680 (Medium).JPG (85.83 KiB) Viewed 3860 times
Drammen Rock City
Re: HL Panther G customization diary
Thanks for the info. So you got the aber kit hangers then ? Nice P btw
Drammen Rock City
