
Hi,
I would like to show you the pics of my first tank.
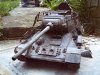
It is an HL WB M41A3.
I had problems to locate it in a right war period and after several searchs I found it has been used in the Corean war by US and only by Vietman army in the Vietnam War.
I decided to reproduce a Korean Model.
I did not use several upgrade or special parts for the tank I was not yet aware of the word of upgrade exsisting for this size!!
I let you watch the pictures and I will appreciate comments and suggestions.
Cheers,
Gianfranco.
My M41A3 Walker Bulldog (HL).
Forum rules
If you're planning on posting a log of your build please use the relevant build sections.
If you're planning on posting a log of your build please use the relevant build sections.
My M41A3 Walker Bulldog (HL).
- Attachments
-
- turret dettails...
-
- front...
-
- rear...
-
- left side
-
- right side
-
- tools and weapons
-
- In progress...
-
- The sign, Flag and few dettails of the leftpart of the tank
-
- I add some upgrade on it..
-
- the GI is the HL one, I did not have time to buy o good one!!
Last edited by Willhob on Wed Apr 04, 2012 10:06 am, edited 1 time in total.
Who dares Wins!!!

Re: My M41A3 (HL).
fetch me the kitty's lets go to war
-
gorgeousfloanne
- Recruit
- Posts: 37
- Joined: Fri May 07, 2010 7:28 pm
Re: My M41A3 (HL).
Lovely job.
Loads of detail.
If that's you're first try at detailing & weathering, you have a real gift for it. The mud effect on the wheels & tracks is excellent. The link for the 50 cal looks really good.
Keep it up.
All the best.
Jo.
Loads of detail.
If that's you're first try at detailing & weathering, you have a real gift for it. The mud effect on the wheels & tracks is excellent. The link for the 50 cal looks really good.
Keep it up.
All the best.
Jo.
 Re: My M41A3 Walker Bulldog (HL).
Thanks for the replies!!
To be honest, as I wrote in the section introduce yourself, I have experience in weathering small tanks in 1/35, this is my first 1/16.
It is different and more difficult cause the global surface is bigger and you have the risk that the effect will not be the same everywhere.
For the mud effect I used red hearth color and tamyia pigJments, mixed with wather and wooden glue. The tracks are the metal ones and they are pretty good, I reproduced the gummy part with nato black and a dry brush effect of gun metal.
It was not easy to weather the weels, they are fixed to the arms and I had no chance to take them out.
I will add in the futur other dettails as sand bags on the turret, behind the camu part, but only when my actual tank will be over, it is a TIger I early version.
I send few pics to show the work in progress...the earth is done only, that time with tamiya pigments and whater.
I used a grass effect, green that is pretty good, as the tank passed by a fresh field and not oly the soil but also few grass is attached to the hul and tracks.
The rust for the ex. system is a mix of rust color mixed with thinners and baking soda..the effect is good, if after you use to weather a bit with pigments...
Really, thanks for the replies, this is an hobby in which sharing experiences and ideas is the base.
Cheers,
Gianfranco.
- Attachments
-
- pipes and ex. system weathered
-
- angle rear side
-
- other dettail
-
- dettail of he trak
-
- right
-
- front, with spare traks
-
- left
-
- rear side
Who dares Wins!!!
-
agentgrider
- Recruit
- Posts: 19
- Joined: Wed Feb 29, 2012 8:45 pm
- Location: birmingham england
Re: My M41A3 Walker Bulldog (HL).
all i can say is WOW thats well cool
Re: My M41A3 Walker Bulldog (HL).
Thanks Agentgreider! 
I can do better I think...but a use to improve and change things when the work is in progress and you can realise what before was just in your head!
I will, thaking inspiration of few pics I saw on the monography I bought yesterday, add a damage in one of the rear wells, taking out also one of the gummy tires or damaging it.
I have the idea to put in the end the tank in diorama, but this needs a lot of space and I have to handle it somehow....
thank you and don't hesitate to ask for advices.
Cheers,
Gianfranco.
Who dares Wins!!!
