M4A1 75mm Sherman from BOB

Post Reply
User avatar
MarkofZollo
Corporal
Posts: 328
Joined: Mon Jul 05, 2010 6:16 pm
Location: Honiton, East Devon

M4A1 75mm Sherman from BOB

Post by MarkofZollo »

Well despite not having finished my Tiger and other models, I couldnt resist starting next project :/ . Since seeing Band Of Brothers for the first time I have wanted to model one of the M4A1s seen at the end of Part 2: Days of days

Image

In digging for info I found that the Shermans they used (same ones in other episodes) are actually Canadian Grizzlys, oh well.
As a present to myself for finishing final year of uni I got a Mato Sherman from Forgebear, in the post is Tamiya turret and sprue A, M34 mantle is on way from Nick Aguilar and rotor shield from Ethan at DAK. Im sure people know what the Sherman look like so will start with todays alterations to the rear :D

Image

Just tidied it up with removing bits and filling holes, accurately "cough bol**cks" carved out the higher rear armour plate and fiddled here and there. I hope I can open the engine doors and have switches etc behind them, though I may have a smoke unit there? Also spent ages correcting the idler mounts, they were facing inward at the front making tracks look odd but sorted now.
Inspired by pics and others work, I will attempt to make a three piece tranny cover, and correct the front hatches and top of hull to the above tank, but thats it for now anyway.
Ta for looking, Dave

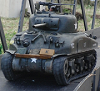
On a last note, does anyone know or have a pic of what is underneath the engine hatch (area cicled below) or how its supposed to look?

Image

I removed the hatch to hinge it but dont know if I should cut a hole or leave it???? Thanks for any answer :D
Last edited by MarkofZollo on Thu Jan 01, 2015 3:26 pm, edited 1 time in total.
There is always a fifth Sherman
User avatar
MarkofZollo
Corporal
Posts: 328
Joined: Mon Jul 05, 2010 6:16 pm
Location: Honiton, East Devon

Re: M4A1 75mm Sherman from BOB

Post by MarkofZollo »

Todays update, a lot of cutting, grinding and moulding and I have (nearly) finished one side of the hull front.

Image

Quite pleased with the outcome as I havnt seen the small hatches done before in this scale on cast hull.

Image

Not really obvious in these pics but the glacis in front of the hatch has been raised to a higher degree.
Hopefully will get other one done tomorrow 8O cheers, Dave
Last edited by MarkofZollo on Thu Jan 01, 2015 3:27 pm, edited 1 time in total.
There is always a fifth Sherman
User avatar
MarkofZollo
Corporal
Posts: 328
Joined: Mon Jul 05, 2010 6:16 pm
Location: Honiton, East Devon

Re: M4A1 75mm Sherman from BOB

Post by MarkofZollo »

Right just finished todays slog and decided I would show more steps. So to start off I removed the tray thing under the co-drivers hatch, and took the hatch out. I then cut out the hull part of the hinge to move it accordingly;

Image

Shaved the large hatches down to rough size of earlier small hatch present on this version, shown here with part of hinge to fit to hatch and hull section of hinge;

Image

The co-driver/hull mgunner side is more complex due to the vent thing (what is it?) near the hatch that was further down and closer to front on the M4A1 75mm, cut and moulded the hull to create the ledge with a little heat;

Image

I had made a cardboard template with the other hatch for the remaining space to be filled, cut out shape from 2mm plasticard and placed;

Image

Whilst that dried I made up the new hull angle with some plasticard again, just roughly done, also made another hatch template to make an inner lip;

Image

And after many hours of fingering the putty 8O :D I have the correctly (ish) angled cast effect glacis plate;

Image

Oh and before that I had filled the gaps behind the ledge for vent with plasticard, then filled and covered rest with Squadron Putty and made out the smooth ledge for the vent.
Last pic of opened hatches ;D

Image

All for today, thanks for looking, Dave
Last edited by MarkofZollo on Thu Jan 01, 2015 3:30 pm, edited 1 time in total.
There is always a fifth Sherman
User avatar
MarkofZollo
Corporal
Posts: 328
Joined: Mon Jul 05, 2010 6:16 pm
Location: Honiton, East Devon

Re: M4A1 75mm Sherman from BOB

Post by MarkofZollo »

Busy here eh?
Todays lot was going to be cut short as I have visited my Ma in hospital :/ so am using another pc, though still managed to plan ahead a little.
Firstly took some better pics of hull front in good light once smoothed down a bit, also raised the vent thing and ledge;

Image

Image

Image

The planning I referred to was re the gearbox, I am cutting back to try to make accurate as possible three-piece tranny without effecting running, pic of opened if anyone wanted to see;

Image

from looking at pics I cut the following;

Image

Image

Image

Tamiya bits came in post today (to parents house so only just seen) so will be able to size stuff up when Im home on Monday eve. Then will cut back other gearbox, cover new shape and start tranny armour!
Cheers for looking, Dave
Last edited by MarkofZollo on Thu Jan 01, 2015 3:32 pm, edited 1 time in total.
There is always a fifth Sherman
User avatar
MarkofZollo
Corporal
Posts: 328
Joined: Mon Jul 05, 2010 6:16 pm
Location: Honiton, East Devon

Re: M4A1 75mm Sherman from BOB

Post by MarkofZollo »

Well not much to show today, matched right gearbox to other, cut a section of the hull so I can put the cover on;

Image

Sized up Tamiya bits and cut and fit turrets, I have seen a few ways to do this but I decided to cut the entire circle section from Mato turret, filed down to fit the inner of the Tam turret. Also cut the drop down bit from the Tam and stuck the Mato bottom on with CA, works perfectly;

Image

Nick Aguilars M34 mantle came today, I would recommend his stuff to anyone, highest quality parts I have seen and for the price even more pleasing!!
I spent about half hour looking for bubbajoe's bogie mod remembering it being mentioned, found it but just need to get some rod tomorrow and get on with that.
Will have more then........ :D
Last edited by MarkofZollo on Thu Jan 01, 2015 3:32 pm, edited 1 time in total.
There is always a fifth Sherman
User avatar
MarkofZollo
Corporal
Posts: 328
Joined: Mon Jul 05, 2010 6:16 pm
Location: Honiton, East Devon

Re: M4A1 75mm Sherman from BOB

Post by MarkofZollo »

Well another rubbish day lol! Managed to blag a 2mm rod from a friend in a lab at uni, started bubbajoe's bogie mod but made a few errors. If anyone wanted to know further details here;
http://www.rctankwarfare.co.uk/forums/v ... 661#p38661" onclick="window.open(this.href);return false;
Got two done at it looks and works great!
Decided to do some fiddling with turret and got the split hatch placed in commanders position, made a template around and fitted with a kind of hook thing so it can still rotate;

Image

A bit more perfecting here and there too, thought Id show a taster to keep you guys interested ;)
(still 76mm cannon btw)

Image
Last edited by MarkofZollo on Thu Jan 01, 2015 3:34 pm, edited 1 time in total.
There is always a fifth Sherman
User avatar
MarkofZollo
Corporal
Posts: 328
Joined: Mon Jul 05, 2010 6:16 pm
Location: Honiton, East Devon

Re: M4A1 75mm Sherman from BOB

Post by MarkofZollo »

I did a couple more bogies today ( :haha: :/ ), I was thinking about making some bits of the bogies smaller as most is oversized, will evaluate what to do when I get nearer the end. Also resized the front hatches as per grim_marmazet's findings.
First part of transmission stuff I decided to get rid of the final drive cover as its in the way;

Image

Then was thinking of what to use to keep the cover in the right place, and had a look at a bottle top, perfect fit!

Image

Above bottle tops is the top section of the bolted trans cover which has been removed and altered to fit new one.
Bottle top is cut and fitted like this;

Image

With some clamp bits added behind the lip of hull it stays in place;

Image

Cover will be screwed into bottom of hull like the Mato one. Still more work to do on front, need to get cover into right place etc but hope to have that done by tomorrow eve :| not sure how I will make the protuding bolted sections, any ideas?
All for now cheers, Dave
Last edited by MarkofZollo on Thu Jan 01, 2015 3:35 pm, edited 1 time in total.
There is always a fifth Sherman
User avatar
MarkofZollo
Corporal
Posts: 328
Joined: Mon Jul 05, 2010 6:16 pm
Location: Honiton, East Devon

Re: M4A1 75mm Sherman from BOB

Post by MarkofZollo »

Thought I would explain a little more about what I did for the transmission cover, basically just got a large plasticard section and stuck the bolted bit of the old cover to top. I cut a half inch strip on either side that went up to about 20mm from the top and placed in position. Today I drilled holes in the hull to attach the cover;

Image

More holes in the bits sticking up on gearboxes to attach top of cover so it stays in place without upper hull;

Image

Then shaped cover and added cardboard in the gaps around final drive (hopefully paint will provide sufficient protection otherwise will have to make out of styrene)
Several different ways to make the bolted bits that connect the sections on real thing, I decided to make 2mm wide strips from 1mm plasticard and placed on top of each other, I think three is enough....

Image

A bit of filing here and there, then spent ages cutting up tooth pics to length of 1mm on right and 2mm (ish) on left of connecting bits and attaching;

Image

It gets annoying when they stick to everything but what you want :problem:
Very pleased with the look!! Only got one bogie done today, and I was sure that I had done two per day for the last couple days but there are two left to do...
Anywho hope you guys like :D
Last edited by MarkofZollo on Thu Jan 01, 2015 3:37 pm, edited 1 time in total.
There is always a fifth Sherman
sassgrunt
Sergeant
Posts: 747
Joined: Wed Oct 29, 2008 9:08 am
Location: Hawaii, USA

Re: M4A1 75mm Sherman from BOB

Post by sassgrunt »

Dave, what a great tutorial on making that three-piece transmission cover! I have an M4A4 conversion for a Firefly that has just been sitting there staring at me for months, while I've tried to decide how to make that blasted cover. You've convinced me that it really CAN be built! Thank you very much. -Mike
User avatar
MarkofZollo
Corporal
Posts: 328
Joined: Mon Jul 05, 2010 6:16 pm
Location: Honiton, East Devon

Re: M4A1 75mm Sherman from BOB

Post by MarkofZollo »

No worries mate, I have been told before "it cant be done" or that the standard Mato cover cant be improved upon, those words never stop me though! ;D
Hope to get at least bogies finished today. Not sure what to use to texturise hull as have seen a few methods. Either get this;
" onclick="window.open(this.href);return false;
which has this effect;

Image

this;

which has this effect (after sanding and painting);

Image

or thinned Squadron putty which has this effect (again after sanding and painting);

Image

(first two pics by streetsquid on rcu, third by volvospeed2010 on rctw)
The last two are pretty similar I think so seing as the joint compound is quite cheap per gram compared to Sqaudron putty I may chose that, thoughts anyone?
Last edited by MarkofZollo on Thu Jan 01, 2015 3:38 pm, edited 1 time in total.
There is always a fifth Sherman
Post Reply

Return to “Sherman”