Tiger Ebbey .....
-
Von kraftwerk

- Lance Corporal
- Posts: 217
- Joined: Thu Mar 24, 2011 11:54 am
- Location: London England
Re: Tiger Ebbey .....
I like the homemade 'etch' much more in scale,better thickness than aber,are you doing tool clamps out of scrap also,I'm enjoying this build,I like the idea of all that extra weight,must be near scale weight,ie your figure x16x16x16 = ? go on tell us
-
majordisastor

- Lance Corporal
- Posts: 208
- Joined: Fri Apr 23, 2010 5:24 pm
- Location: Llantrisant, South Wales
Re: Tiger Ebbey .....
Funny you should mention the weight ...I have felt a bit guilty by not weighing Ebbey after every stage - but I was worried my posts would start to look like a weightwatches help page !! 
I am planning to use the bathroom scales this weekend as I need to see what impact the steel BB's in the turret rotation mod have had - not to mention the additional spare tracks on the hull - so far she is working out as a tough old beast but you wouldnt want to drop her on your foot !!
Regarding the tool holders ... I was mulling over some cut up soft drink cans - will have to have a fiiddle after peering into the recoil mod....
Andy
It always gets darkest before it goes completley black......
-
majordisastor
- Lance Corporal
- Posts: 208
- Joined: Fri Apr 23, 2010 5:24 pm
- Location: Llantrisant, South Wales
Re: Tiger Ebbey .....
Just a couple of quick updates ...
New tow shackles ......
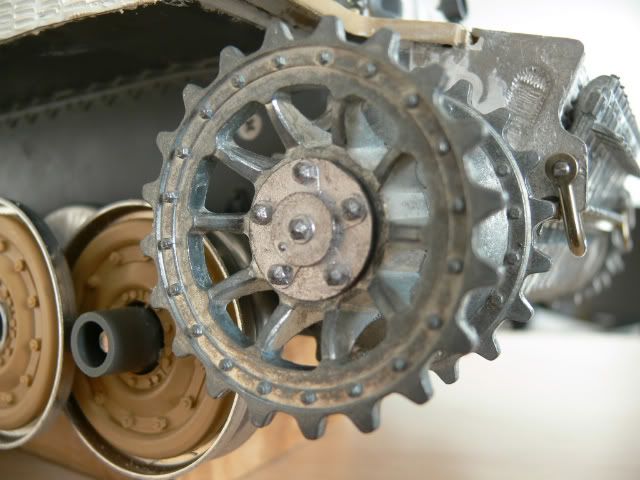
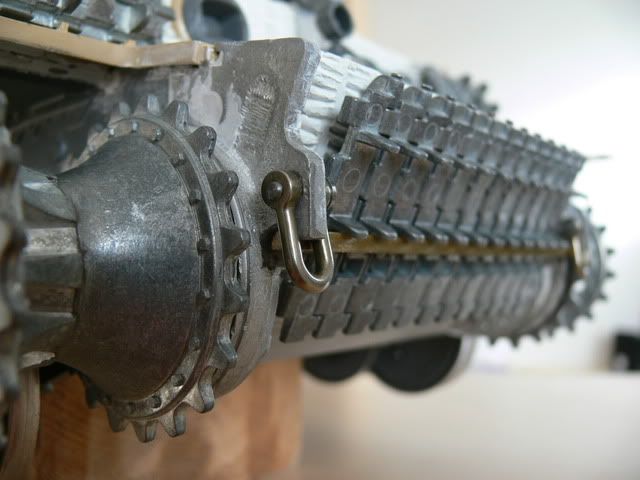
and the correct sprocket covers.
I chose metal as I plan to fix them with silcone - easier to pry apart when I need to
Andy
New tow shackles ......
and the correct sprocket covers.
I chose metal as I plan to fix them with silcone - easier to pry apart when I need to
Andy
It always gets darkest before it goes completley black......
-
majordisastor
- Lance Corporal
- Posts: 208
- Joined: Fri Apr 23, 2010 5:24 pm
- Location: Llantrisant, South Wales
Re: Tiger Ebbey .....
Well, after my attempt at installing Daryl 's rear suspension I thought it only fair to let him see what I was up too..
Fortunatly Daryl is still talking to me so I will post his response .....
Andy
Fortunatly Daryl is still talking to me so I will post his response .....
Hi Andy,
Great ideas. Very innovative use of materials. By the way, I also use flathead screws to add additional support along the lower hull area, like you said where the plastic tends to flop around in the region of the suspension arms. It really beefs things up.
Note the extra screws fitted to the lower hull - it really stiffens the whole affair up nicly !!Your use of various items 'found' is exactly what I do, by the way. Sure, some items are engineered, but on my many models (boats, trucks, airplanes, etc.) over the years, that wasn't a luxury or possible. I have hundreds of boxes full of "stuff". Old cameras, broken printer equipment, old toys, old radios, scraps from work, it's got all parts! In my spare time, I'll break things down into springs, screws, clips and brackets, motors, gears, shafts, clear parts, etc. Raw materials often come from scraps from machine shops and rejects from work. I still must buy raw materials for my upgrades I sell, but for my custom builds and one-of-a-kind machined items, I almost always recycle from previously used materials. You can't tell in the end, of course. Saves the environment, saves me money.
I like the use of staples as straps (and handles, and a lot of other things). That idea is brilliant, and is what I need for my own current projects. I was about to do something "more fancy". That is what I like about this hobby...the sharing of ideas!
Thanks and talk soon,
Daryl
Andy
It always gets darkest before it goes completley black......
-
majordisastor
- Lance Corporal
- Posts: 208
- Joined: Fri Apr 23, 2010 5:24 pm
- Location: Llantrisant, South Wales
Re: Tiger Ebbey .....
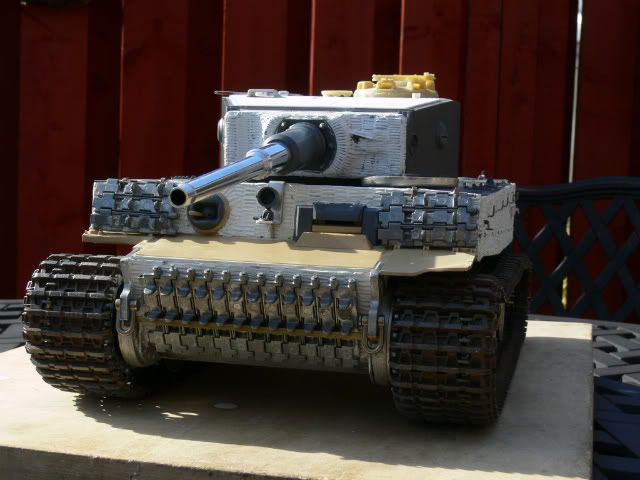
In My last couple of posts I have given a little bit of history behind some of the features of the Tiger tanks …. So he go again …..

They lost …. So moving on to the build now….
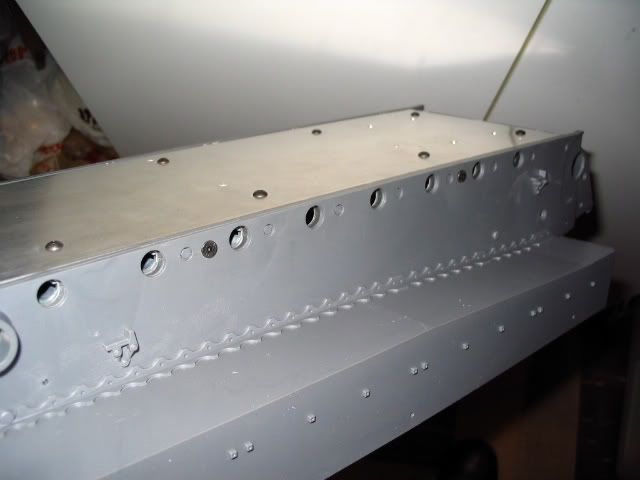
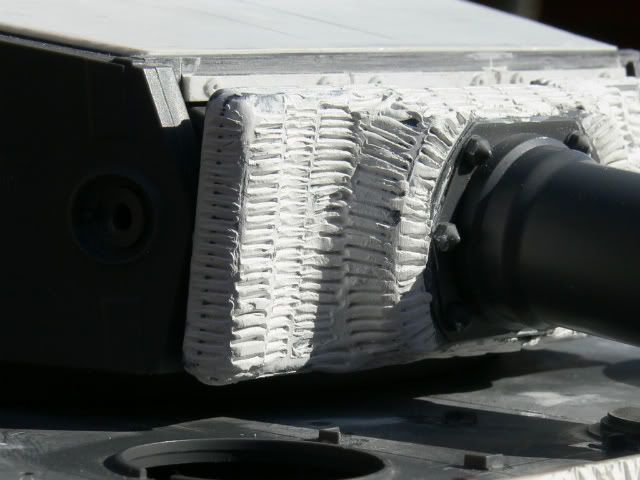
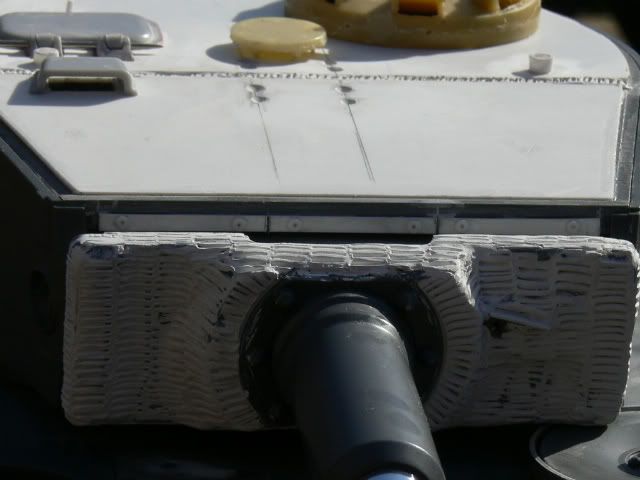
I fitted the king tiger 20 ton jack with a modified handle – and repositioned the mounts. Added the rear aerial tube holder, C mount and added Zimmerit to finnish.

A quick bit of mudguard fixing as well ...
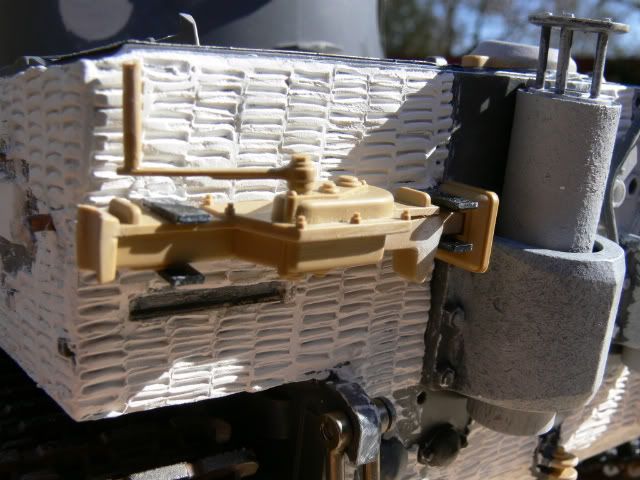
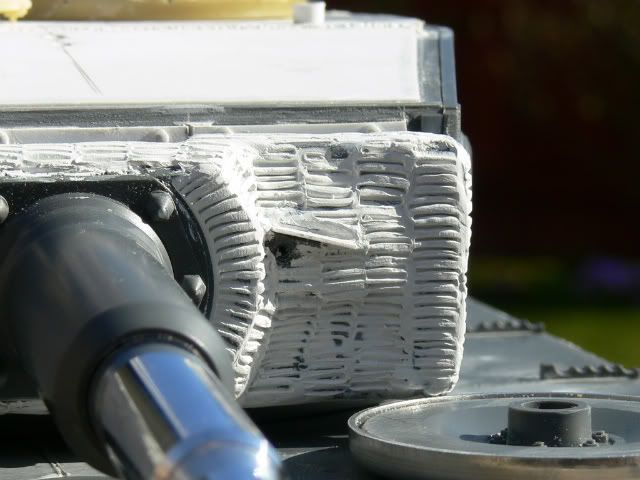
I started to work on the turret next. Blanked off the Machine gun hole –as per command tank spec – it allowed for the fitting of the extra radio in the machine gun position instead.
Upgraded Ebbey to the later single gun sight , added a field mod rain cover and Zimm to suit .
Andy
They lost …. So moving on to the build now….
I fitted the king tiger 20 ton jack with a modified handle – and repositioned the mounts. Added the rear aerial tube holder, C mount and added Zimmerit to finnish.
A quick bit of mudguard fixing as well ...
I started to work on the turret next. Blanked off the Machine gun hole –as per command tank spec – it allowed for the fitting of the extra radio in the machine gun position instead.
Upgraded Ebbey to the later single gun sight , added a field mod rain cover and Zimm to suit .
Andy
It always gets darkest before it goes completley black......
-
majordisastor
- Lance Corporal
- Posts: 208
- Joined: Fri Apr 23, 2010 5:24 pm
- Location: Llantrisant, South Wales
Re: Tiger Ebbey .....
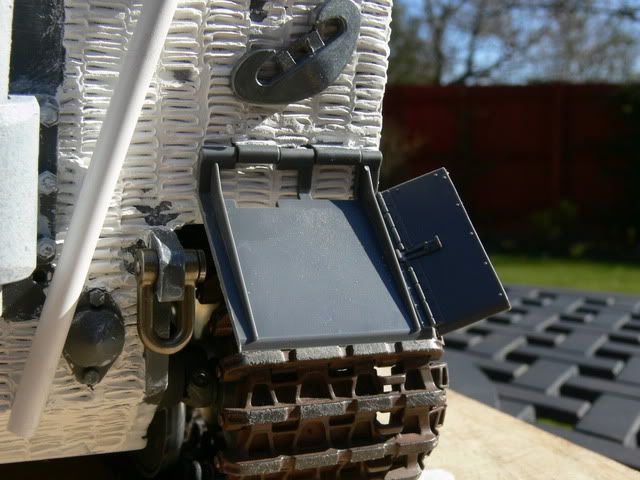
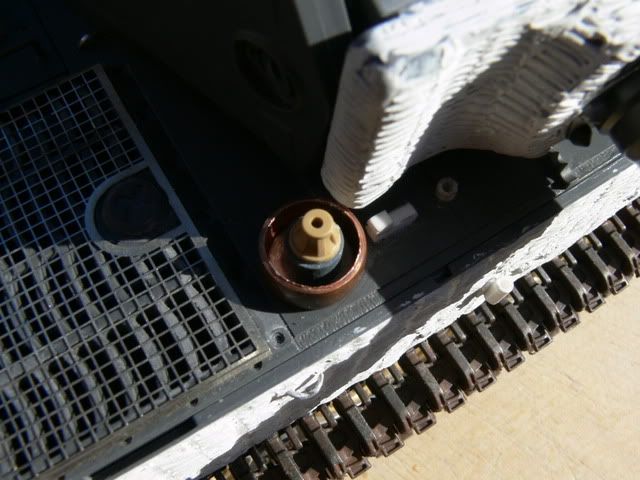
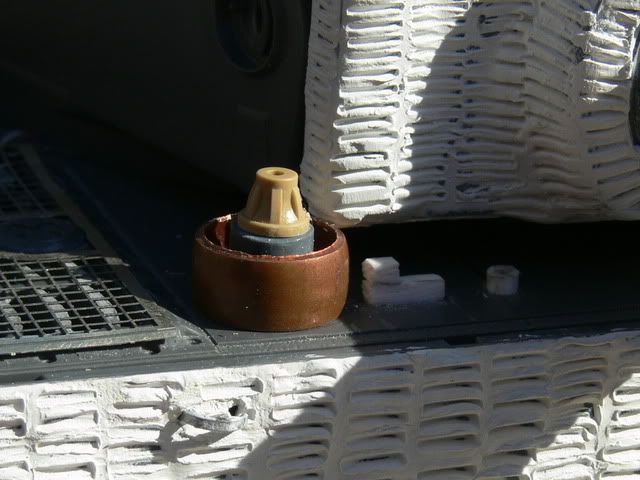
Side aerial mount and fun and games ...
This is my mount for the long range aerial radio mount.
I have seen pictures of this recessed – and mounted on top of the hull.
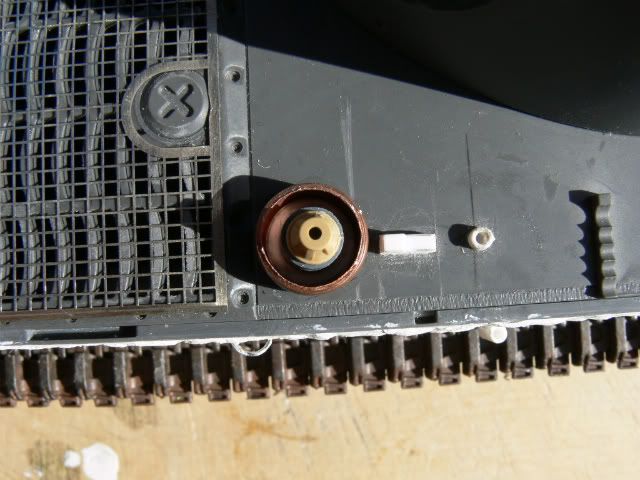
I decided to mount Ebbeys aerial mount on top of the deck – more common on King Tigers and Panthers though . I have also seen this fixture fitted to other models in the same way.
Construction of this part was dead simple - a piece of copper water pipe, an off cut sprue and finished off with the tammy aerial base.

Fresh back from our Weston club meet and I had my Ally tiger barrel and turret track mounts arrive in the post !!
I placed Paul Septons resin cast later coupla and everything was looking good …….however..
Houston – we have a problem…….
Correcting a few issues . Yep as you can see my positioning might have been slightly off – but I can appreciate why I saw more Bexxxxxx with recessed mounts.
Correcting a few issues .
Yep as you can see my positioning might have been slightly off – but I can appreciate why I saw more Bexxxxxx with recessed mounts.
Nothing else for it but drill out and recess the whole mount- easier said than done as directly beneath the fitting is the aluminium lower hull side strenghing bar.
A bit of drilling and cutting later and all done -
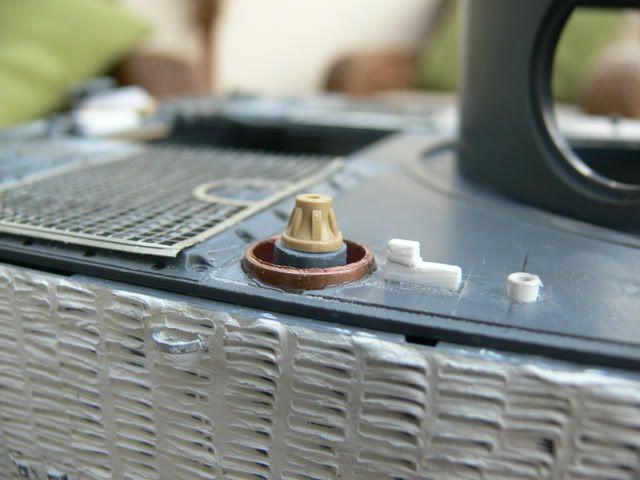
Now other problems revealed themselves . My turret rotation was very stiff, perfect if I wanted to create the effect of a hand cranked turret – but I would be a sitting duck on the battle field.
I had quite a few issues to fix here – The added tarpauling tie downs were catching the lower edge of the turret – so they had to be removed. – I will put them back later after the turret is fixed in its final position.

My added Heng Long turret fixing was still stiff and dragged the upper deck.
I decided to drill some holes through the turret floor,
Add some bb’s to use as bearings…the washers hold the bb’s in place and stop them fouling the rotation.

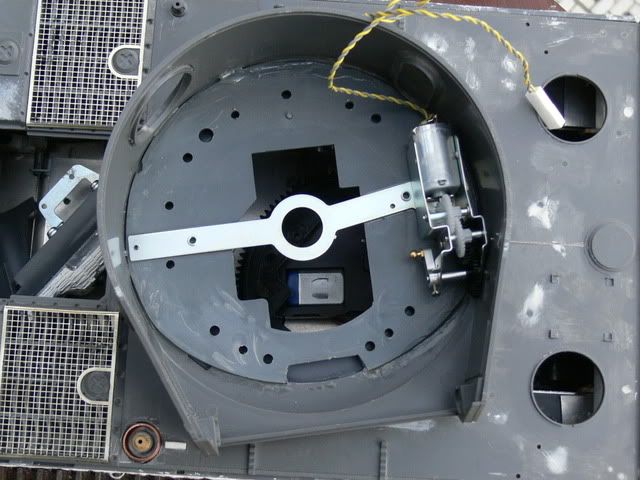
Better , the bearings version 2 ,x x size hole have raised the turret off the deck to reduce drag. I also appeared to have modelled at this point the backside of a Dalek !! However the action was still catching part way round.
There must have been some warp present in the Heng Long deck – the Tamiya upper deck has all the structural strength of damp lasagne – and just formed itself to the Heng Long deck.
So a bit of beefing up needed here....

The added ally strips help to stop the deck from flexing, and might help in keeping any wiring out of the way.
The brass square section fits neatly under the Heng Long rotation motor.
Reworked Turret rotation and mounts ...
I have now replaced my plastic BB bullets with metal 6mm bearings/BB bullets to give a smoother action...

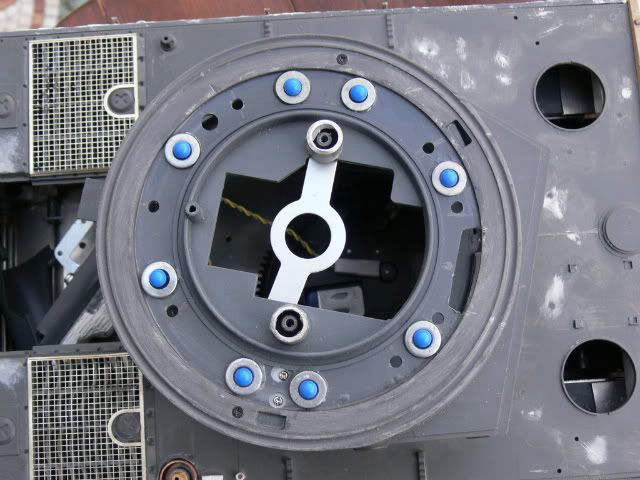
One unexpected problem came up during all this faffing about was the rapid deteriation of the orginal Heng Long turret screw mounts - the ones that hold the toothed lower turret ring in position.
The screws kept working lose and needed thicker screws to secure them - making the mounts even more fragile.
So.......Time for some serious mounts to be fitted -
As you can see above I redrilled down through the original mounts, then cut away the old plastic posts .
I could then fit these heavier mounts - secured top and bottom - and decent screws.

Here is a view inside the turret showing the new posts fitted through the turret floor.
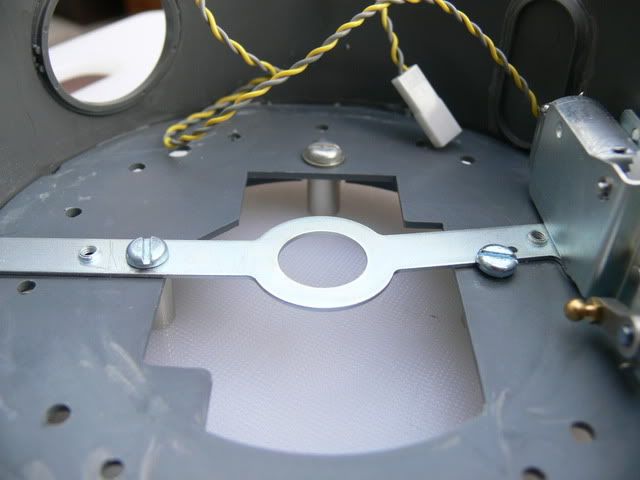
This is a comparison to show how more substantial the new posts are ..
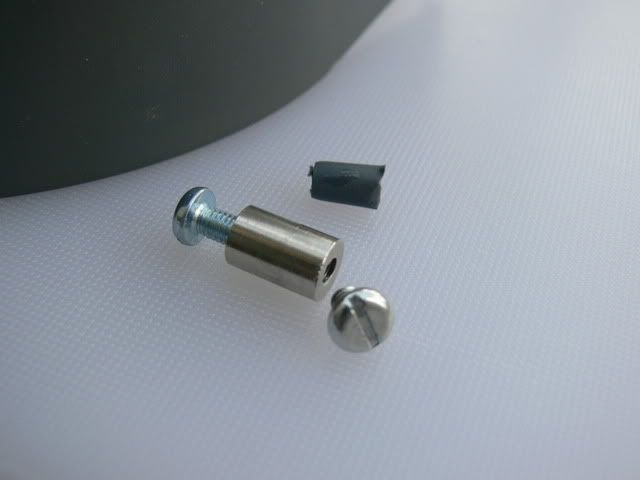
One benefit is a far more stable turret weight distribution.....
Andy
This is my mount for the long range aerial radio mount.
I have seen pictures of this recessed – and mounted on top of the hull.
I decided to mount Ebbeys aerial mount on top of the deck – more common on King Tigers and Panthers though . I have also seen this fixture fitted to other models in the same way.
Construction of this part was dead simple - a piece of copper water pipe, an off cut sprue and finished off with the tammy aerial base.
Fresh back from our Weston club meet and I had my Ally tiger barrel and turret track mounts arrive in the post !!
I placed Paul Septons resin cast later coupla and everything was looking good …….however..
Houston – we have a problem…….
Correcting a few issues . Yep as you can see my positioning might have been slightly off – but I can appreciate why I saw more Bexxxxxx with recessed mounts.
Correcting a few issues .
Yep as you can see my positioning might have been slightly off – but I can appreciate why I saw more Bexxxxxx with recessed mounts.
Nothing else for it but drill out and recess the whole mount- easier said than done as directly beneath the fitting is the aluminium lower hull side strenghing bar.
A bit of drilling and cutting later and all done -
Now other problems revealed themselves . My turret rotation was very stiff, perfect if I wanted to create the effect of a hand cranked turret – but I would be a sitting duck on the battle field.
I had quite a few issues to fix here – The added tarpauling tie downs were catching the lower edge of the turret – so they had to be removed. – I will put them back later after the turret is fixed in its final position.
My added Heng Long turret fixing was still stiff and dragged the upper deck.
I decided to drill some holes through the turret floor,
Add some bb’s to use as bearings…the washers hold the bb’s in place and stop them fouling the rotation.
Better , the bearings version 2 ,x x size hole have raised the turret off the deck to reduce drag. I also appeared to have modelled at this point the backside of a Dalek !! However the action was still catching part way round.
There must have been some warp present in the Heng Long deck – the Tamiya upper deck has all the structural strength of damp lasagne – and just formed itself to the Heng Long deck.
So a bit of beefing up needed here....
The added ally strips help to stop the deck from flexing, and might help in keeping any wiring out of the way.
The brass square section fits neatly under the Heng Long rotation motor.
Reworked Turret rotation and mounts ...
I have now replaced my plastic BB bullets with metal 6mm bearings/BB bullets to give a smoother action...
One unexpected problem came up during all this faffing about was the rapid deteriation of the orginal Heng Long turret screw mounts - the ones that hold the toothed lower turret ring in position.
The screws kept working lose and needed thicker screws to secure them - making the mounts even more fragile.
So.......Time for some serious mounts to be fitted -
As you can see above I redrilled down through the original mounts, then cut away the old plastic posts .
I could then fit these heavier mounts - secured top and bottom - and decent screws.
Here is a view inside the turret showing the new posts fitted through the turret floor.
This is a comparison to show how more substantial the new posts are ..
One benefit is a far more stable turret weight distribution.....
Andy
It always gets darkest before it goes completley black......
-
Chef_bikes
- Recruit
- Posts: 36
- Joined: Tue Dec 07, 2010 9:58 pm
Re: Tiger Ebbey .....
This is a really great thread! I love the tank, the build log and the great pics. Please keep 'em coming. 
Chef
Chef
A positive attitude may not solve all your problems, but it will annoy enough people to make it worth the effort.
Re: Tiger Ebbey .....
Very nice work!
best wishes,
jeff
best wishes,
jeff
-
majordisastor
- Lance Corporal
- Posts: 208
- Joined: Fri Apr 23, 2010 5:24 pm
- Location: Llantrisant, South Wales
Re: Tiger Ebbey .....
Thanks guys - have been a bit busy to post the latest updates - will do as soon as possible ...
Watch this space .......!!
Andy
Watch this space .......!!
Andy
It always gets darkest before it goes completley black......

Re: Tiger Ebbey .....
I'm a total noob and have read this thread in awe!
Totally insane.....Genius!
keep it coming.
p.s if the weight keeps goin up you might have to design some real miniature diesels
to get her movin!
Totally insane.....Genius!
keep it coming.
p.s if the weight keeps goin up you might have to design some real miniature diesels
to get her movin!
If i'd of kept all the money i'd already spent,
I'd have been a millionaire a long time ago
I'd have been a millionaire a long time ago
