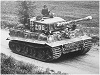
Well i skipped a few steps, however here is the finished product all painted and detailed. I still made the top tow ropes from scratch, barbed wire, antenna, extra bullet holes on muffler guards etc and muddied the wheels just a bit (still will have to work on the tracks). I also decided that i wanted the turret to do a complete 360 rotation so i modified the sprocket. I also got annoyed with picking the tank up every time i wanted to turn it on so i moved the S+S, power switch and volume into the front hatches so they are easily accessible.
Here are some of the pictures (probably not the best lighting conditions as they turned out a bit on the yellow side) .
Now thinking that this is all i wanted to do to the Tiger i took it outside onto rugged terrain and after about 20 minutes the tack tension adjusters were toast. I was actually expecting that and have already ordered metal tensioners and metal suspension. I am also now working on waterproofing the tank as i thought it was pretty cool to go over water with it. I'm also thinking of installing the Asiantam barrel recoil but am a bit confused on how to eliminate the tank recoil once the barrel recoil is installed. I see that there are modules available but i think that i would want to try doing without them.
Anyway hope that you enjoyed the build (probably not finished yet) and welcome any comments.
My First Tiger Build 2
Forum rules
If you're planning on posting a log of your build please use the relevant build sections.
My First Tiger Build 2
Last edited by abec91 on Fri Feb 25, 2011 10:03 am, edited 1 time in total.
-
- Recruit
- Posts: 39
- Joined: Sun Dec 19, 2010 4:47 pm
Re: My First Tiger Build 2
Looks really excellent! Nice work!
Could you give a bit of a list of the extra detail items you've added?
Re: My First Tiger Build 2
WOW, that looks fantastic, i love the finish of it, top job..... 

Re: My First Tiger Build 2
Great looking paint job
Love the cruddy effect on the oil drum


Love the cruddy effect on the oil drum

Hey man....I just ride 'em, I dunno what makes 'em work.
Woof woof woof !
Woof woof woof !
Re: My First Tiger Build 2
excellent paint job weathing looks great 

Re: My First Tiger Build 2
REALLY like your finish/weathering. Can you explain how you did it? Thanks much
DanL
DanL
Re: My First Tiger Build 2
Thanks Dan,DanL wrote:REALLY like your finish/weathering. Can you explain how you did it? Thanks much
DanL
I used acrylic paints in spray can format believe it or not as i want to save up to buy a decent airbrush kit. I used light gray primer on the whole body, than i used dark brown in the engine grill area. Now i started painting small patches with a dark gray and a bit of white. Once dry i used 1600 sandpaper to smooth out the blends. Now it was time to do a little washing on the tank grills and other areas that i wanted to dirty. I used a fine brush to make water stains on the fenders with a mix of white and gray, i also used a mixture of black and brown to put a bit of discoloration on certain bolts and some rust coming from underneath the fenders, I used a darker mixture on the bullet holes on the muffler shields and rear right fender. I got a great look on the muffler shields from using a lighter as i was doing a bit of damage on them. I just cleaned them up and blended them in with the dark gray. The rust effect on the actual muffler was done bu mixing red with black and i also added some finely ground red stone which i found outside (used for gritting on the pavements in winter). The final stage was adding the white which was applied with a sponge, now i recommend playing around with different sponges and with different amount of paint to get the look that you want. I took abit of playing around on scrap paper to get it just right. the wheels were also done with the sponge, i wanted some dirt on the wheels (not too much as i seen some people over doing it) i brushed just the black part of the wheel with a little glue and sprinkled dirt over it. With all that done i sprayed the whole tank with a couple coats of matt varnish to seal it. I hope that this will give you a bit of guidance.
Thanks to all for the encouraging comments.