As you can see from these photos we have still an awful lot of work to do but at least it is starting to look like a tank now. The gun is made in 2 seperate pieces and comes apart where it narrows. It has been threaded so a longer barrel can be added if wanted. We have yet to decide whether to make it move up and down and possibly even fire bb pellets.....As this is a total scratch build we have no plans to follow so every stage is a challenge to improve....
Feel free to comment even if negativly as we take all advice and comments to try improve the tank. Thank you for looking.
newbies start 2 scratch built 1/8 Panzer III
-
solosyphos
- Recruit
- Posts: 44
- Joined: Wed Jan 06, 2010 8:44 pm
Re: newbies start 2 scratch built 1/8 Panzer III
- Attachments
-
- sept 2010 (2).JPG (110.17 KiB) Viewed 5984 times
-
- sept 2010.JPG (121.09 KiB) Viewed 5984 times
-
solosyphos
- Recruit
- Posts: 44
- Joined: Wed Jan 06, 2010 8:44 pm
Re: newbies start 2 scratch built 1/8 Panzer III
Hi all
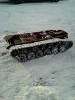
Just a quick update with our tanks. Have just finished our machine guns and for once things went well and are very pleased with the result. Didnt know how to make this but Frank persevered and I think the result looks quite well. As you can see the whole tank is starting to take shape and actually look like a Panzer III.
Will be starting soon to insert the 2 x 18volt drill motors and get the drive somewhat like and hopefully we might actually see movement.
- Attachments
-
- guns on tank (2).JPG (99.41 KiB) Viewed 5984 times
-
- assembled gun.JPG (86.06 KiB) Viewed 5984 times
-
- guns on tank.JPG (103.17 KiB) Viewed 5984 times
-
- gun parts.JPG (91.51 KiB) Viewed 5984 times
-
solosyphos
- Recruit
- Posts: 44
- Joined: Wed Jan 06, 2010 8:44 pm
cupola and machine guns
Just a few more photos to keep you up to date. We have now managed to get the doors on the cupola hinged and usable although we still need a handle on. Also complete is the fixed machine gun next to the main cannon and the shaped side pieces at either end of the gun armour.The drivers view slot works and moves up and down
- Attachments
-
- oct 13-2010 (2)6.JPG (111.47 KiB) Viewed 5984 times
-
- oct 13-2010 (2)5.JPG (108.39 KiB) Viewed 5984 times
-
- oct 13-2010 (2)4.JPG (112.14 KiB) Viewed 5984 times
-
- oct 13-2010 (2)3.JPG (89.11 KiB) Viewed 5984 times
-
- oct 13-2010 (2)2.JPG (111.58 KiB) Viewed 5984 times
-
[ICE]monkey

- 2nd Lieutenant
- Posts: 2669
- Joined: Wed Sep 10, 2008 5:58 pm
- Location: pluckley ,ashford ,kent
Re: newbies start 2 scratch built 1/8 Panzer III
very nice , shes coming together now
regards, cliff
regards, cliff
-
solosyphos
- Recruit
- Posts: 44
- Joined: Wed Jan 06, 2010 8:44 pm
Re: newbies start 2 scratch built 1/8 Panzer III
Hi to everyone
Just thought it was about time to update our never ending project. We never realised the enormity of this project when we started.
We decided to have a go at sorting out the drive mechanics which we had quietly been avoiding as we had no idea of how to proceed. Firstly we decided to use the same method as a vacuum cleaner drive i.e. a very tight belt on 2 pulleys driven by a smooth shaft on a drill motor.(see photo)
Before we got there we had to somehow hold the stripped battery drill motor so I made an aluminium cradle whilst Frank made the pulleys to go onto the end of the drill motor.We assemble it all together, applied the power and NOTHING......AAARRRGGGGHHHH. nothing but a slipping belt !!. Plan 74a next......W decided to try use a cog and chain method but after researching ebay we couldn't locate cogs that were small enough.....Plan 75a....Only way forward was to make our own cogs and that was something we had never done...However with some aluminium bar, some very precise measurments and some trial and error we are now quite proud of our cogs. Next problem was how to get the chain to exactly the right tension so we drilled elongelated holes in the base plates so that we could move the motor mounts backwards and forwards.We had mounted all this onto some MDF boarding but found this far too flexible so then made aluminium base plate but still too much movement so then another strip down and plenty of wood packing underneath all the boarding. Finally we assembled it all again and connected the electrics and the battery......SUCCESS...it moved beautifully forwards and backwood and sounded great with the metal treads on a metal table.....The electrics need a lot of work as can be seen in the photo but we are going to use a servo for applying power to the motor but we need to find some electric device that will reverse the + and - so that the motors will go into reverse. Any ideas anyone ???....It is so nice after 12 months to finally see movement as there have been times when we could have easily advertised the whole lot on ebay due to the frustration it has caused at times. Still dont know what to do when finished......perhaps ebay might be the answer to raise funds for the next build
Just thought it was about time to update our never ending project. We never realised the enormity of this project when we started.
We decided to have a go at sorting out the drive mechanics which we had quietly been avoiding as we had no idea of how to proceed. Firstly we decided to use the same method as a vacuum cleaner drive i.e. a very tight belt on 2 pulleys driven by a smooth shaft on a drill motor.(see photo)
Before we got there we had to somehow hold the stripped battery drill motor so I made an aluminium cradle whilst Frank made the pulleys to go onto the end of the drill motor.We assemble it all together, applied the power and NOTHING......AAARRRGGGGHHHH. nothing but a slipping belt !!. Plan 74a next......W decided to try use a cog and chain method but after researching ebay we couldn't locate cogs that were small enough.....Plan 75a....Only way forward was to make our own cogs and that was something we had never done...However with some aluminium bar, some very precise measurments and some trial and error we are now quite proud of our cogs. Next problem was how to get the chain to exactly the right tension so we drilled elongelated holes in the base plates so that we could move the motor mounts backwards and forwards.We had mounted all this onto some MDF boarding but found this far too flexible so then made aluminium base plate but still too much movement so then another strip down and plenty of wood packing underneath all the boarding. Finally we assembled it all again and connected the electrics and the battery......SUCCESS...it moved beautifully forwards and backwood and sounded great with the metal treads on a metal table.....The electrics need a lot of work as can be seen in the photo but we are going to use a servo for applying power to the motor but we need to find some electric device that will reverse the + and - so that the motors will go into reverse. Any ideas anyone
- Attachments
-
-
-
-
-
-
-
-
-
-
-
solosyphos
- Recruit
- Posts: 44
- Joined: Wed Jan 06, 2010 8:44 pm
electrics here we come
We decided to move onto the dreaded electrics. We didnt have a clue what to do concerning installing electric so back to google to do some research. I soon discovered it was throw a lot of money at it or devise something yourself. We decided that the electrics that came with the cordless power drills worked ok with the drills so lets adapt them for the tank. This was fine with the throttle but if you have ever used a cordless drill the forward / reverse switch is quite hard to operate and a servo would never manage it. Looking for a speed controller that would handle 18v drill motors were super expensive so back to the drawing board. I metered out the reverse switch and realised it was only reversing polarity so we designed a simple method to reverse polarity. It was at this time that I went over to the good old U S A for xmas so left Frank with the drawing to play around. On return Frank had managed to get the tank running using radio control but had only done a very rough job to test the theory. He took me outside and handed me the controls and told me to have a go. 20 seconds later and smoke was streaming from the tank.....AAAARRRGGGHH. He had just bought a brand new radio control, servos and receiver so I was in full panic mode expecting the worst...On inspection it was the drill electrics that had burnt out. I hadnt moved the lever far enough and as you can see from the photos the first rough connections ran very close so I have managed to bridge both + and -
and therefore burn out the electrics. Luckily we had a spare so back to the workshop for a rethink. The idea worked but we had to neaten it up. See next lot of photos for the almost finished board. Instead of top wiring all wire run under the board. The first copper connection on each servo is positive with the other arm being on negative. When the switch is operated the arms move and the positive arm moves to the negative and the negative arm moves to the positive thus reversing the motors.Hence forward and reverse.......
Here is a link of RC movement with the old system with elevator and rudder sticks to change direction. It was hit and miss as you will see
http://s889.photobucket.com/albums/ac94 ... edia_share" onclick="window.open(this.href);return false;
The new system uses the auxilary switches on the TX so there is no room for error.This will leave the rudder control available for when we get the turret ready to be controlled using a 360 degree rotating sail heavy duty servo.Seems to work great
- Attachments
-
-
-
solosyphos
- Recruit
- Posts: 44
- Joined: Wed Jan 06, 2010 8:44 pm
Re: newbies start 2 scratch built 1/8 Panzer III
Next we decided to concentrate on the mudguards but just before that we had to incorperate charging and on/off switches. Frank managed to find switches on ebay that were great. You can see how we had to make the holes in the thick steel drilling 1 hole at a time. Painstaking work but had to be done. The bonus is that when the switches are operated they light up so we put the switches in opposite ways to look a little like rear lights. Next we moved onto the mudguards (sure thats not the proper name ! ) It was hard to bend over the ends to form a lip but with steel bars, heating up and plenty of hammering Frank managed to do a pretty good job. He also made the copper parts all by hand using copper piping and soldering brass brackets on each one. I think they look good and it will seem a shame to have to paint them,
Let me know what you think and we always enjoy receiving any suggestions or comments that you peeps might have....
Let me know what you think and we always enjoy receiving any suggestions or comments that you peeps might have....
- Attachments
-
-
-
-
Re: newbies start 2 scratch built 1/8 Panzer III
Have you seen the Tri-pact speed controller? 4 X 5 pin relays and some diodes. Works very well and does not take up as much room in the tank.
http://rctankcombat.com/articles/speed-control/
Sorry! I do not know how to make the URL into a hyperlink.
Phil
http://rctankcombat.com/articles/speed-control/
Sorry! I do not know how to make the URL into a hyperlink.
Phil
If you are not living on the edge, then you are taking up too much room.
Re: newbies start 2 scratch built 1/8 Panzer III
Here is a (slightly blurry) picture of the TRI-Pact speed controller that I built for my 1/8th M26. The relay on it's own is to power my homemade smoker. Obviously the Tri-pact controller was designed by someone else. I just copied it from the RC tank combat website. It uses 4 X 40 amp 5 terminal relays, some microswithches and some diodes. I found the exact diodes on Ebay.
Works really well. Can control the tank with just one stick on the transmitter.
Phil
Works really well. Can control the tank with just one stick on the transmitter.
Phil
- Attachments
-
If you are not living on the edge, then you are taking up too much room.
