Hi Ice
yup... you are correct, many times I have thought "all I have I done is wreck a perfect Pershing".
Every time I have sliced into my finger with a Stanley blade, glued my fingers together and had to alter something that looked ok the night before....@hit and *ugger.
But then I am in good company....and plasticard is relatively cheap isn't it...
Mike
centurion part 4 foto
-
fleshpedler

- Sergeant
- Posts: 664
- Joined: Mon Sep 15, 2008 1:36 am
- Location: weston super mare
Re: Centurion turret pics
Well done Mike its looking good ,off for a few days catch you early next week and wait for the next batch of piccys..............
Fleshy........................and before you know it well,l be Luton.........
Fleshy........................and before you know it well,l be Luton.........

Re: Centurion turret pics
Looking really good Mike. I'm strongly tempted to have a go at a Centurion myself after seeing yours and oztruck's build (and the loss of a finger or two is neither here nor there when you get results like this!).
Cheers
Chris
Cheers
Chris
Re: centurion part 4 foto
nice work Mike
I have merged your centurion topics together and move them from General discusion to here and merged them
I have merged your centurion topics together and move them from General discusion to here and merged them
-
Andy in Cheltenham
- Corporal
- Posts: 427
- Joined: Mon Sep 21, 2009 12:54 pm
- Location: Tewkesbury
Re: centurion part 4 foto
Hi
A very bizarre option indeed (changing a pershing to a Centurion), but I will admit you'll get an effective end result. I'm surprised that no one actually makes a kit of one in 1/16 yet. What scheme are you finishing it off in? Personaly I'd do it as a late Isreali version and plaster it in aplique' armour and a few 30 and 50 Cal. machine guns.
A very bizarre option indeed (changing a pershing to a Centurion), but I will admit you'll get an effective end result. I'm surprised that no one actually makes a kit of one in 1/16 yet. What scheme are you finishing it off in? Personaly I'd do it as a late Isreali version and plaster it in aplique' armour and a few 30 and 50 Cal. machine guns.
Re: centurion part 4 foto
Hi Andy,
Bizzare eh!......my efforts have been called many things but never bizzare.....habbits yes.
I intend making a British version of the MK5, with side skirts. I want a British tank not another "Johny Foreigner" tank so this one seemed a good bet as I had the basis of a project in the loft.
If anyone is going to have a go at this conversion, I would recomend buying a model kit as a good template. Once the model hull and upper is compared to the Pershing, the size difference is very marked. The Pershing hull is a bit too wide, and it is about 2 inches too short to be a true scale model. The turret is way too big, and too high also. If you look at Oztrucks conversion, you will notice that he has fitted a box on the rear, this gives the appearance of a longer body which is visually more to scale. The Ausie version did have this box fitted so he has not just added it as an afterthought.
I thought the Axis tanks had lots of versions of each tank, you should check out the Centurion. It has about 13 UK upgrades over it's manufacturing life and because it was widely used throughout the world, many changes have been made by the end users too. As you have pointed out, the Israeli versions are deffinately the most interesting.
I have been hacking away at the turret for a week now and I have changed it many times, hopefully I will post some fotos tomorrow of the basic job.
Have a good week
Mike
Re: centurion part 4 foto
The box on the back is a fuel tank. They needed it because they were a thirsty beast
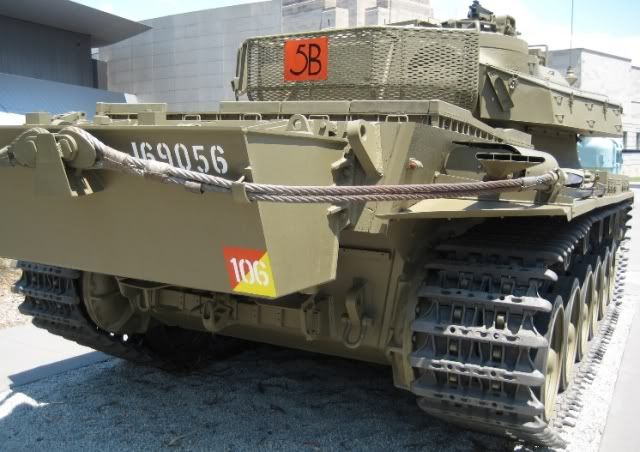
the extra length is gained by moving the front idelers forward and the drive sprocket back and up.
the extra length is gained by moving the front idelers forward and the drive sprocket back and up.

Re: centurion part 4 foto
with this kind of mod wouldnt a bulldog chassis make a better donor?
not taking anything off your build mick its bloody marvellous keep up the good work
not taking anything off your build mick its bloody marvellous keep up the good work
Re: centurion part 4 foto
Hi fv...You are probably rite about the Buldog chassis, but I didn't have one spare...ha ha
Hi Oztruck nice to hear from you again. Thanks for all the inspiration your videos gave me. I should have guessed the box was not a box...although it might have been a cool box to hold the beer for the evening barbie...just kiddin.
Well below are a few fotos of the turret so far. It is shown in a bit of a state covered in filler and in need of tidying up.
Please keep in mind that this conversion is my first attempt with plasticard. I knew when I started that it would not be an exact scale representation of the Centurion just a good likeness. This thread is posted as encouragement to everyone who may feel that they could not do this sort of thing. Please believe me that if I can do it anyone can so go on, have a go.
The rear of the turret has been built out in car body filler, and all the parts formed from plasticard and glued on with liquid polly.
In the general forum I have posted a note about a great little tool that I used in order to get the shape of the turret side transfered to the plasticard for cutting...have a look at it, it realy is a cool tool
I hope you enjoy the fotos
Mike
- Attachments
-
-
-
-
-
-
-
-
-
-
[ICE]monkey

- 2nd Lieutenant
- Posts: 2669
- Joined: Wed Sep 10, 2008 5:58 pm
- Location: pluckley ,ashford ,kent
Re: centurion part 4 foto
shes taking shape now mike, great job, looks nothing like a pershing turret
all the best, ice
all the best, ice
