Re: R/C 1/18 Vietnam era M113 ACAV - work in progress

Post any other Post WWII build loges that do not fit into the other boards here
Post Reply
User avatar
Crispy
Sergeant
Posts: 566
Joined: Wed Oct 29, 2008 6:59 pm
Location: Redhill, Surrey
Contact:

R/C 1/18 Vietnam era M113 ACAV - work in progress

Post by Crispy »

Picked this up off ebay last year and filed it away in the loft until recently. It was originally from Elite Force i think as i dont have the box anymore. It has pretty basic R/c "all or nothing" movement and some basic engine and m/gun sounds and came as a modern Gulf was era M113 with the external fuel tanks, add on front armour, skirts, aircraft recognition panels and loads of awful rubber stowage.

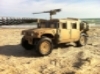
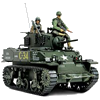
Sounds like a real bargin right? Well i'd always intended to convert it into a Vietnam era M113 ACAV. I'd already removed the stowage and extra armour when i first bought it. So last month i finally had a little spare time and figured this shouldnt take to long. I'll leave the R/c gear for now and if i like how it turns out i'll replace it with some ESC's.

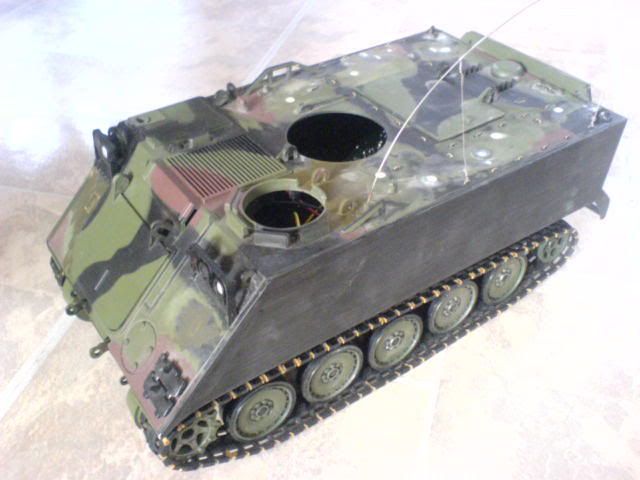
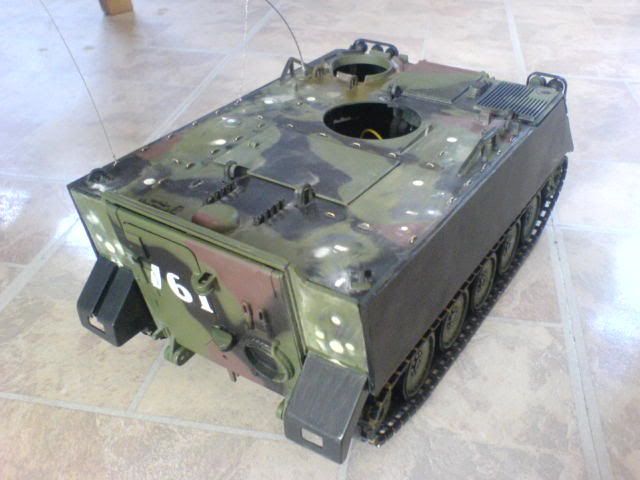
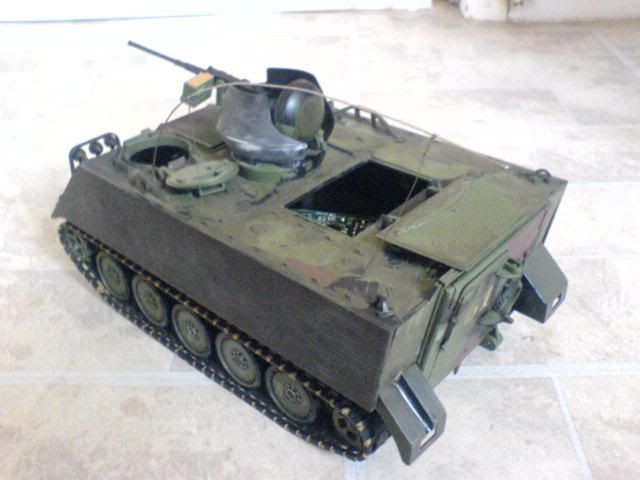
First i decide to remove the skirting from the tracks as i prefered this look, and then fill all the holes left by the stowage (note - if you're doing this yourself, the top, sides and front of the hull can be removed as one piece by just removing hte 4 screws on the underneath. Do this first and its much easier to get all the rubbish off the APC)

Image

Image

Image

Image

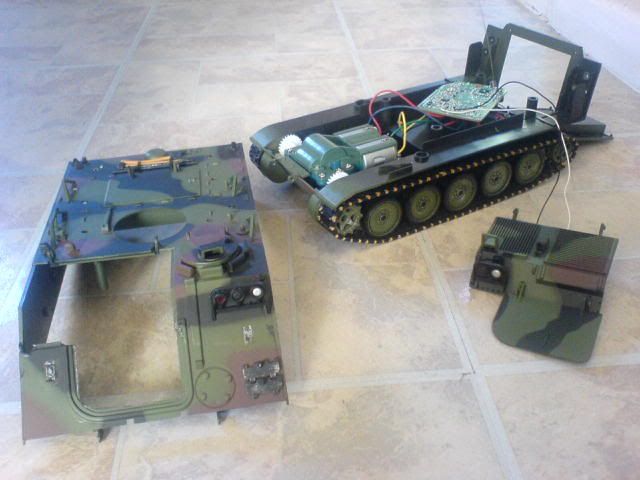
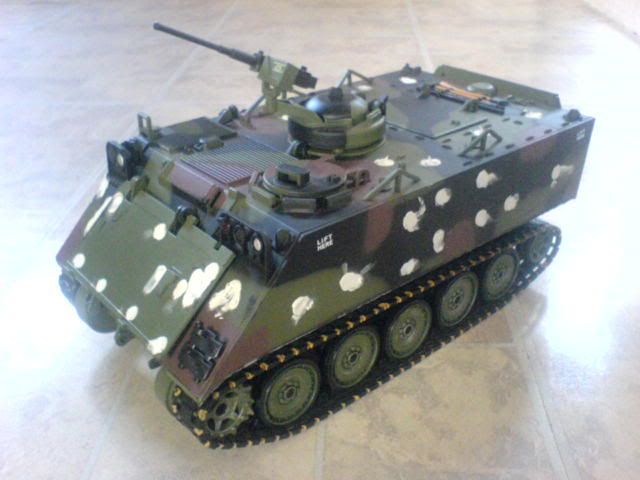
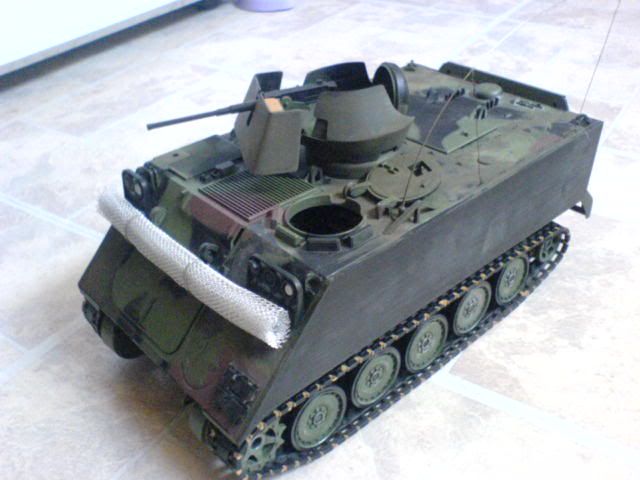
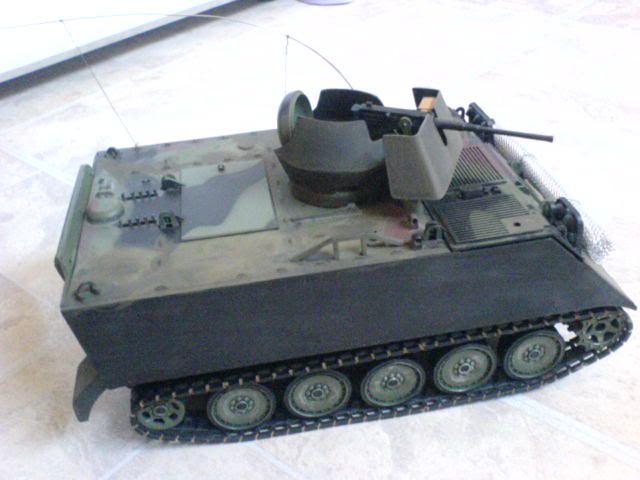
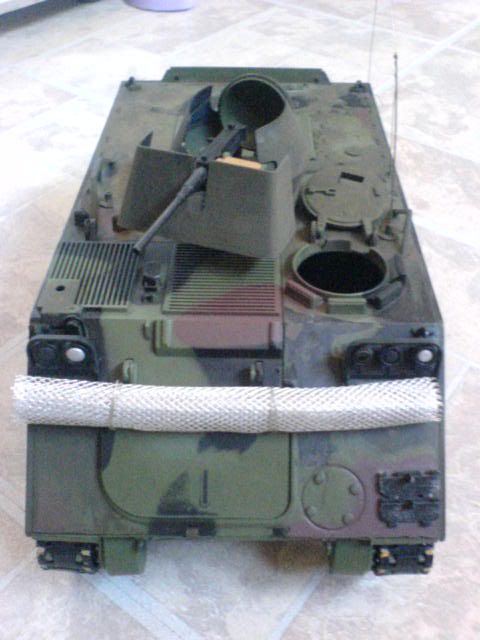
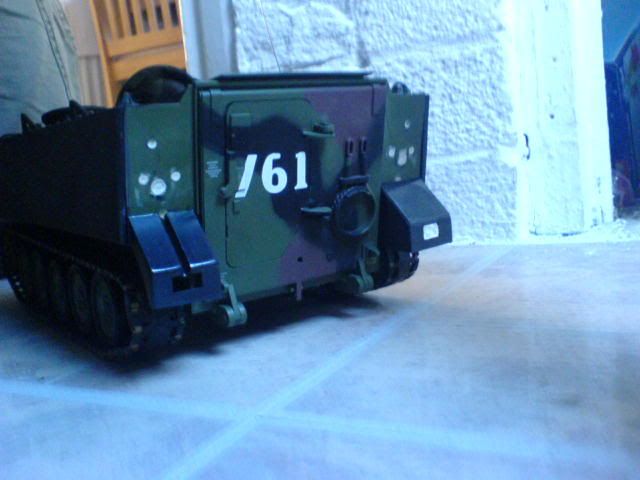
Then I cut off the speaker as the sounds are not great and the speaker is fixed under the engine screens so it becomes a pain with this still attached. Besides i have a plan to fit some more sounds in to it later. The filling on the hull sides didnt look that good so i reskinned them with a thin layer of plactic card. Then searching Google images and using a 1/35 M113 kit as reference i made up the rear mud guards (the left hand side one has some kind of drain gully in it). At this point I realised the top of the drivers hatch was hindged in the wrong position so that it would hit the commanders cupola when fully open. All it needed was to be moved around the hatch hole clockwise a few mm's,  fortunately the hindge is pretty basic and is pushed through holes in the hull from underneath. So out came the dremmel and i just needed to enlarge these holes to the right, slide the hindge over 4mm's and glue it back in place and fill the gaps. The hatch now opens fully without hitting the cupola.

Image

Image

I then moved the r/c aerial to the post just behind the drivers hatch and in a fit of madness decided to remove the moulded on tie down points and remake them with wire. This wasnt as bad as i'd thought and will allow me to add loads of stowage later without having to glue it in place.

Image

Image

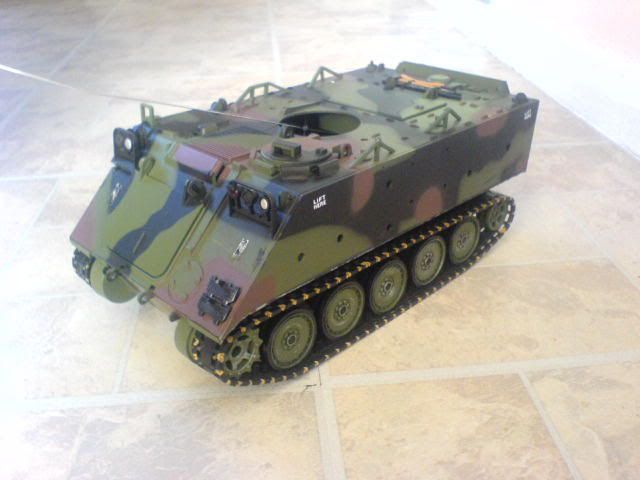
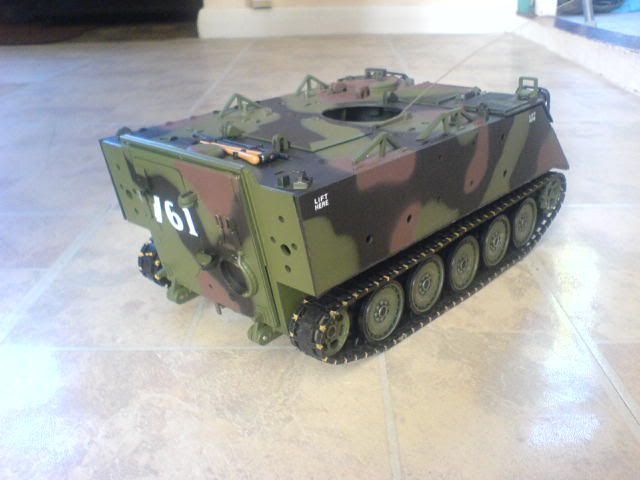
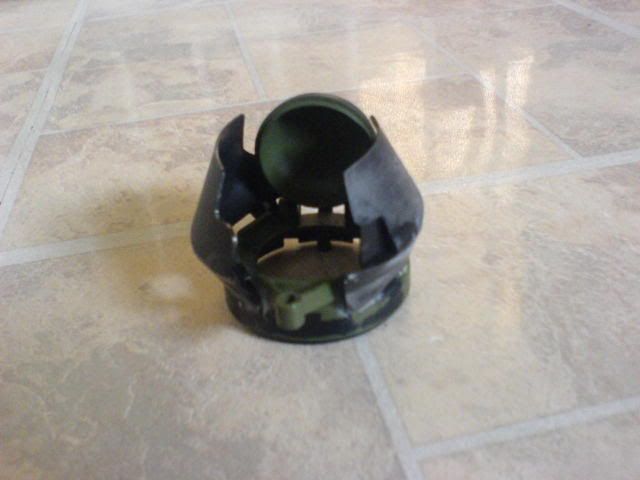
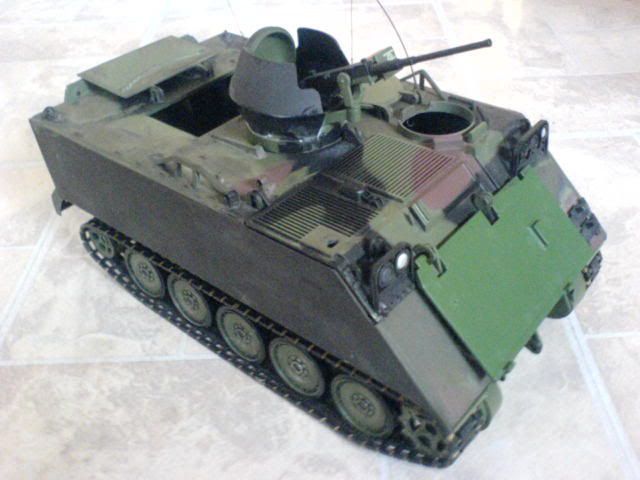
I wasnt happy with how the left mud guard had turned out, the gully in it just didnt look right when i check the reference pics so i cut out a larger channel and replaced the gully. Then i came the bit i'd been dreading... the commaqnder cupola's armoued shield. This is what really defines the ACAV M113 so i had to get it right but its not an easy shape to recreate. After a bit of chin scratching, studing the reference pics & the little 1/35 kit i decided the best way to do it would be to make a cardboard former on the top of the existing vision blocks and then fit the plastic card around this. The formers were made as two seperate cones so i could work on the upper and lower parts and then join them together. I mapped out on paper the shape i'd need to cut out in plastic card and then lightly tacked the plastic card onto the former with superglue. A quick blast from Mrs Crispy's hair dryer and the plastic card softened to the shape of the former and once cooled held its shape.  Then it was just a matter of glueing all the pieces of plactic card together and holding them in place until they set. Unfortunatly the plastic shield just wouldnt hold to the cupola with ordinary liquid poly glue so i had to dill and pin it in place and then super glue it. Hopefully this'll hold up to being bumped around when driving (theres no suspension on the APC's road wheels!) if not i'll add some extra strips of plastic card inside.

Image

Image

Image

Image

Image

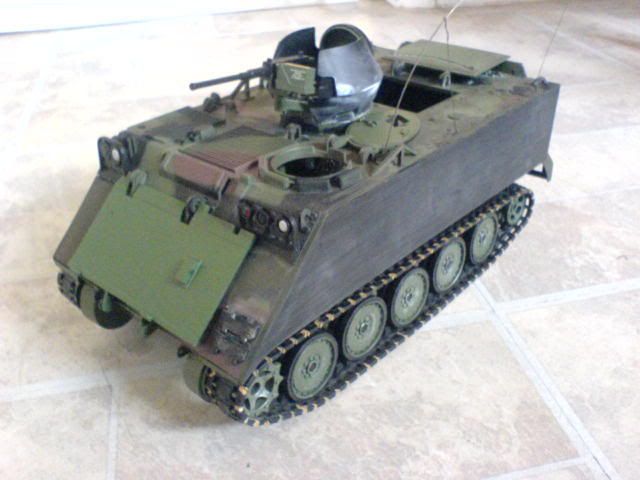
And thats where I'm at with at the moment. Just waiting for a better 50.cal so i can get on with the gun shield and i'm ordering some figures that'll give me the M60's i need for the rear deck. I'm not to sure about the front amphibious screen, it makes it look too toy like as it is. I could rebuild it and loose the existing hindges but i plan to cover the vhl is stowage and figures so they will likely be hidden anyway. Many reference pics i found had the screen removed and i dont intend to show it deployed so thats another option.

I intend to have a cheap MP3 player in mine with a load speaker playing a loop of Vietnam era tunes (arguabally the war with the best soundtrack) as though the troops are rocking out.

I'll post more pics when i have them.

Nic
Last edited by Crispy on Fri Nov 21, 2008 12:47 pm, edited 1 time in total.
You aint gettin me on no plane fool!
User avatar
Rocketman
Sergeant
Posts: 604
Joined: Tue Sep 30, 2008 5:17 pm
Location: Surrey Hills
Contact:

Re: R/C 1/18 Vietnam era M113 ACAV - work in progress

Post by Rocketman »

Looking good litle bro, really wish you hadnt done the tie downs cos I gotta do it now!  Love that gun shield, seeing you have done that it kinda lets me off teh hook to do the standard one. You decided on the smoke and lights yet?

Rckt
Dorking First Light Foot and Mouth (Mechanised)
User avatar
[ICE]monkey
2nd Lieutenant
Posts: 2669
Joined: Wed Sep 10, 2008 5:58 pm
Location: pluckley ,ashford ,kent

Re: R/C 1/18 Vietnam era M113 ACAV - work in progress

Post by [ICE]monkey »

looking good , cant wait to see this one finished, it will look the business
all the best,ice
on second thoughts lets not go to Camelot ,it is a silly place
User avatar
Mackem
Staff Sergeant
Posts: 752
Joined: Thu Oct 02, 2008 4:22 am
Location: Sunderland

Re: R/C 1/18 Vietnam era M113 ACAV - work in progress

Post by Mackem »

That is going to be brilliant. I didn't know you could get an RC M113.

Cheers
John
HE/HL Leopard 2-A5, HL Pz IV-F1, HL Jagdpanther (WIP), M26A1 Pershing (WIP), HL Pz III M (WIP), Bandai Hummel (WIP)
BIGMIG
Warrant Officer 2nd Class
Posts: 1219
Joined: Tue Sep 09, 2008 8:42 pm
Location: AMBOY WASHINGTON

Re: R/C 1/18 Vietnam era M113 ACAV - work in progress

Post by BIGMIG »

Very nice work and interresting to see and read. ;D

                      BIGMIG  ;) ;)
User avatar
Crispy
Sergeant
Posts: 566
Joined: Wed Oct 29, 2008 6:59 pm
Location: Redhill, Surrey
Contact:

Re: R/C 1/18 Vietnam era M113 ACAV - work in progress

Post by Crispy »

Thanks for the comments chaps.

Rckt - I've decided I wont put lights on it now. I want to give this a heavily weathered and well used look, so it'll be paint chipped and covered in dust. Think i'll wait and see how the exhaust looks on yours before deciding to fit it on mine.  Thats the good thing with this little kit, it has plenty of room inside to fit whatever you want and you can easily open it up as the hull screws on to the base.

I'm really happy with how its turned out. Think i'll make up the gun shield this weekend using the rather basic 50 cal that comes with the kit. Im just to impatient to wait for the detailed one to arrive  ;)
You aint gettin me on no plane fool!
oztruck
Corporal
Posts: 311
Joined: Sun Oct 12, 2008 2:25 am
Location: South Australia

Re: R/C 1/18 Vietnam era M113 ACAV - work in progress

Post by oztruck »

WOW didn't know they were out there. Looks great. Where can I get one?
HL Pershing, HL Bull Dog,HL powered T34/85 IR, HL Tiger 1, HL Pz III, Stug III IR, PzIV, King Tiger, WSN Tiger1 mid IR, T34/85 winter IR, HL Jagpanther IR
User avatar
Crispy
Sergeant
Posts: 566
Joined: Wed Oct 29, 2008 6:59 pm
Location: Redhill, Surrey
Contact:

Re: R/C 1/18 Vietnam era M113 ACAV - work in progress

Post by Crispy »

Well I got mine on Ebay but I havent seen them for a while.

Quick update

Image

Image

Image

Decided to loose the swimming screen so I removed the awful support that was moulded into the body with a sanding disc. The gun shield was a little harder to do than I thought. Im just waiting for the Tamiya 50 cal to arrive as the one on the kit is too toy like. This being 1/18 and the Tamiya 50 cal is 1/16 I'm hoping it wont look to out of place, chances are I'll need to redo the shield to fit around it anyway. Still I'mhappy with how its looking. The mesh roll on the front was sourced from Halfords car body repair section. Much cheaper than buying from model suppliers and it holds its shape really well. Obviously it needs painting to tone down the brightness but I wanted to see how it'll look hanging on the APC.

Theres also a moulded retangular block just above it that isnt on a Vietnam era M113. Rather than remove this and the hindges for the engine hatch I plan to build a wooden stowage box out of plastic card with a false bottom that'll fit over these.
Last edited by Crispy on Tue Nov 25, 2008 2:16 pm, edited 1 time in total.
You aint gettin me on no plane fool!
User avatar
tiger205
Warrant Officer 1st Class
Posts: 1800
Joined: Thu Oct 23, 2008 11:21 pm
Location: southampton

Re: R/C 1/18 Vietnam era M113 ACAV - work in progress

Post by tiger205 »

hey crispy thats a cracking apc youre building there, alot of great work has been done on her

                  Tony 8)
Image

"Er, der kämpft und Lebend davonläuft,
Lebt um einem anderen Tag zu kämpfen".
Post Reply

Return to “Other Modern”