- 20251124_155955.jpg (957.98 KiB) Viewed 806 times
"Lea" a Finnish Sturmi
-
ColemanCollector
- Warrant Officer 2nd Class
- Posts: 1328
- Joined: Sat Jan 14, 2023 8:50 pm
- Location: Ontario, Canada
Re: "Lea" a Finnish Sturmi
That'll be a fun one to craft. If you can get a copy of the Haynes Stug III book, there's a great walkaround section of a Finnish Stug III, with that sweet waffle pattern Alkett zimmerit, back rack, the cool concrete around the hatch, and the much less cool concrete on the hull.
Mike.
Elbows up
-
Stormbringer

- Staff Sergeant
- Posts: 918
- Joined: Wed Aug 06, 2025 8:24 am
- Location: Near Edinburgh Scotland
Re: "Lea" a Finnish Sturmi
Yeh the Haines manuals are good and i have them for both the Tiger and Panther
Cheers
Alan
Let slip the cats of war!!!!
Taigen Panther G
Taigen T34/85
Heng Long King Tiger
Heng Long Tiger 1
Heng Long Jagdpanther
Coolbank Crusader III
Alan
Let slip the cats of war!!!!
Taigen Panther G
Taigen T34/85
Heng Long King Tiger
Heng Long Tiger 1
Heng Long Jagdpanther
Coolbank Crusader III

Re: "Lea" a Finnish Sturmi
This time the Glue Monkey wasn't a completely evil witch. The rear panel came off with some progressive coaxing with a razor wedge blade and bamboo sticks.

Of course old Murphy was there to pitch in and the exhaust cans and fairing snapped at their attachment points.
This time around was much quicker removing old ider wheel mounts and installing the Taigen pieces because I took some advice from Mr. Bix builds and made templates the first time. This time was just marking the holes and drilling. My preferred method to reattaching the rear panel is JB weld and BIG CLAMPS. The idler mounts fit perfectly tight and I fix their 3 posts at the rear with CA glue.

Let it set overnight and the bond has been made

Of course old Murphy was there to pitch in and the exhaust cans and fairing snapped at their attachment points.
This time around was much quicker removing old ider wheel mounts and installing the Taigen pieces because I took some advice from Mr. Bix builds and made templates the first time. This time was just marking the holes and drilling. My preferred method to reattaching the rear panel is JB weld and BIG CLAMPS. The idler mounts fit perfectly tight and I fix their 3 posts at the rear with CA glue.
Let it set overnight and the bond has been made
"Charlie don't surf"- Lt. Col. Bill Kilgore
Re: "Lea" a Finnish Sturmi
These lower hull side escape hatches were only on the very earliest Stug III's then were quickly phased out.

Off they come. Judicial use of the rotary tool. Hey Mr. B. what was that cool sander you showed me awhile ago? The one that has a micro oscillating head for small spots? H'mmm I think I need one of those for the upcoming Santa day!

The wonderful wife is generous enough to supply me from her neverending cache of nail art supplies from back when that as her money maker. The abrasive nail files are perfect for this kind of sanding. I've only once bought those mini sanding boards, They are useful for tight spaces but I'm amazed how our hobby marks stuff up. These were free when she cleaned out her station at her last gig.I have several boards with different grit. The foam buffing blocks are some of my favorite things to mute the sharp edges on the tanks from the molding. Anyway,,, I digress...
Skimmed some Tamiya putty on to fill the deeper grooves. Kinda anal since it'll be covered up with an added armor plate but what the heck...

Sturmi's didn't have the smoke dischargers. So I pulled them off and they promptly left blemishes. So skimmed some more putty there too.

Off they come. Judicial use of the rotary tool. Hey Mr. B. what was that cool sander you showed me awhile ago? The one that has a micro oscillating head for small spots? H'mmm I think I need one of those for the upcoming Santa day!
The wonderful wife is generous enough to supply me from her neverending cache of nail art supplies from back when that as her money maker. The abrasive nail files are perfect for this kind of sanding. I've only once bought those mini sanding boards, They are useful for tight spaces but I'm amazed how our hobby marks stuff up. These were free when she cleaned out her station at her last gig.I have several boards with different grit. The foam buffing blocks are some of my favorite things to mute the sharp edges on the tanks from the molding. Anyway,,, I digress...
Skimmed some Tamiya putty on to fill the deeper grooves. Kinda anal since it'll be covered up with an added armor plate but what the heck...
Sturmi's didn't have the smoke dischargers. So I pulled them off and they promptly left blemishes. So skimmed some more putty there too.
"Charlie don't surf"- Lt. Col. Bill Kilgore
Re: "Lea" a Finnish Sturmi
So Artistic license in hand it's time to make some damage. Something about a tank with missing and ragged damaged fenders. Plus cutting these things up is just Fun!


The Stug seems to have more gaps at points where the upper and lower meet than the Pz III than I remember. I'll have to fill these holes eventually.
Rotary tool and sanding sticks out again I thinned the fenders and started getting mean with them.


Trimmed this one off but haven't decided if I want to remove more. Just posting this pic I see it needs to be squared off a bit better.

And a bit here too...
Undecided if I want to bend the side fenders on both sides a bit.

The Stug seems to have more gaps at points where the upper and lower meet than the Pz III than I remember. I'll have to fill these holes eventually.
Rotary tool and sanding sticks out again I thinned the fenders and started getting mean with them.
Trimmed this one off but haven't decided if I want to remove more. Just posting this pic I see it needs to be squared off a bit better.
And a bit here too...
Undecided if I want to bend the side fenders on both sides a bit.
"Charlie don't surf"- Lt. Col. Bill Kilgore
-
Stormbringer
- Staff Sergeant
- Posts: 918
- Joined: Wed Aug 06, 2025 8:24 am
- Location: Near Edinburgh Scotland
Re: "Lea" a Finnish Sturmi
making good progress mate 
Cheers
Alan
Let slip the cats of war!!!!
Taigen Panther G
Taigen T34/85
Heng Long King Tiger
Heng Long Tiger 1
Heng Long Jagdpanther
Coolbank Crusader III
Alan
Let slip the cats of war!!!!
Taigen Panther G
Taigen T34/85
Heng Long King Tiger
Heng Long Tiger 1
Heng Long Jagdpanther
Coolbank Crusader III
-
PainlessWolf

- Colonel
- Posts: 7916
- Joined: Sun Feb 26, 2012 9:09 pm
- Location: Southern Colorado Rocky Mountains
Re: "Lea" a Finnish Sturmi
Mr. Chef!
It is looking mean and well used already! Following along!
regards,
Painless
It is looking mean and well used already! Following along!
regards,
Painless
...Money!? What's that!?...
Re: "Lea" a Finnish Sturmi
Interesting use of spare tracks on a Stug.
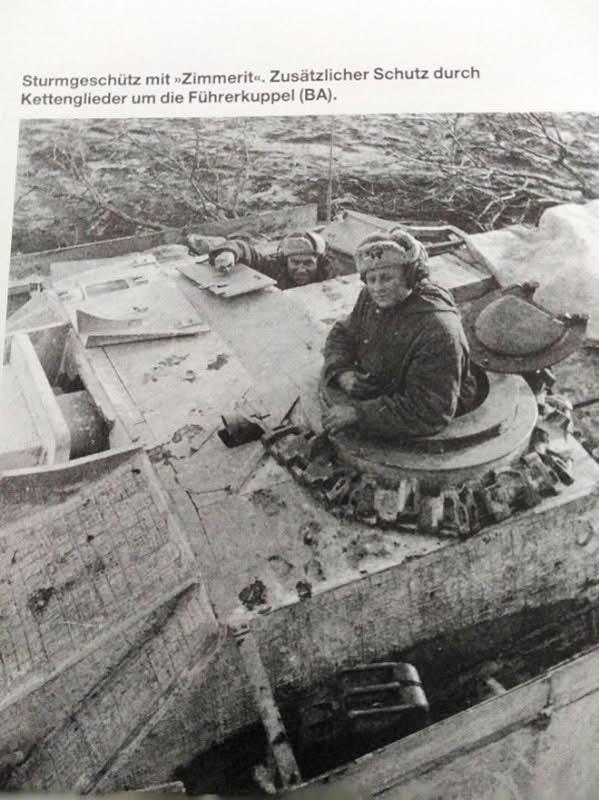
"Charlie don't surf"- Lt. Col. Bill Kilgore
-
HERMAN BIX

- Major-General
- Posts: 11975
- Joined: Sun Jan 12, 2014 12:15 am
- Location: Gold Coast,Australia
Re: "Lea" a Finnish Sturmi
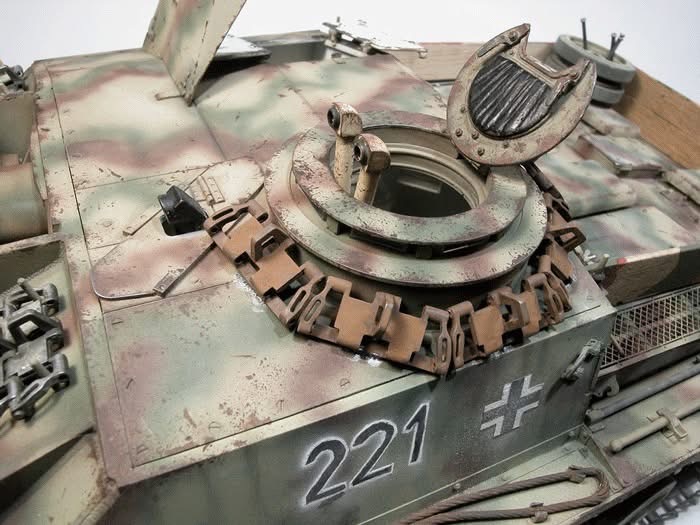
A tear to an old Herman’s eye looking in at the damaged guards!!
I too have done the spare track around the cupola but I represented them being wired on not welded
I too have done the spare track around the cupola but I represented them being wired on not welded
HL JAGDPANTHER,HL TIGER 1,HL PzIII MUNITIONSCHLEPPER, HL KT OCTOPUS,HL PANTHER ZU-FUSS,HL STuG III,HL T34/85 BEDSPRING,
HL PZIV MALTA,MATORRO JAGDTIGER,HL F05 TIGER,TAMIYA KT,HL PANTHERDOZER,HL EARLY PANTHER G,TAIGEN/RAMINATOR T34/76,
HL AN-BRI-RAM SU-85
HL PZIV MALTA,MATORRO JAGDTIGER,HL F05 TIGER,TAMIYA KT,HL PANTHERDOZER,HL EARLY PANTHER G,TAIGEN/RAMINATOR T34/76,
HL AN-BRI-RAM SU-85
Re: "Lea" a Finnish Sturmi
Not my favorite part to dig out, But the engine intake vents are happening.

"Charlie don't surf"- Lt. Col. Bill Kilgore
