Hi everyone, and welcome to my deep dive into the Wiesels I made/am making. I wanted to post about it for a while, but people on Makerworld seem less interested in historical accuracy, so the forum felt like the perfect place. (if im posting this in the wrong place do let me know tho!)
The design dates back to early May when I was introduced to the Cyberbrick system. I had wanted to make RC tanks for a while. Before becoming an additive manufacturing specialist (3D print engineer) at a lighting company, I officially joined 3D printing on a hobby level to make custom parts for my Panzer IV Ausf F2 (which I modded to an H). I have wanted to make an RC tank of my own for years now (originally it was a BT5 though) but was scared of the complexity of programming RC vehicles. I have finished IT bootcamps in college for Python, C#, and C++, but honestly don’t remember much besides C++ for Arduino.
So, the Cyberbrick kit seemed like the perfect time to design my own RC vehicle. Though also limiting (mainly by motor options), I chose the Wiesel as I had drawn anime for a Wiesel 1A4 Blackcops story in the past, and since then, it has probably become my favorite “tank” (I’m going to refer to it as a tank, though it’s technically a Waffenträger/AWC or sometimes referred to as a tankette).
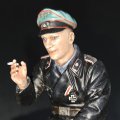
I immediately ran into my first difficulty with the hull, as the angles of the front plates are quite difficult to get right, which got me stuck quite early on. But I managed to continue after about a month with a scan of a Wiesel for reference. After this, the hull was mostly smooth sailing, with the only difficulty being figuring out how detailed I could get. I settled on 0.2mm after that, the printer doesn’t even consider it most of the time, so smaller details would be useless. I first printed the hull in one solid piece, but quickly after, I cut it up into two, with angles beneficial to printing the detail. I also switched to the Mk20 as that would be easier to print than the 1A4 but kept all 1A4 designs on hand.
After that, the biggest difficulty became the tracks. The tracks of the Wiesel are absolutely tiny at 1/16 scale. It took a while to get them printable, mainly due to bed adhesion of such small parts playing a huge role. But making the layer height 0.1 and reducing the print speed on the first layer gave very satisfying, strong tracks. Though I’m still continuing development, I’m currently at version 60 or something.
https://youtu.be/v0rsa6F1uFI
https://youtube.com/shorts/gpWT-79HZaQ?feature=share
After this came the more dreaded part the turret. Mainly how to move it and how to do the belts. For turret rotation, I quite quickly settled on just directly connecting it to the 180 servo, as the real life Wiesel also doesn’t have a 360° rotatable turret. But gun elevation and depression became more difficult. The original concept had it moved with a nylon cord from the hull. The cord could be pulled in or expanded by a servo moving the cannon up and down. I quickly realized what a headache that was and switched to a boom and socket design. To my excitement, this worked very well, and after a few servo mounts, I had a design I was happy with. After this came the belt, which at first I wanted to use TPU for. I quickly scratched that idea though, as TPU is kind of annoying to work with in my opinion and looked quite toyish. So I split the belt into three and rigged them up with a nylon cord, giving it a wide range of motion, which was good enough to look realistic. After this, a small test was made, and it worked great.
https://youtu.be/De9MlxCHkOA
Then the biggest roadblock hit the Mk20’s gunner sight. With the ammo boxes covering it in all pictures, it was hard to get references for a realistic model. In the end, I contacted both Munster and Dresden, which allowed me to design a realistic sight after a week.
I decided to add LEDs with two LED boards to give enough reach across the vehicle without having to solder. Originally, I had decided not to add LEDs to avoid making it too complex, but at this point, I was quite confident.
Shortly after, I launched the Mk20 for everyone to enjoy. But after the release, I did notice some issues. Mainly, the gun wasn’t printed nicely due to how thin it was, and there were no antennas. The gun issue was solved by separating the gun and gun breach into separate objects, making the gun stand straight up instead of at an angle, and making very thin antennas to print even one with a German flag, as the Wiesel in Munster sometimes has at shows.
CyberBrick | Wiesel Family Development Showcase
- PrivateMiku
- Recruit
- Posts: 12
- Joined: Sun Oct 26, 2025 12:04 pm
- PrivateMiku
- Recruit
- Posts: 12
- Joined: Sun Oct 26, 2025 12:04 pm
Re: CyberBrick | Wiesel Family Development Showcase
After this, I started on the TOW series, as it was also part of that same anime, so I wanted both.
This was, of course, easier as they share parts, but I wanted to upgrade a few things. First, stronger axles so it could hold screws even better. A functioning LED simulated firing option, which I plan to also add a little shake in the track to make the effect more clear, as Cyberbrick currently doesn’t have sound modules. I also wanted to upgrade how the battery was held and powered. Power I sadly had to let go after testing all Cyberbrick options and concluding the regular 400RPM Cyberbrick motor was really the most powerful one with a decent speed. It did bug me a lot though that I had parts for the 1A4 designed but not released, so I switched gears after making the TOW hull to the 1A4 again. The only difficulty I ran into was the SATCOM disk sometimes failing, so it was made into a separate part. After this, I decided to push it even further, making all hatches functional. While it worked great, it was very brittle and tolerance depended on the printer, so I didn’t pursue it further after finishing a kit to upgrade the 1A4 with it. I filmed the 1A4 with her sister, the Mk20, at the National Museum Soesterberg with a Leopard 1A5, which was a very fun experience mainly with young and old being curious and having a chat about the vehicles.
https://www.youtube.com/watch?v=AQaXBxzNe2k
After having a little side quest with WW2 German flatcars, I continued on the TOWs. The hulls were straightforward, only having to be cut a bit differently to allow all details to print better. I thickened the axles, added better battery stowage, and had to move the LED boards to allow LEDs to go into the TOW launcher. The fence in front of the launcher was a bit scary, but after having printed five tests with zero fails, it’s quite reliable! The launcher itself was more challenging, as the turret ring had gotten a lot thinner than the Mk20.
I again opted for a nylon cord design and again came to the conclusion it was a headache, so I switched to the boom design. With the small space, changes were made to make it more compact, but in the end, I got an even more reliable solution than the Mk20 and 1A4 had! Besides that, the scope and launcher couldn’t be one part, as one hung outside of the turret with the turret wall in between, requiring me to split the scope in two to be glued back together later. Then the lower launcher would be installed with the LEDs, then the scope, and then the top, sandwiching the scope firmly in place. It quickly became clear you had to tighten it quite a bit to get a nice fit with the LEDs as well. The idea for the six piece design came from a Discord friend named Kurarashi, who later also joined me to make attachments for the Wiesels. Of course, the second problem was that we couldn’t drop in the turret like we did with the Mk20, so we split it in two the bottom electronics are installed first in the hull, and then the launcher with LEDs is dropped in and secured.
https://youtube.com/shorts/EbZbtooh3JM
After moving the LEDs back to ensure the cables could reach the LED board, the design was mostly finished, which leaves me with where I currently am in development. I’m slowly starting to print the 1A1 Wiesel TOW. If you read this far, thank you for reading my development rant! I’m pretty sure I forgot some things in my recap, but honestly, I already filled like two pages, so xD
Re: CyberBrick | Wiesel Family Development Showcase
It's a cool little project. We here on the forum love detail and historical accuracy.
Derek
Too many project builds to list...
- Herr Dr. Professor
- Major
- Posts: 5903
- Joined: Mon Apr 22, 2019 10:48 pm
- Location: Southern Wisconsin USA
Re: CyberBrick | Wiesel Family Development Showcase
I read through your explanation, and I admire the ever-increasing quality of 3D printed models. RCTW is rich with fine examples.
Re: CyberBrick | Wiesel Family Development Showcase
This seems a very interesting thread, i will read it completely when i am home again
Regards,
Jaap
Jaap
- HERMAN BIX
- Major-General
- Posts: 11779
- Joined: Sun Jan 12, 2014 12:15 am
- Location: Gold Coast,Australia
Re: CyberBrick | Wiesel Family Development Showcase
I hope your seeing this General Alpha............... 
HL JAGDPANTHER,HL TIGER 1,HL PzIII MUNITIONSCHLEPPER, HL KT OCTOPUS,HL PANTHER ZU-FUSS,HL STuG III,HL T34/85 BEDSPRING,
HL PZIV MALTA,MATORRO JAGDTIGER,HL F05 TIGER,TAMIYA KT,HL PANTHERDOZER,HL EARLY PANTHER G,TAIGEN/RAMINATOR T34/76,
HL AN-BRI-RAM SU-85
HL PZIV MALTA,MATORRO JAGDTIGER,HL F05 TIGER,TAMIYA KT,HL PANTHERDOZER,HL EARLY PANTHER G,TAIGEN/RAMINATOR T34/76,
HL AN-BRI-RAM SU-85
- PrivateMiku
- Recruit
- Posts: 12
- Joined: Sun Oct 26, 2025 12:04 pm
Re: CyberBrick | Wiesel Family Development Showcase
Thx everyone! here is a little update on the 1A1.
Have installed all electronics and im now finetuning some parts of the turret. also slowly working on programming the LEDS to simulate a tow being fired
- Attachments
-
- IMG_20251101_154858.jpg (323.14 KiB) Viewed 345 times
-
- IMG_20251031_204633.jpg (198.44 KiB) Viewed 345 times
-
- IMG_20251031_162413.jpg (285.45 KiB) Viewed 345 times
Re: CyberBrick | Wiesel Family Development Showcase
Interesting read for sure. As soon as you release the TOW version, I'll build it 
- PrivateMiku
- Recruit
- Posts: 12
- Joined: Sun Oct 26, 2025 12:04 pm
Re: CyberBrick | Wiesel Family Development Showcase
Quick update. I just finished the 1A1 and am now working on stowage and the 1A2. I ran into some issues with MicroPython. Using it to code custom sequences gets delayed by the Cyberbrick driver, so I will need to adjust the simulated firing approach. Stowage is working great though. It is attached either permanently with glue or with a sticky tag. Only the license plates are left.

I’m planning to start the project on 11-11 at 15:00 CET. There are also early bird discounts, so if you’re quick, you can grab a small discount
- Attachments
-
- IMG_20251108_223556.jpg (149.76 KiB) Viewed 218 times
-
- IMG_20251108_223627.jpg (186.95 KiB) Viewed 218 times
-
- IMG_20251108_223705.jpg (219.15 KiB) Viewed 218 times
-
- IMG_20251108_223658.jpg (243.83 KiB) Viewed 218 times
-
- ad.png (2.83 MiB) Viewed 218 times