Thank you Barry, Ecam and Herman for your interest and encouragements.
HERMAN BIX wrote:Almost looks like 'Hagenau' outside your window
Canadian winter. We had some additional snow this week, very white and cold.
Ecam wrote: Love those graphite tubes, I would never have thought they could be cut that cleanly with a hand saw and sanded. I would have figured they would fray.
Yes, it needs a fine metal saw blade, its pretty fast and clean. I did a test first with a large tube cutter i had for metal tubes, oh what a mess it did.
Now, the sliding breech... Here's the report and a short Youtube video of the howitzer in action at the end of the post.
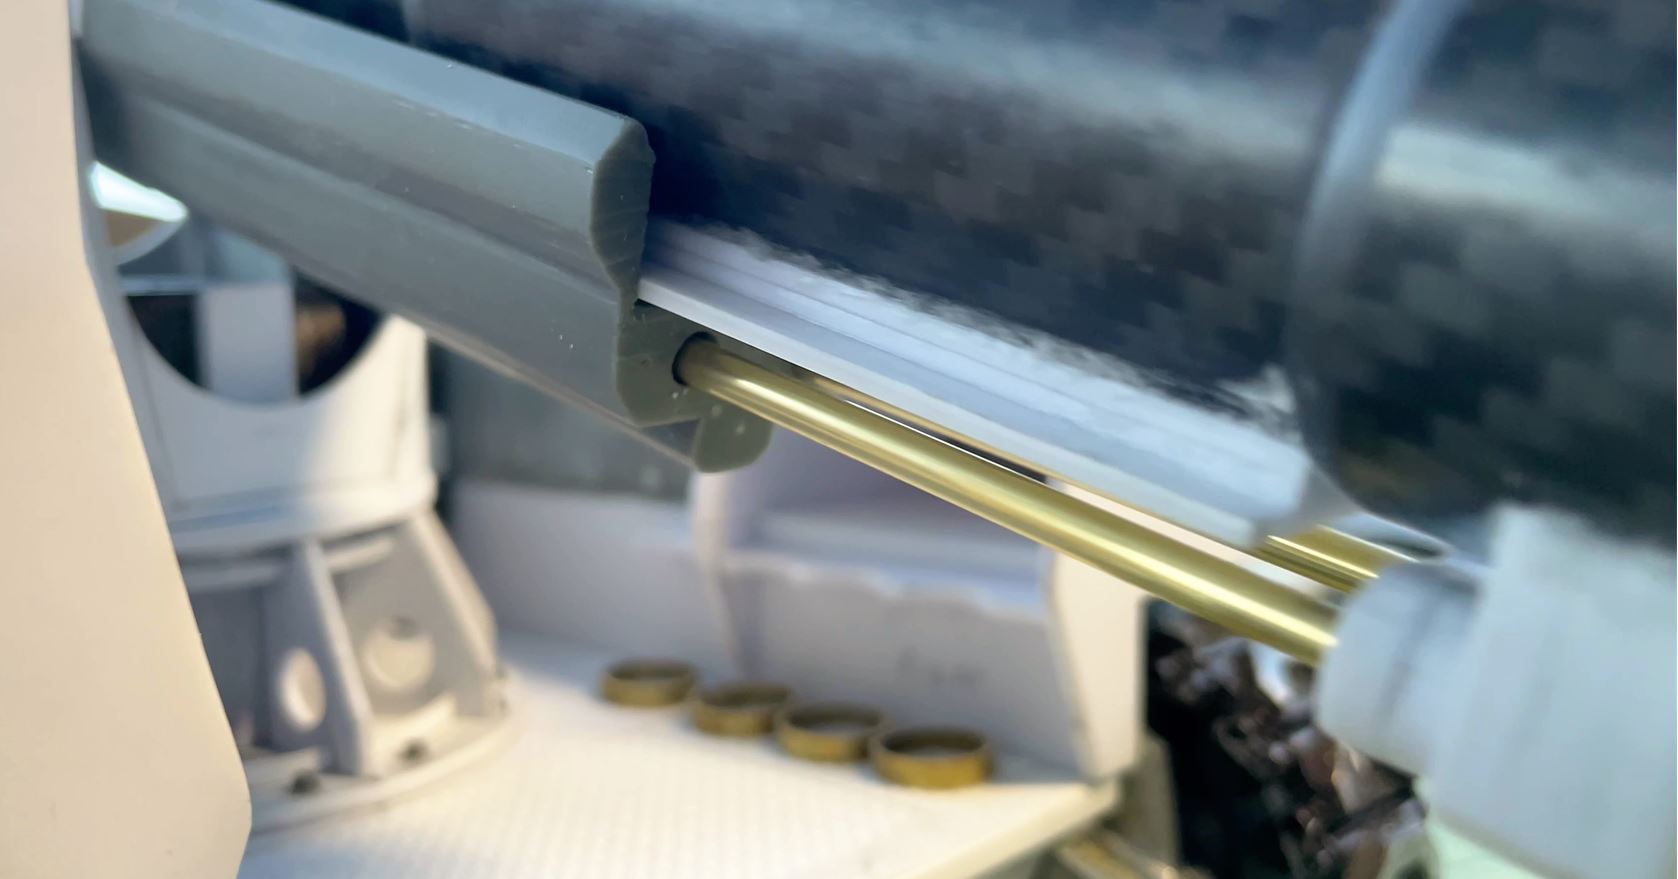
The push rod is installed under the barrel embedded in the sliding component.
 Viewed 1620 times")
- 1/16 RC US 155mm Gun Motor Carriage M12 - Build
After some calculations, i made the hole in the cradle right there at a specific angle, aligned with where the push rod is coming out of the chassis at the front.
 Viewed 1620 times")
- 1/16 RC US 155mm Gun Motor Carriage M12 - Build
View of the mating process...
 Viewed 1620 times")
- 1/16 RC US 155mm Gun Motor Carriage M12 - Build
The howitzer was made to slide absolutely freely even with the rod attached to it. With some finetuning of the above steps, it is possible to remove almost all resistance.
 Viewed 1620 times")
- 1/16 RC US 155mm Gun Motor Carriage M12 - Build
First, i tried a regular size 20kg servo. The recoil was working well but the tension of the push rod on the servo was giving it a hard time. I could see that the 20kg servo was at the limit, was having some issues pulling back the barrel in the last 5mm. I decided to go with a stronger servo.
 Viewed 1620 times")
- 1/16 RC US 155mm Gun Motor Carriage M12 - Build
I had to use my beautiful and expensive 35kg servo that i had on inventory. I was saving it for the upcoming 234/3 Stummel build. I will have to get another one for the Stummel steering. Notice the battery in the compartment above the recoil servo. Every free space need to be used. Good thing i was able to put the elevation servo inside the mount, i would have been difficult to make it fit under the deck.
 Viewed 1620 times")
- 1/16 RC US 155mm Gun Motor Carriage M12 - Build
 Viewed 1620 times")
- 1/16 RC US 155mm Gun Motor Carriage M12 - Build
View of the electronics showing how i was able to fit it. The wiring is still loose. Very simple;
- Heng Long gearbox
- Clark TK-22 on the side
- Speaker and receiver at the back
- 35kg recoil servo with scratch built arm with an adjustable push rod
- Battery above the recoil servo
- Elevation micro servo inside the gun mount and connected directly to an available channel on the receiver, assigned to vrB knob.
 Viewed 1620 times")
- 1/16 RC US 155mm Gun Motor Carriage M12 - Build
The model as it stands today. I gave it the fenders at the front, no mud guards yet. The upper hull fits in place, every mm counted.
 Viewed 1620 times")
- 1/16 RC US 155mm Gun Motor Carriage M12 - Build
I also started to detail the howitzer, still has a lot to do.
- 1/16 RC US 155mm Gun Motor Carriage M12 - Build
- Capture9.JPG (98.5 KiB) Viewed 1620 times
And here is the model in action. Overall, i am satisfied and it is working relatively well. It gives a whopping 60mm of sliding breech recoil, seen below on the Youtube video thumbnail. It was not easy to do. The recoil is very powerful, realistic but maybe a bit too strong for an RC vehicle. The elevation servo is having a hard time keeping the gun steady in direct fire support mode when it is lowered, but ok when raised. I'll see if i can improve that a bit. Recoil is important on an howitzer, its the showcase of the model. Wartime pictures of the M12 in action show the sliding breech recoil to be quite dramatic.
Next step, detailing the howitzer and the inside of the fighting compartment.
Regards, Louis