Jagdpanther build

Re: Jagdpanther build
Great result. 

Re: Jagdpanther build
wibblywobbly wrote:Looking good, there is something about Jagdpanthers that appeals to me, I am planning to get another, I should never have sold the one I had.
Ditto! Might have to buy another one...
Good work Mr
-
c.rainford73

- Major
- Posts: 6104
- Joined: Thu Aug 25, 2016 7:34 pm
- Location: Connecticut USA
-
LordPanzer

- Lance Corporal
- Posts: 152
- Joined: Mon Jul 27, 2020 2:15 am
- Location: North Carolina
Re: Jagdpanther build
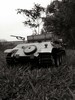
Thank you all for the kind words. Been a long week with work and life. Had some time last night and this morning to finish off the last of the painting and chipping. Next up to reinstall the barrel and then to start the long weathering process. 90% of the paint i used on the JD except for some of the chipping, tools and fire extinguisher where from this AK box set. The red undercoat, lighter of Dunkelgelb and lighter green all from the box. No mixing necessary just right out of my trusty Iwata.
Maybe this could be a topic for another thread altogether, but one work station and lighting? I have a basic workbench in my garage that I do everything on. An Amazon air compressor with moisture trap, an old cardboard box as a makeshift spray booth, 2 fans off to the left side to keep the air moving. Storage shelving units which I keep some painting supplies along with other normal things found in a garage. As far as lighting i have 2 normal bulbs in the ceiling in the center of the garage, a LED 30inch light which hangs over the bench and for some fun accent lighting LED strip lighting that i picked up off Amazon to light up the shelves. The camera I use for pics with my Samsung galaxy s10 cell phone.
Thanks for following along on the project with me.

Sent from my SM-G970U using Tapatalk
Maybe this could be a topic for another thread altogether, but one work station and lighting? I have a basic workbench in my garage that I do everything on. An Amazon air compressor with moisture trap, an old cardboard box as a makeshift spray booth, 2 fans off to the left side to keep the air moving. Storage shelving units which I keep some painting supplies along with other normal things found in a garage. As far as lighting i have 2 normal bulbs in the ceiling in the center of the garage, a LED 30inch light which hangs over the bench and for some fun accent lighting LED strip lighting that i picked up off Amazon to light up the shelves. The camera I use for pics with my Samsung galaxy s10 cell phone.
Thanks for following along on the project with me.


Sent from my SM-G970U using Tapatalk

Re: Jagdpanther build
Well done, great Looking JP and colours work well!
-
HERMAN BIX

- Major-General
- Posts: 11903
- Joined: Sun Jan 12, 2014 12:15 am
- Location: Gold Coast,Australia
Re: Jagdpanther build
Ive got that paint set, but have not put it to the test over time.
The green you used looked too light to me in the bottle, but seeing it on a tank seems to make it right.
I really like what you've done & more so due to the sad sloppy mess you began with on page 1 !!
The green you used looked too light to me in the bottle, but seeing it on a tank seems to make it right.
I really like what you've done & more so due to the sad sloppy mess you began with on page 1 !!
HL JAGDPANTHER,HL TIGER 1,HL PzIII MUNITIONSCHLEPPER, HL KT OCTOPUS,HL PANTHER ZU-FUSS,HL STuG III,HL T34/85 BEDSPRING,
HL PZIV MALTA,MATORRO JAGDTIGER,HL F05 TIGER,TAMIYA KT,HL PANTHERDOZER,HL EARLY PANTHER G,TAIGEN/RAMINATOR T34/76,
HL AN-BRI-RAM SU-85
HL PZIV MALTA,MATORRO JAGDTIGER,HL F05 TIGER,TAMIYA KT,HL PANTHERDOZER,HL EARLY PANTHER G,TAIGEN/RAMINATOR T34/76,
HL AN-BRI-RAM SU-85
-
LordPanzer
- Lance Corporal
- Posts: 152
- Joined: Mon Jul 27, 2020 2:15 am
- Location: North Carolina
Re: Jagdpanther build
Thank you Herman. I think the red oxide underneath and chipping helped the color over all. I still have weathering and washes to add which will tone it down and darken some.HERMAN BIX wrote:Ive got that paint set, but have not put it to the test over time.
The green you used looked too light to me in the bottle, but seeing it on a tank seems to make it right.
I really like what you've done & more so due to the sad sloppy mess you began with on page 1 !!
Sent from my SM-G970U using Tapatalk
-
FredtheFrench
- Corporal
- Posts: 478
- Joined: Sun Feb 09, 2014 6:13 pm
- Location: Rennes. France
Re: Jagdpanther build
I love your Jagdpanther, and I m impatient to see end of camo scheme...
Sorry for my spelling mistakes, I try to do better every day...
-
LordPanzer
- Lance Corporal
- Posts: 152
- Joined: Mon Jul 27, 2020 2:15 am
- Location: North Carolina
Re: Jagdpanther build
Good evening folks! It's been a little while since my last update on my Jagdpanther build. Just to share a few of the little things I've done this past week. I'm coming down to the end of this build and still have a few little weathering touch ups left to fiddle with, a PE screen which is still on order and a nice speaker upgrade!
The two hatches on the top of the casemate. I added a simple styrene platform for a crew member to sit on with some double sided tape to hold him in place during battle. Although I've thought about using magnets to keep him secure. Maybe in the future. Since I removed the DMD and sold the apple base with it I picked up a 3D printed apple base and installed in the same hatch. I did cut a small notch in the top of the apple base to allow the hatch to close flush when not battling.
The LED MG I got to replace the plastic static Tamiya one needed to be trimmed down maybe 1/4 inch and the hull MG mount trimmed to give enough room to allow the main gun to move with enough clearance form side to side to achieve full traverse.
Thanks for checking in and following along !


Sent from my SM-G970U using Tapatalk
