Hi, Just a few minor points about your really most impressive work,
Don't forget the Jack and its retaining clamps and the bracket for the Jack Handle,
And before you think of spraying the rear panel you will need to paint the exhaust shrouds with metal etching primer or the paint wont take.
At the bottom of the plate the moulded on starting handle shaft can either be removed and replaced by a proper starting handle and two retaining brackets or removed and replaced by a two piece later type starting handle that fits adjacent to the radio aerial on the tank body.
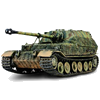
Tiger 1 detailed build.
-
jarndice

- Colonel
- Posts: 8466
- Joined: Mon Sep 03, 2012 11:27 am
- Location: the mountains of hertfordshire
Re: Tiger 1 detailed build.
I think I am about to upset someone 
-
Von Mooflesaaa
- Corporal
- Posts: 318
- Joined: Sat Aug 24, 2019 9:28 pm
- Location: Boise ID
Re: Tiger 1 detailed build.
At this point I'm calling the rear panel done. I'm going to leave the starting handle as it is, due to its position I have a fear that it will be easily broken during maneuvers. Rear jack is a resin replacement that I will attach at a later date after painting. The rear notek convey light is just a metal tube. I seem to of misplaced my forgebear one. Bugger. But it will do for now. I can always pull it off and replace with a new one if I find my forgebear one.
I have drilled all the holes for the exhaust shrouds and the C clamps. Next step is a coat of black primer before painting starts.
Until next time.


Sent from my SM-A102U using Tapatalk
I have drilled all the holes for the exhaust shrouds and the C clamps. Next step is a coat of black primer before painting starts.
Until next time.


Sent from my SM-A102U using Tapatalk
Taigen Metal Tiger
Taigen Metal Panzer IV
Taigen Metal Panzer IV
-
Von Mooflesaaa
- Corporal
- Posts: 318
- Joined: Sat Aug 24, 2019 9:28 pm
- Location: Boise ID
Re: Tiger 1 detailed build.
Now its time to start work on the turret. Todays task is to get the zimmeret completed on the gun mantlet. Add the viewing slits to the commander's cupola, and finally add some weld lines. So far I've managed to attach the machine gun and led behind it. 
Sent from my SM-A102U using Tapatalk

Sent from my SM-A102U using Tapatalk
Taigen Metal Tiger
Taigen Metal Panzer IV
Taigen Metal Panzer IV

Re: Tiger 1 detailed build.
Nice mg. Is that from East Coast Armory? Things are looking good.
-
Von Mooflesaaa
- Corporal
- Posts: 318
- Joined: Sat Aug 24, 2019 9:28 pm
- Location: Boise ID
Re: Tiger 1 detailed build.
It is indeed from East Coast Armoury. All of the resin on this build is from East Coast. Great quality and decent pricing. Would highly recommend for anyone else looking to do a tiger build.
The mg is actually really nice as the rear end has a hole big enough for you to just slide the LED in with no sanding or trimming required.
Sent from my SM-A102U using Tapatalk
The mg is actually really nice as the rear end has a hole big enough for you to just slide the LED in with no sanding or trimming required.
Sent from my SM-A102U using Tapatalk
Taigen Metal Tiger
Taigen Metal Panzer IV
Taigen Metal Panzer IV
Re: Tiger 1 detailed build.
I had one and accidentally broke it during removal. I’ve had another one ordered for quite some time now. Meanwhile I have a metal mg with led from Taigen so I might try to fit that as an experiment.
-
Von Mooflesaaa
- Corporal
- Posts: 318
- Joined: Sat Aug 24, 2019 9:28 pm
- Location: Boise ID
Re: Tiger 1 detailed build.
Oh now that's an idea. Good shout. Yeah the shipping can be somewhat long. Just email oddball, he is super quick on updates.
Sent from my SM-A102U using Tapatalk
Sent from my SM-A102U using Tapatalk
Taigen Metal Tiger
Taigen Metal Panzer IV
Taigen Metal Panzer IV
-
Von Mooflesaaa
- Corporal
- Posts: 318
- Joined: Sat Aug 24, 2019 9:28 pm
- Location: Boise ID
Re: Tiger 1 detailed build.
So after much cursing and fiddling. I've managed to get the commanders cupolas periscopes added. Also started work on adding weld lines. More to follow. 

Sent from my SM-A102U using Tapatalk


Sent from my SM-A102U using Tapatalk
Taigen Metal Tiger
Taigen Metal Panzer IV
Taigen Metal Panzer IV
-
Von Mooflesaaa
- Corporal
- Posts: 318
- Joined: Sat Aug 24, 2019 9:28 pm
- Location: Boise ID
Re: Tiger 1 detailed build.
Well I'm calling the turret weld lines done. Next step is to add welds to all the small parts and commander cupola. Stay tuned for more. 
Sent from my SM-A102U using Tapatalk

Sent from my SM-A102U using Tapatalk
Taigen Metal Tiger
Taigen Metal Panzer IV
Taigen Metal Panzer IV
Re: Tiger 1 detailed build.
Wow, great job. I’m envious of your patience and vigor.
