My current dilemma? I have assembled a small tank army - as you know, it happens - and they were all BB gun type but my recent acquisition was IR. I had no choice in the matter. When Taigen finally got round to committing to their new IS-2 I was in there like a bullet but only IR types were available to pre-order. Twelve months later there was a knock on the door and standing there was Julie, Dave's better half, struggling with a large, heavy box while Dave locked the car. Being the gentleman I am I showed Julie to the dinning room where she could place the box on the table. This was just two days before Christmas 2018, when all responsible family people should be busy with their kin preparing. Dave took it from the box to check it was okay and as that 122mm gun fired I fell in love with IR/gun flash/recoil (I had long been in love with IS-2s).
So what now? Do I abandon BB? I confess the fun of punching holes in targets was wearing thin and the noise of my two cats playing football with the pellets was becoming a little irritating. Okay, I'll ring Dave and ask how best to convert my existing BB fleet. Simples!
Dave, as usual, was a great help. Yes, you could buy a myriad of parts to convert or even purchase pre-assembled upper hulls but........ "I've got a couple of unpainted Torro IR equipped King Tigers..." that would give my new IS-2 a run for it's money. Like the sucker I am, I swallowed it hook line and sinker. They had the latest electronics, just like th IS-2, but with a German sound set. I mean, how could I refuse? A week later and I was travelling Northwards to collect.

The naked KaTie
The journey, a 90 minute run round the M25 and up the M1 took several hours. Road works and accidents restricted speeds to 40/50 mph and then, at the service station just before the Bedford turn off, I stopped to call him. My ageing mobile was still in Google Navigation mode and pulling up Dave's email to get his address and phone number was the final straw. The lack of free memory cause it to reboot, and then reboot again, and again. With power failing fast I plugged in the USB charger cable, only to find it was a SatNav cable which wasn't standard. A quick trip into the WHSmith shop saw me £10 lighter with a cable that would have cost £3 on e-bay. Still no luck.
To cut a very long story short, I found a map book in the boot and remembered that Dave lived in a village that had the name Moretaine in it and drove to the local post office who would know Dave from all the parcels he has sent and recieved. Foolproof.
"Who?"
By chance a local postie arrived who Googled Forgebear Tanks for a contact number and then, with no number shown, agreed to e-mail Dave to say he had a lost General with him and could Dave rescue me. To Dave's credit he appeared in a matter of minutes but I learnt two (no, three) vital things. Firstly Dave and Julie live miles from their village centre. Secondly, Dave uses a different post office near the village he actually lives in and, three, NEVER put all your eggs in one basket, especially if it looks like a mobile phone!
A very pleasant afternoon was spent drinking coffee, researching the internet for camos suitable for the defence of Berlin (it was never going to happen Mr Hilter) and Dave selling me a Zimmerit set and some 'special' water slide transfers that would just melt into the Zimmerit. I then took a look around the 'shop', met his family of ducks and, very impressed and green with envy, I left trying to remember Dave's detailed instructions on how to get back to the M1. No mistakes but several hours later I was home.
Did you need to know all that? Of course not but it sets the scene for the following month or so spent on the tank, with gardening and family get togethers all getting in the way. Okay, a weak excuse - I had told Dave I'd do a review but he may have expected it sooner!
Here started yet another dilemma. My first impressions were not good. How could I give it a bad review and mess with Dave's business income? The dilemma was resolved by a new forum member's post about his Torro KT and the problems he had to fix. The cat was out of the bag so I continued this write-up!
Firstly, and in no particular order, why would a company fit all the detailed parts if they knew they would have to be removed for painting before use? To make matters worse, the plastic parts had been removed from the sprues very crudely. The parts had then been glued in place with a very strong resin type glue, like Araldite. The pin holes were well coated and the ends of the locating pins were then liberally coated too. I short, to remove the parts it was necessary to prise them off - all the plastic pins broke in their holes and only the metal pins survived, mostly at the cost of the hull. No Torro, a kid could have planned that better.
Luckily the plastic parts are readily available on line and at Heng Long prices so these were replaced, as was the 2000mah NiMH pack that refused to charge correctly due to a faulty cell. Yes, I could have fitted new brass rod pins to the plastic parts but with the added thickness of the Zimmerit I decided to do things 'proper'.
Next, the Zimmerit. It was Atak's set for the Trumpeter Henschel KT kit. This is required if you want to do the job properly as Torro's upper hull is the only place you'll find some of it already moulded in. To complete the job you need to add Atak's superb (but pricey!) sheets. Whilst the overall size and shape of the panels fit the Torro shell reasonably well, hardly any of the holes for the fitting of the detailed parts (spades, spare track hooks etc) correctly align and the turret sides and hull rear panel will really test your modelling skills / patience. A couple of tips should you choose to do the same. If you cut some sheets into smaller sections they are easier to place. Always cut along the Zimmerit vertical lines so that the joins will not be seen. My second tip is a great one! I decided to use 'No More Nails' to glue the sheets into place. A small, new tube is easy to use, the white paste spreads easily under the Zimmerit sheet upon finger pressure and the surplus that is squeezed out of the edge is easy to wipe off with a small, damp kitchen sponge. It grabs so you don't need to hold parts in place but moves freely for five minutes so aligning is simple. It also provides an instant gap filler and can be shaped to scale Zimmerit using a flat knife blade while still.... moist - great word that!

It all fitted wonderfully, once each part was custom shaped!

Worth the effort though

That rear hatch took some fiddling

and the rear panel? More like a jigsaw!
So there you go, two great glues for tank building - ShoeGoo and No More Nails. You heard it here. Now, the problems that might frighten you off - though you shouldn't run!
The lose, wobbling turret. The bouncing barrel. The swinging turret and the flexing top deck. These are all, in my opinion, a result of going metal without using suitably upgraded fittings and servos. Frankly Torro, I'm deeply disappointed that you have seen fit to release this model with these faults. However, they are all remedied quite easily and cheaply so if you don't have the skills or time to do a full redesign and engineering project as our Belgium member did, read on.
I'll tackle the lose, wobbling turret first. With the tank sat flat on the ground, you can lift the turret from the hull by some 1.5 to 2mm - not good! There are several ways to approach this. You can shim out the slack fit between the hull top deck and the turret base with pads fitted under the turret between the rollers, as shown in Tgerard's thread. However, this lifts the rollers from the hull so you lose their benefit. Similarly, you can fit a circular ring spacer to the hull deck so the the slack is removed but the turret rollers are still operational now running on the circular spacer. I chose this method. The third way is I think is the best but I had already used the second when I thought of this solution, typically 3am in the morning and 12 hours after the work was completed! If you carefully reduce the height of the three 'pilars' that the turret ring securing screws go in to, you will allow the ring to get closer so removing the slack and retaining use of the rollers. This avoids the lifting of the turret. Then again......the turret does without spacers lay very low on the deck so no bad thing.

Spacer ring in situ, still allowing the bearings to work
Next the bouncing barrel. This matter has been covered thoroughly in the various IS-2 threads as the IS-2 shares the same problem, though not so bad. There are several issues here. The plastic and metal cradles that hold the barrel pivots in place are too flimsy for the task so need reinforcing. I also added a thin shim over the turret floor moulded plastic uprights that hold the pivots in their cradle seats as this further resists unwanted movement. The next issue is the slack in the elevation servo, both the gears and the revolving metal S bent bar where it sits in the plastic forked part allow movement. The plastic fork is elongated to allow for the recoil movement where the S bar slides within the fork but plastic is far too bendy given the length and weight of the barrel. You need to remove the S shaped metal bar that rotates and rebend it to create more offset. This will give you more elevation/depression and if you the sleeve the end of the bar with very thin metal tube that still fits between the plastic forked part, you will remove more slack. Finally, a small kitchen sponge fitted between the exiting barrel and the roof of the turret will act as a simple damper. Ultimately, the gear set will still give some slack but with these mods it should be tolerable (see later).

The turret internals
Swinging turret! Ironically, this problem is made more apparent as a result of the roller bearings freeing up the rotation movement of the turret. Again, the issue stems from the use of existing budget mechanisms where the gear set is too poorly meshed. Torro have not allowed for the heavier turret mass and the impact of the roller bearings. I managed to reduce a little of the slack between the turret ring and the 'servo' gears by moving the rotation servo a little closer to the ring but that's about it. Maybe Tgerard used his shim pads to lift the rollers out of action intentionally! Incidentally, I found it advantageous to reinforce the underside of the rather flimsy top hull around the turret area. I'm sure its quite strong enough for a plastic turret but allows some sagging under the weight of the cast one, not aided by my adding 40grams counterbalance weights to the rear of the turret to create a better balance.

Reinforced top deck helps reduce unwanted turret movement
Okay, enough of the problems. The rest just gets better and more than makes up for the problems covered in detail above.
The motors and gearbox combos are strong and silent, the speed controllers in the new MFU doing a great job in offering smooth and full control. The engine sounds seem very well controlled too with easy access to the volume control through the rear engine hatch. This also gives you access to the charging socket, master on/off switch and alternate hull release slide (mimics the pin under the hull rear). Whilst dealing with the underside, you'll also find a pair of track 'trim' screws. These are in fact track tensioner screws and they provide a very good system - one you won't need to upgrade.


Gearboxes and motors are the strong, silent type!

Track tensioners are good quality and easy to access and use, as is the switch panel beneath the engine hatch
Likewise, the wheels are all metal and sit on bearings. These are easily released by a single 1.5mm grub screw so can removed for painting. The heavy, wide metal track is easiest removed by simply punching out a single pin. I found a KV-1 spare pin just the job for this, a tad thinner but still long.
The 360 degree rotating turret is facilitated by a fully rotating cable drum which sits in the turret ring. Model tank designers just don't seem to have grasped the need for the position of this barrel to be central to the turret ring so that the barrel doesn't drag the cables around the hull in a circular motion, stirring the internals like a pudding mixer. Maybe one day! Until then, it is important to ensure that all lower hull components and cable are secured as low as possible and that the descending turret cables are not able to tangle with anything when rotating. By the way, with a hull mounted antenna is there any need for a 360 ring? I'm still working on this.
The cannon flash is blindingly bright and the barrel recoil very realistic and impressive, as is the synchronised shell firing sounds, including the ejecting spent shell casing falling to the floor. Unfortunately I was unable to find the hull recoil switch on this latest model mfu - shame. I found that fitting a flush mounted IR emitter tube to the inside of the turret where the led was originally mounted fairly straight forward. I still use a 11mm long, 3mm internal diameter matt black tube for this as it requires absolute precision aiming with no IR spread whatever. I needed to remove a little of the internal plastic moulding to hold the end of the tube and bulb but did not attempt to make the tube follow the elevation of the barrel, unlike the IS-2 'hole' which is in the mantlet. This could, with a fair bit of remodelling be achieved but the benefits are small. Maybe another day?
After a full lube and running in test, the tank was again dismantled for paint. I used a badger 200 airbrush for most of the work and took great care to mask off all openings that could allow a fine paint spray to land on an LED. I find heat shrink tube ideal for masking machine gun barrels etc.


I only needed to remove the outer road wheels for priming. Use a good primer!

The easy bit, getting those tools looking right
Now, most important! Your metal parts do NOT like paint! The bare metal castings will chip better than a Maris Piper if they are not properly primed with a good quality primer. Once primed and dried, the fun begins. You can try to copy a prototype or just be in the style of one, or just go wild! I chose the 'Ambush' camouflage pattern, as apparently used by the battalions that were involved in the defence of Berlin as both my IS-2 and three T34/85 carry the Berlin stripes.


After a base colour coat, the first green is applied
Daves 'special' decals were indeed good, softening to melt into the Zimmerit without any distortion. When all the spraying and detailed brushwork was complete the whole lot received a couple of fine coats of Tamya clear flat varnish.
Next dilemma. Whether to weather or whether not to weather. Or not? I went down the cowards route. All crevices received a light dusting followed by a few rainfalls. Nothing too dramatic then but realistic given that there is no body damage either! This represents a careful driver motoring to the tank's first battle. A little road dirt, no more.


Cats, big and small! The redish brown was added, then the detail and light weathering
So, four weeks on, good absorbing fun was had in bag loads. This is a high quality bit of kit that comes at a reasonable price. You may be able to save a quid or two shopping around but for a friendly and knowledgeable service, Dave and Julie are a good bet. And no, I didn't receive any financial favours or discounts so this review is as honest as I am (??) but I did get a great before and after service, so important if you are going to start stripping down a complex bit of kit. Sat next to my £108 resprayed HengLong plastic version KT, can you tell them apart? But you know it's quality!
(some days later still)....... the KT and the IS-2 was taken to the freshly mown garden for a test battle. Oh dear! I had fired the main gun a number of times previously but with either the turret detached or with the the completed model raised on a block with the tracks off the ground.
In the garden, sat on the turf, as the gun was fired the hull kicked rearwards and then forwards with great speed and force so that the front of the hull was thrown upwards, acting like a catapult for the long barrel. The mass of the barrel took it higher than the elevation servo allowed which meant that the plastic servo fork was actually bending further. All the work I'd done had remedied the problems but could not resist the forces of unwanted hull recoil! Ring Dave.
A couple of days later and a variant of the V3 MFU arrived, the one with the hull recoil switch fitted. Swapping he leads over was simple and the problem was sorted, the gun recoiling sweetly whilst the hull remained stable. What really impresses me is that Forgebear always responds quickly, always has a remedy and it's usually in stock with a fast delivery at a sensble price. After sales exemplified.


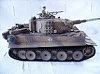
Final assembly and its done, battle ready!
Now, finally, what would make a fair challenge for the T34/85s? A Panther maybe? I don't own an Panther F....yet! I'm sure I saw some nice ones in the Bedford area (wink). Yeah, it's due for delivery this Saturday AND the man has had it fitted with the switchable recoil! Pre-sales service!


And here they are, sat just outside Berlin ready to take on the Ruskies. Win some, loose some....