1/6 1943 Stuart M5
-
PainlessWolf

- Colonel
- Posts: 7864
- Joined: Sun Feb 26, 2012 9:09 pm
- Location: Southern Colorado Rocky Mountains
Re: 1/6 1943 Stuart M5
Not a lot done lately, glasses frames just came in today and I still have a 200 mile drive to fetch them and have my specs repaired. The redo on the Return Rollers is coming along. I just have to pick up some 10mm washers, bushings or bearings to make up five more road wheels similar to the static one that Sassgrunt sent along. These new rollers will screw in with a bolt and nut setup and use a plastic bottom brace scratched out of the left over mounts for the original version. Looking forward to have these done and remounted soon. Worked a little on the bottom of the lower hull tonight. I sanded down fillers on a couple of screw holes and tested the die and punch set I rounded up to make all the various covers on the lower hull of the tank. Works fine but I will use a smaller, brass Hobby hammer instead of a claw hammer. Too much racket. ;o) Pics: ( Click to Enlarge )
- Attachments
-
- Satisfactory results.. Hatch covers and Maint. covers will be accurate and screwed down with brass hardware.
-
- Ready for a test of the Die and Punch set...
-
- Closeup of putty cut and sanded down. This fills the screw holes which held the cover closed.
-
- Permanently mounted L brackets and magnets on the cover will keep this space closed but usable.
...Money!? What's that!?...
-
PainlessWolf
- Colonel
- Posts: 7864
- Joined: Sun Feb 26, 2012 9:09 pm
- Location: Southern Colorado Rocky Mountains
Re: 1/6 1943 Stuart M5
Driving tomorrow to get the specs repaired ( finally ) Tonight, I did a little more on the lower hull. Pics:
- Attachments
-
- I am working towards a less detailed version of this from Steinbrunns build.
-
- Mounted with the 24hr epoxy. Drilling and bolts will come later.
-
- This hatch is sealed but can be reopened if ever required.
...Money!? What's that!?...
-
Markocaster
- Staff Sergeant
- Posts: 997
- Joined: Mon Mar 31, 2014 11:16 pm
- Location: Bay Area , California
Re: 1/6 1943 Stuart M5
Painless this is great and inspiring:)
I picked up the book. Now where to find a preowned Stuart
Keep up the excellent work!
Sent from my iPad using Tapatalk
I picked up the book. Now where to find a preowned Stuart
Keep up the excellent work!
Sent from my iPad using Tapatalk
HL /Mato tiger 1 early, Tamiya Tiger 1 early, Taigen tiger 1 mid
Taigen T34/85, HL SU-100
Jagdpanzer Lang
Taiga Jagdpanther
Heng Long Sherman DGS Firefly kit
Tamiya King Tiger (unbuilt)
Mato all metal Panzer III
1/10 Jagdpanther
Taigen T34/85, HL SU-100
Jagdpanzer Lang
Taiga Jagdpanther
Heng Long Sherman DGS Firefly kit
Tamiya King Tiger (unbuilt)
Mato all metal Panzer III
1/10 Jagdpanther
-
PainlessWolf
- Colonel
- Posts: 7864
- Joined: Sun Feb 26, 2012 9:09 pm
- Location: Southern Colorado Rocky Mountains
Re: 1/6 1943 Stuart M5
Markocaster,
Thank you very much. Yep, the book is a gold mine of how to build one of the biggest Shelf Queens ever! Bob Steinbrunn freely admits that he built that one for display and the very rare, careful outing. His book is chockablok with How-Tos on making the build accurate so I am again walking a line between eye candy and outdoors use worthy. I spent all day yesterday on the road and it is Easter weekend so my work time is limited. I did get the brackets and magnets fix in place on the rear speaker box hull cover. Also, the first of many, many brass bolts were drilled and installed. ;o) Pics ( click to enlarge )
Thank you very much. Yep, the book is a gold mine of how to build one of the biggest Shelf Queens ever! Bob Steinbrunn freely admits that he built that one for display and the very rare, careful outing. His book is chockablok with How-Tos on making the build accurate so I am again walking a line between eye candy and outdoors use worthy. I spent all day yesterday on the road and it is Easter weekend so my work time is limited. I did get the brackets and magnets fix in place on the rear speaker box hull cover. Also, the first of many, many brass bolts were drilled and installed. ;o) Pics ( click to enlarge )
- Attachments
-
- Lower drilled and brass bolts screwed in with a drop of the gel superglue to help keep them there.
-
- A multi-loc ratcheting screwdriver was needed to work within the cramped space of the lower hull box.
-
- The fix I was looking for.
-
- A drop of the Loc-Tite Ultra Gel helps hold both the bracket and the magnet in place.
-
- A quick visit to Home Despot while fetching repaired specs yesterday.
...Money!? What's that!?...

Re: 1/6 1943 Stuart M5
Two on eBay...not cheap but available.Markocaster wrote:Painless this is great and inspiring:)
I picked up the book. Now where to find a preowned Stuart
Keep up the excellent work!
Sent from my iPad using Tapatalk
Barry
"Details make perfection, and perfection is not a detail."
Leonardo Da Vinci
Leonardo Da Vinci
-
PainlessWolf
- Colonel
- Posts: 7864
- Joined: Sun Feb 26, 2012 9:09 pm
- Location: Southern Colorado Rocky Mountains
Re: 1/6 1943 Stuart M5
Today, I had time to mount the front tow brackets and start the putty blending on them and the previously installed lower hull side hook mounts. There are a lot of weld beads to add and fortunately some well thought out help for them. More on that later. Pics: ( click to enlarge )
- Attachments
-
- Putty blending underway on the lower hull side hooks
-
- Eyes in place with 24 hr epoxy. Putty blending to follow.
-
- A nifty set of ArmorPax front tow eyes
...Money!? What's that!?...
-
HERMAN BIX

- Major-General
- Posts: 11879
- Joined: Sun Jan 12, 2014 12:15 am
- Location: Gold Coast,Australia
Re: 1/6 1943 Stuart M5
Sometimes its the little things in life eh !.............those tow hooks and trans covers really add to the overall effect.
HL JAGDPANTHER,HL TIGER 1,HL PzIII MUNITIONSCHLEPPER, HL KT OCTOPUS,HL PANTHER ZU-FUSS,HL STuG III,HL T34/85 BEDSPRING,
HL PZIV MALTA,MATORRO JAGDTIGER,HL F05 TIGER,TAMIYA KT,HL PANTHERDOZER,HL EARLY PANTHER G,TAIGEN/RAMINATOR T34/76,
HL AN-BRI-RAM SU-85
HL PZIV MALTA,MATORRO JAGDTIGER,HL F05 TIGER,TAMIYA KT,HL PANTHERDOZER,HL EARLY PANTHER G,TAIGEN/RAMINATOR T34/76,
HL AN-BRI-RAM SU-85
-
PainlessWolf
- Colonel
- Posts: 7864
- Joined: Sun Feb 26, 2012 9:09 pm
- Location: Southern Colorado Rocky Mountains
Re: 1/6 1943 Stuart M5
G'mornin' Herman,
It's going to be the details that really bring this tank to life. Sure, it will run a little quicker and have better sound and the lights and main gun\MG will work. However, it will be all the work Sassgrunt did to the upper and my work on the lower and bogies and idlers and all the bolts and weld beads, etc, ad infinitum that will give it realism. So, yessir, it will be the little things. ;o)
regards,
Painless
...Money!? What's that!?...
-
PainlessWolf
- Colonel
- Posts: 7864
- Joined: Sun Feb 26, 2012 9:09 pm
- Location: Southern Colorado Rocky Mountains
Re: 1/6 1943 Stuart M5
Nothing in the Post the last few days. I'm awaiting a Tap and Die set to use on all the bolts for this tank and am kind of held up with work pending on the lower hull. Still a little progress can always be made. Pics:
- Attachments
-
- These are held on by one bolt so I could carefully file and sand them to fit. More bolts to follow once mounting holes can be tapped.
-
- All I am waiting for now is my Tap and Die set...
-
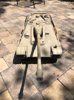
- A cunning plan has formulated for affixing the return rollers ( it does not involve that screw but rather the washer....)
...Money!? What's that!?...
-
PainlessWolf
- Colonel
- Posts: 7864
- Joined: Sun Feb 26, 2012 9:09 pm
- Location: Southern Colorado Rocky Mountains
Re: 1/6 1943 Stuart M5
No post today. I almost broke down and bought another tap and die set at the local hardware store. If it had had all the correct taps, I might have...Slow Boat from China action.....Anyway, I did get a little done on the sprockets thanks to some hardware store purchases and fortuitous finds at home....Pics ( click to enlarge )
- Attachments
-
- Corrected and original sprocket...primer and paint tomorrow.
-
- Mates freebie vinyl wrist bands were the correct diameter and thickness. He still has plenty left.
-
- Good thing that pvc tube only cost a 1.05 US since the perfect solution was already at home...
-
- The plastic friction ties I used earlier had already loosened so I took good advice and got screw clamps instead.
-
- Local Hardware store produced some screw clamps for the Stuart sprockets, pvc tubing for possible sprocket banding and a couple of nice, new hobby screwdrivers.
...Money!? What's that!?...
