Tiger Build

Post Reply
Mad Fox
Corporal
Posts: 324
Joined: Tue Jan 06, 2009 5:13 pm

Tiger Build

Post by Mad Fox »

Hi Guys well the build/correction has started, the tank is in bits and a non runner lol, hopefully things will progress and it will go back to being a runner when sorted.
started with the commanders coupola, as many will know, it needs some detailing as well as turning to the correct position on the top of the turret, so that was the first thing i set about removing.
luckily the glue monkey had not been taking happy pills when he glued mine on and with a bit of careful scoring with a sharp knife it came off.
leaning and stripping was shall we say a little more tedious, obviously the glue monkey had had a tea break and popped a happy pill when this was put together in the factory, and getting the hinge apart from the main cupola proved more of a challenge, but not dismayed I soldiered on and eventually managed to get the whole thing in bits.
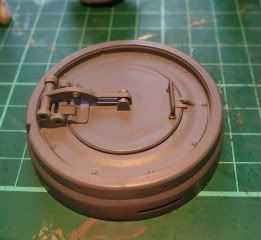
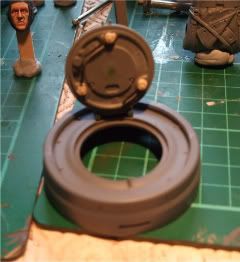
one of the first problems I wanted to solve was the closing of the hatch, as I don't know about the rest of you's experiences but mine always sat a little open, (not good), so I set about cleaning the mould lines and sanding with some wet and dry, once happy with the sanding/cleaning I dry fitted the whole thing back together.
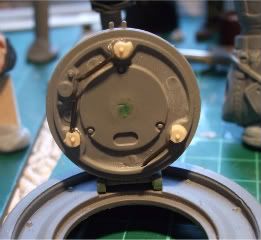
happy now that the hatch closed correctly I started on the detailing of the inner hatch, thatnks to you guys I got some pics of the locking mechanisim and after a rummage through one of my many bits boxes I found some bits that would help make the locks, that and some piano wire.
I know the results are not fantastic but I think they do the job, as I didn't fancy spending a small fortune on the white metal ones that probably only cost a couple of quid in metal to make.

Image

Image

Image

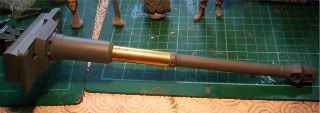
The Barrel extension and changing round of the gun mantel were my next stage of the project, I stripped the gun and cut the mid section completely out of the barrel, using a 48th scale barrel I measured up scaled to 1-1 then down scaled again to 1/16 with this measurement I cut the brass tube and plastic tube packing to length, the inner airsoft barrel was also renewed and correct length to fit inside the main barrel, I then drilled the two holes in the airsoft barrel that were needed to release/draw air and fitted the whole lot back together.
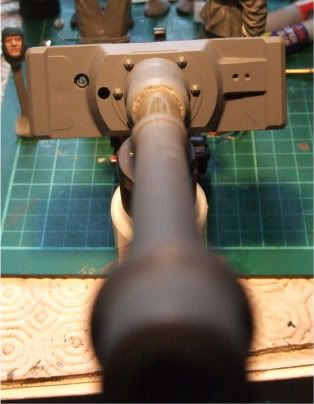
turning the mantlet was a pretty easy job, with a few hole to drill and a small amount of cutting with a modelling grinder attachmentto take down the old screw fitting lugs.

Image

Image
1 H/L Tiger in lots of bits being sorted

"A Tiger gives you a VERY nice Edge"
User avatar
[ICE]monkey
2nd Lieutenant
Posts: 2669
Joined: Wed Sep 10, 2008 5:58 pm
Location: pluckley ,ashford ,kent

Re: Tiger Build

Post by [ICE]monkey »

great start mad fox, nice detail on the commanders cupola
all the best, ice
on second thoughts lets not go to Camelot ,it is a silly place
User avatar
raven
Warrant Officer 2nd Class
Posts: 1042
Joined: Mon Dec 29, 2008 8:27 pm
Location: dublin ireland

Re: Tiger Build

Post by raven »

good job mad fox i will be doing mine when i finish my other tank so i will be watching with great intrest

  chris
Mad Fox
Corporal
Posts: 324
Joined: Tue Jan 06, 2009 5:13 pm

Re: Tiger Build

Post by Mad Fox »

Thanks guys, i've got a long way to go but will keep you all updated on progress :)
1 H/L Tiger in lots of bits being sorted

"A Tiger gives you a VERY nice Edge"
BREL
2nd Lieutenant
Posts: 2473
Joined: Tue Jul 22, 2008 9:10 pm

Re: Tiger Build

Post by BREL »

A great start to re-working your tiger
oztruck
Corporal
Posts: 311
Joined: Sun Oct 12, 2008 2:25 am
Location: South Australia

Re: Tiger Build

Post by oztruck »

You are off to a good start. Keep the photos coming. Well done
HL Pershing, HL Bull Dog,HL powered T34/85 IR, HL Tiger 1, HL Pz III, Stug III IR, PzIV, King Tiger, WSN Tiger1 mid IR, T34/85 winter IR, HL Jagpanther IR
Mad Fox
Corporal
Posts: 324
Joined: Tue Jan 06, 2009 5:13 pm

Re: Tiger Build

Post by Mad Fox »

Update on the project....

All the wheels are off the tank, the road wheels have been washed and sprayed with undercoat as have the metal drive sprockets.
I've now installed the new metal Gearboxes and im toying with the idea of getting some 3-1 reduction units as I have been told of a cheap source that will save loads of money and will be a VERY reasonable cost.

Image

ok so the the gun mantlet is now zimmerited although I am going to use milliput to zim the sides of it as I feel it will look better than it does at the moment.

Image

Image

will update again on my progress as things move on :D
Last edited by Mad Fox on Fri May 22, 2009 4:03 am, edited 1 time in total.
1 H/L Tiger in lots of bits being sorted

"A Tiger gives you a VERY nice Edge"
User avatar
mt 1
Staff Sergeant
Posts: 882
Joined: Thu Feb 12, 2009 10:17 pm

Re: Tiger Build

Post by mt 1 »

nice progress mad fox,
                              wish i had saved a lot more pics of my tiger build,nice detailing will look brill when done going on previous models /
                              figures etc. ::)
H/L TIGER. H/L CONVERTED PANTIGER.
Mad Fox
Corporal
Posts: 324
Joined: Tue Jan 06, 2009 5:13 pm

Re: Tiger Build

Post by Mad Fox »

Cheers MT 1, taking plenty of pics as do stuff, might help someone else in there build as some of the guys have helped me with there pics, plus it will be nice to look through them for the start to finish tour :D
done some more work so will post some more piccies when I take some :D
1 H/L Tiger in lots of bits being sorted

"A Tiger gives you a VERY nice Edge"
Post Reply

Return to “Tiger I”