c.rainford73 wrote: Lovely paint work on your tanks! I see the combination of the two works excellent
Thanks. I'm still learning a lot about weathering and not up to the standard of some of the members on here but I think I get a bit better with each build and that's all you can ask for really.
Herman, I'm due for a new can soon so might give that type a run. Have you sprayed it over bare decals and noticed any effects?
Yes I have. For what its worth , there was no adverse effect on the decals.
Coming from a spray can, it is hard to regulate the layer thickness, but with a warm-ish subject, and time, you can lightly coat the entire thing, then wait a bit & go again.
The product I use is supposed to be for covering paintings on canvas, so you could guess the R & D the manufacturers will have done to ensure this stuff does not ruin the next Rembrandt's work !!
In fact the only less than desirable outcome I have had from matt seal has come from Tamiyas clear coat, it went slightly smokey on my King Tiger.
This stuff has never failed and I have used it in warm and cold(though not your cold) conditions.
Hair drier, and hit it.
Hey, the worst that can happen is you have to use pigments and real dirt to get your effect & cover failed seal..............
So no real problem
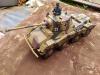
I had a rethink and decided to fit the tools and other external bits and pieces before attempting the streaking. Th only thing not fitted is the jack, as I'm not sure whether this will interfere with the mudguard retaining screws. I'm not sure how well it shows up in the photos, but it definitely does not look as pristine as it used to.
20170527_145555.jpg (43.73 KiB) Viewed 3708 times
20170527_145611.jpg (48.12 KiB) Viewed 3708 times
20170527_145635.jpg (44.54 KiB) Viewed 3708 times
20170527_145650.jpg (41.94 KiB) Viewed 3708 times
Richard
Tamiya Tiger 1, Taigen FlakPanzer IV,Torro M16 half-track, Tamiya Panther,WSN/Torro T34,Taigen M41 Bulldog,H/l/Taigen Sherman M4A3,H/L T90, Haya M3 Grant, Metal Origins 234/2 Puma, Nashorn by Alwyn. I was only going to have one tank - honest!
Richard, that looks just fantastic. The paint work and the wooden handles for the tools and cleaning rods are outstanding. You've really given me the bug to build a Puma, but I think I'll go with the Mark One in 1/6 scale. Want more bigger!!!
When FDR coined the phrase "The Arsenal of Democracy", he was talking about Detroit. Proud to live in the 2nd most violent city in America!!
Thank you, gentlemen, for your kind comments. The thought of a 1/6 Puma fills me with envy - a lot more room to fit things in. The downside would be that I have nowhere to keep something that big. I hope you will post some photos - I would love to see how it compares.
Richard
Tamiya Tiger 1, Taigen FlakPanzer IV,Torro M16 half-track, Tamiya Panther,WSN/Torro T34,Taigen M41 Bulldog,H/l/Taigen Sherman M4A3,H/L T90, Haya M3 Grant, Metal Origins 234/2 Puma, Nashorn by Alwyn. I was only going to have one tank - honest!
Don't be too envious, Richard, your 1/16 scale Puma is every bit as impressive and will cost a lot less in the long run, not to mention the space considerations you bring up. At 40 inches long a 1/6 puma will be difficult to store and transport (as compared to 1/16 scale) but I think it will be fun, and like you said, lots more space inside for cool electronic stuff, but the cost is really out there. More than $4,000 US for the kit! That will be the main hold up for me, money! I have my eye on a great little Armortek PzIV that will cost a bit more than that, but will be a very sweet piece so now all I need is to scrounge up the scratch for it! After that I might think about putting all my efforts into a 1/6 Puma, but until then I can live vicariously through you and your fantastic 1/16 puma.
Thanks for posting this stuff, it really is great to see.
When FDR coined the phrase "The Arsenal of Democracy", he was talking about Detroit. Proud to live in the 2nd most violent city in America!!
Advice time again, please. I've had a go at the streaking. Got it totally wrong first time as the brush I used to feather out the lines had way too much solvent and completely removed what I had put on. Second attempt a lot better. The effect is very subtle but it has made a difference.
The advice I need is what to do now. I was intending to spray it with matt varnish, but I read somewhere that tanks were actually a satin finish. Is this right? Whatever I do, some parts, particularly the decals, still look much too clean, so I was going to give the whole thing a misting coat of the brown earth wash I used to dirty the wheels and tyres. The final touch will be a bit of mud splash on the mudguards and rear of the vehicle. Last question - am I going in the right direction or over or under-doing it?
Richard
Tamiya Tiger 1, Taigen FlakPanzer IV,Torro M16 half-track, Tamiya Panther,WSN/Torro T34,Taigen M41 Bulldog,H/l/Taigen Sherman M4A3,H/L T90, Haya M3 Grant, Metal Origins 234/2 Puma, Nashorn by Alwyn. I was only going to have one tank - honest!
For what it's worth, I go with a matt finish. I use diluted Vallejo Lacquer but anything will do. Then a diluted wash with weathering, either out of the bottle or diluted acrylic earth, and greys. Any sharp edges can be removed with a damp cotton bud. Streaking is easier to achieve using a childs stiff bristle nylon brush, Asda sell cartons of them for about £1.