Tom!,
Tarps go on and can come off. *chuckles* Anyway, sitting around on a Sunday, I went to the tank room closet and checked out Jack's upper for the M36B1. As I suspected, when MATO shipped me a new upper, they left all the things having to do with accessories off ( except the tools, oddly enough ). I couldn't budge the upright for the .50 cal on that one so came back to look at the new upper and plot some sort of cunning plan...Pics:
1944 M36 B1 Tank Destroyer
Forum rules
If your question is electronics related please post it in one of the relevant boards here: viewforum.php?f=31
If your question is electronics related please post it in one of the relevant boards here: viewforum.php?f=31
-
PainlessWolf

- Colonel
- Posts: 7877
- Joined: Sun Feb 26, 2012 9:09 pm
- Location: Southern Colorado Rocky Mountains
Re: 1944 M36 B1 Tank Destroyer
- Attachments
-
- Closeup ( kind of ) of the completed base and upright. Paint will seal the deal.
- Closeup ( kind of ) of the completed base and upright. Paint will seal the deal..JPG (92.42 KiB) Viewed 3129 times
-
- .50 cal locked in place with a brass handle pin.
-
- The base is designed to lay flat on this mount so adding another pin and chain seemed obvious. The base set is decorative tho' the handlepin can be pulled out to lay loose
- The base is designed to lay flat on this mount so adding another pin and chain seemed obvious. The base set is decorative tho' the handlepin can be pulled out to lay loose.JPG (87.92 KiB) Viewed 3129 times
-
- Pin and chain attached after drilling all components
- Pin and chain attached after drilling all components.JPG (89.79 KiB) Viewed 3129 times
-
- Probably a good thing I could not get the MATO upright loose. I could not have drilled it with a Yankee Drill and non carbide bit.
- Probably a good thing I could not get the MATO upright loose. I could not have drilled it with a Yankee Drill and non carbide bit..JPG (95.98 KiB) Viewed 3129 times
...Money!? What's that!?...

Re: 1944 M36 B1 Tank Destroyer
Well Painless, that's looking to be a lot better than the original mount anyway! Also, on mine at least, it isn't a good fit and the .50 wobbles about. I could pack it I suppose but it might be easier to just make anew like you have.
One query, if you don't mind, I'm thinking of basing my build on a particular M36 that has the .50 mounted at the front of the turret (which they apparently did quite often when they had the hood down, so to speak). What I can't find is any pictures or information on exactly how or where it mounts (there is no obvious mounting point on any photos i have come across or in the Tankograd manual) - any ideas?
One query, if you don't mind, I'm thinking of basing my build on a particular M36 that has the .50 mounted at the front of the turret (which they apparently did quite often when they had the hood down, so to speak). What I can't find is any pictures or information on exactly how or where it mounts (there is no obvious mounting point on any photos i have come across or in the Tankograd manual) - any ideas?
-
PainlessWolf
- Colonel
- Posts: 7877
- Joined: Sun Feb 26, 2012 9:09 pm
- Location: Southern Colorado Rocky Mountains
Re: 1944 M36 B1 Tank Destroyer
Doc Phibes, Good Afternoon,
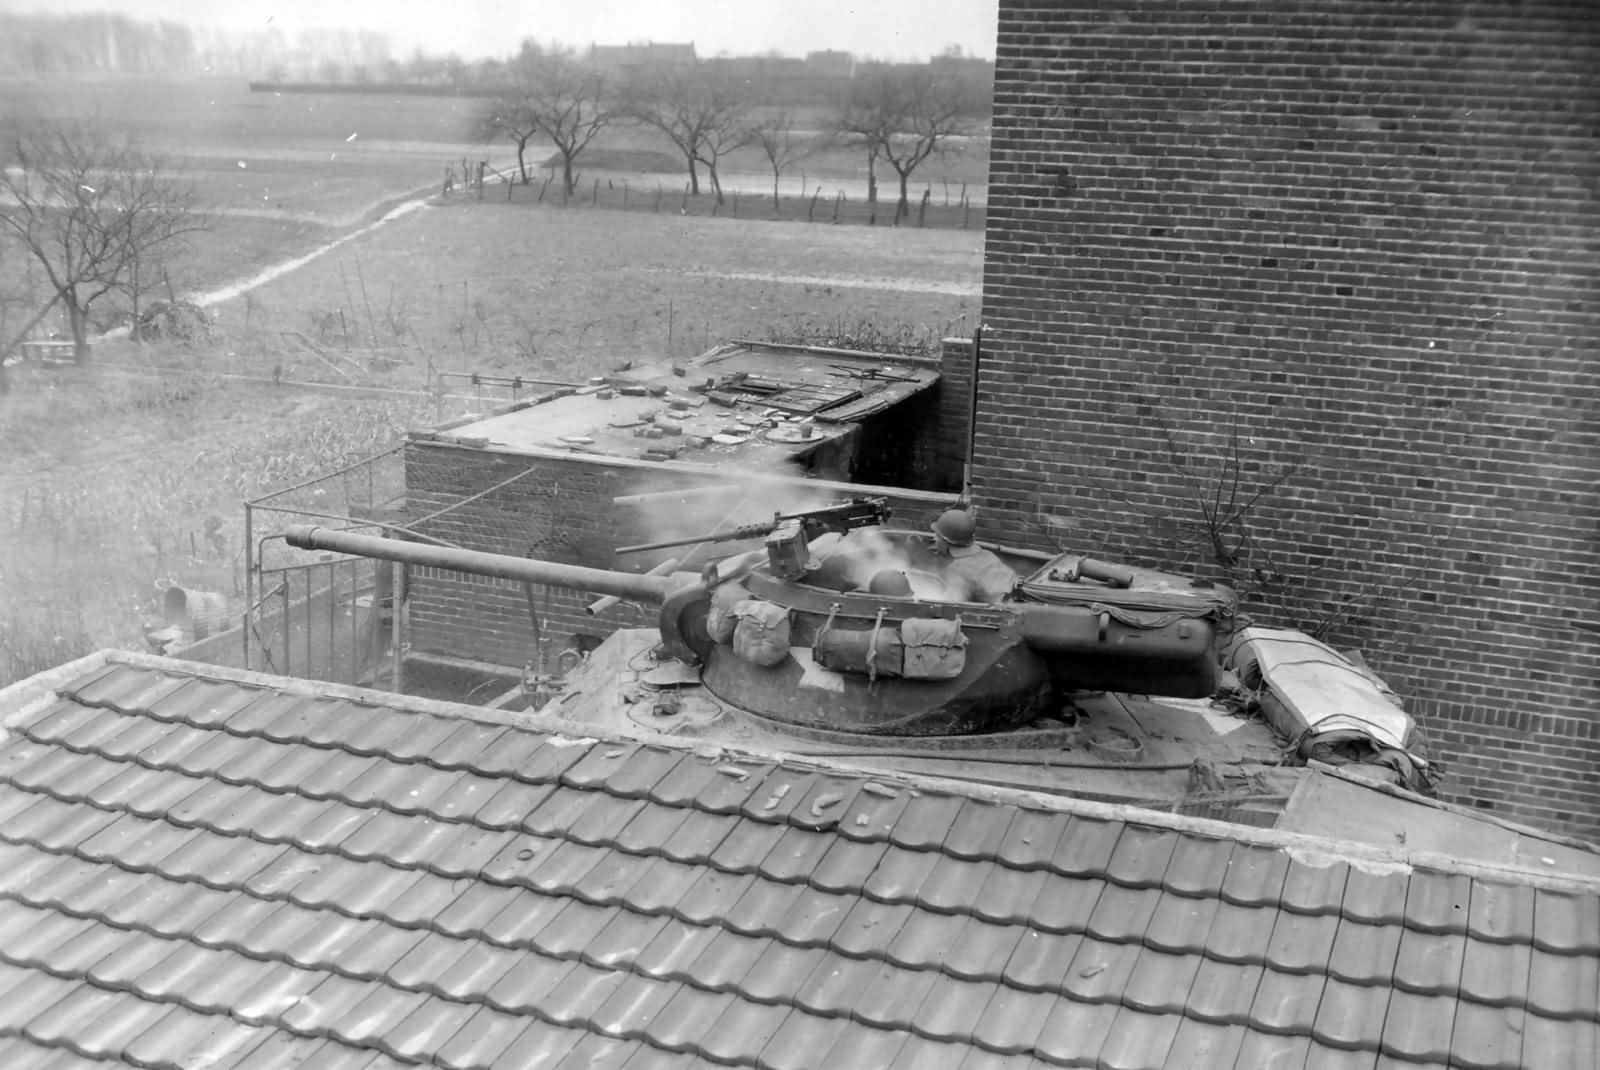
Here is one of the clearest shots I could find of the .50 cal being used up front on the lip of the turret, upper left of the breech travel lock. From the height and lack of ring, it has to be a short, welded on mount with the same diameter as the official mount on the rear turret bustle. It does not appear that you could pull a pin and lay it flat ( like this crew has done with the rear bustle mount ) Note the base of the strapped down infantry mount still in place.
http://www.theshermantank.com/wp-conten ... y_1945.jpg
Here is a frontal pic of the same kind of short mount being used for a .30 BMG. It appears to be a shortened version of the rear tube mount.
http://www.theshermantank.com/wp-conten ... r_1945.jpg
regards,
Painless
...Money!? What's that!?...
Re: 1944 M36 B1 Tank Destroyer
Painless, now I know it is you that is the mind-reader.  For that is (first pic) the very same M36 I have set my sights on - Of the 654th TD Battalion, taken Feb 25, 1945!
The M.2 mount looks low so you are probably right about it being a short version. I have other pictures of it mounted higher on M36B2 but it still isn't too clear to me how it is welded to the front of the turret and whether it is collapsible like the rear mount (so as to fit the roof more easily if so desired). Many thanks for checking it out nonetheless.
The M.2 mount looks low so you are probably right about it being a short version. I have other pictures of it mounted higher on M36B2 but it still isn't too clear to me how it is welded to the front of the turret and whether it is collapsible like the rear mount (so as to fit the roof more easily if so desired). Many thanks for checking it out nonetheless.
-
PainlessWolf
- Colonel
- Posts: 7877
- Joined: Sun Feb 26, 2012 9:09 pm
- Location: Southern Colorado Rocky Mountains
Re: 1944 M36 B1 Tank Destroyer
Doc,
Anytime, my Friend! I will keep an eye out for a better pic as well. I have seen the tall forward mount on the M36B2 and while it has a pin release to lift the M2 out of the mount, I have not seen one with a folding base as was standard on the rear bustle.
regards,
Painless
Anytime, my Friend! I will keep an eye out for a better pic as well. I have seen the tall forward mount on the M36B2 and while it has a pin release to lift the M2 out of the mount, I have not seen one with a folding base as was standard on the rear bustle.
regards,
Painless
...Money!? What's that!?...
-
PainlessWolf
- Colonel
- Posts: 7877
- Joined: Sun Feb 26, 2012 9:09 pm
- Location: Southern Colorado Rocky Mountains
Re: 1944 M36 B1 Tank Destroyer
Having spent the last four days working 'at' getting the M36B1 ready for exterior paint, I thought I had better add a post to keep track of what's been done. The Schumo shipment is still a week out from ETO so those Sherman bits are that + a few days from me. I've given up on the 1/18 fire extinguisher from Singapore. I ordered a replacement today from here in the states. It's 3 times pricier but it looks three times better right off the bat as well. Progress is slow but I have taken a page from the Good Doctor Phibes tonight and cleaned up the rear bulkhead of the vehicle, again, all in the 'getting ready for paint' frame of mind. Pics:
- Attachments
-
- Closer to exterior prime and paint...any exterior details can be painted then added later ( like those blasted light guards )
-
- The gun breech travel lock was bothering me as my first attempt had it wrong side up. There, it was blocking the mounting spot for the .50 cal Dismount Tripod so, Fixed...
-
- In the interest of having time to do it, I rebuilt the phone wire reel into something closer to approximating another angle of view photograph I found of it.
- In the interest of having time to do it, I rebuilt the phone wire reel into something closer to approximating another angle of view photograph I found of it..JPG (98.25 KiB) Viewed 3064 times
-
- Added a little welded seam to the .50 cal mount
- Added a little welded seam to the .50 cal mount.JPG (86.58 KiB) Viewed 3064 times
-
- A closer view...
-
- Screws and bolts cut short and filed smooth and screw heads filled to sand flat.
-
- Miniature hasps and padlocks...No more blinding myself with ABER bits for those.
- Miniature hasps and padlocks...No more blinding myself with ABER bits for those..JPG (80.07 KiB) Viewed 3064 times
-
- An-Bri-RC strikes again with some excellent stuff!
- An-Bri-RC strikes again with some excellent stuff!.JPG (75.88 KiB) Viewed 3064 times
-
- Norge Chocolate! and oh yeah, a TK24 and custom speaker box ;o)
-
- The Good Stuff from Norway
- The Good Stuff from Norway.JPG (87.02 KiB) Viewed 3064 times
...Money!? What's that!?...

Re: 1944 M36 B1 Tank Destroyer
I am curious to see it painted 
Re: 1944 M36 B1 Tank Destroyer
Really coming together now Painless, and again I learn something new - I mistakenly thought the 'legs' often seen on the front/top of the turret were re-positioned barrel cleaning rods not, as you point out, a tripod for the .50
The new improved phone cable reel looks great too.
Regarding the speaker, is that a Visaton FRS7? I've been pondering options for this myself and this is a great speaker but not sure I can fit it in with what else I have planned (e.g. smoker, etc). But, anyway, is this the 4ohm or 8ohm version? There is scant info from Clark on this (of course I could just ask him I suppose, but that would be too easy ). I tried both on the KT but stuck with 8ohm as I felt the 4ohm might be pushing the Clark board's audio amp a little too much?
The new improved phone cable reel looks great too.
Regarding the speaker, is that a Visaton FRS7? I've been pondering options for this myself and this is a great speaker but not sure I can fit it in with what else I have planned (e.g. smoker, etc). But, anyway, is this the 4ohm or 8ohm version? There is scant info from Clark on this (of course I could just ask him I suppose, but that would be too easy
-
c.rainford73

- Major
- Posts: 6104
- Joined: Thu Aug 25, 2016 7:34 pm
- Location: Connecticut USA
Re: 1944 M36 B1 Tank Destroyer
Hello there Mr Painless it does appear that you have made quite a bit of progress!
I also see that Mr Maxmekker was able to sneak some more fantastic milk chocolate to another customer - that stuff is awesome.
I think I order just to sample the chocolate
Nice quality details now it's almost time to hear it run
it does appear that you have made quite a bit of progress!I also see that Mr Maxmekker was able to sneak some more fantastic milk chocolate to another customer - that stuff is awesome.
I think I order just to sample the chocolate
Nice quality details now it's almost time to hear it run
Tanks alot.... 
-
PainlessWolf
- Colonel
- Posts: 7877
- Joined: Sun Feb 26, 2012 9:09 pm
- Location: Southern Colorado Rocky Mountains
Re: 1944 M36 B1 Tank Destroyer
Good morning, Gentlemen,
Soeren, I am as well. I am always surprised when I set the paintbrush down and call the job finished.
Doc Phibes, I learn something new about this vehicle on an almost daily basis. The speaker is an FRS-5 with the biggest box that woul fit in the remaining space, roughly 8x5x5. I am not sure on the ohms but Max will know.
Carl, the sound from the Tk 24 and the boxed speaker is incredible!, resonant and robust! I thought the paired speakers from MATO were good but they cannot hold a candle to this setup. More today, Hopefully!
Regards,
Painless
...Money!? What's that!?...
