Well, time to get on with this build so, first things first, is the tear down. This wasn't as straightforward as it could have been, not least because the Mato factory assemblers appear to be obsessed with super-gluing everything to everything. This kind of understand on my RC helis and multirotors because these things are by default designed to shake and rattle themselves to death, but a tank!
Enough of the whinging Phibes, just get on with it.
Ok, ok, but I just thought to recommend any others contemplating this build to take a leaf out of Mr Painless's book and get some of that fancy pants CA glue dissolving stuff for this one.
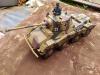
So, finally I got to this.....
The turret is quite well detailed I think, though I will be making a few changes and additions. There are gaps in the seams where weld lines should be between the upper and lower halves of the turret (I haven't split them as there is no need as far as I can tell). I'm undecided yet as to what level of detail I want to include inside the turret. I like the tin roof it comes with but, from what I understand, these tanks were mostly used with the top down. If I go this route the detailing will be greater but, as I say, we shall see....
I must admit I have been quite impressed with the quality of the hull. It's very strong and rigid and the detailing is by no means bad either......
And here is my first real disappointment, the suspension bogies. On the positive side they are very well detailed and, as far as I can tell, accurate in most respects. They look and feel great. However, I found a couple of the wheels to be binding, one quite badly. On closer inspection (see follow on pic) I discovered what might be underlying this problem, none of the wheels, sprockets or idlers have bearings. No ball races, or ever brass bushings just metal on metal. The tolerances are quite good so there is not too much sloppiness here but really for a tank in this price bracket I expected more. Hey ho, that's life. So I am now think I need to go through these checking and adjusting each, and perhaps packing with a little lithium grease.....
 Viewed 3257 times")
And here they are stripped to their component parts. I'm going to keep them as matched sets so I can ensure each wheel works perfectly with its corresponding axle and hardware - probably overkill but I want to avoid any future binding if I can. If I had the tools (I don't) I would have liked to drop bearings or at least bushings in but, as it is, that option isn't open to me at present. There is also some flashing and mold lines/marks to clean up......
And that's it so far.. will update further soon hopefully.


 I am beyond impressed